
Login

Shoutbox
You must login to post a message.
renatoa
07/26/2024 3:49 PM
Bill grubbe and Jk, 
allenb
07/26/2024 5:15 AM
Spiderkw Welcome to HRO!

renatoa
07/24/2024 8:31 AM
ramiroflores and John123,

 ?
?
?renatoa
07/21/2024 1:18 AM
 , Luislobo
renatoa
07/19/2024 11:28 AM
Koepea,
Forum Threads
Newest Threads
Skywalker roaster modsBackground Roast Iss...
Hello from Arkansas
TC4ESP
Green coffee reviews
Hottest Threads
| Skywalker roaster... | [375] |
| TC4ESP | [115] |
| War on Farmers by... | [47] |
| Adventures in flu... | [26] |
| Hello! (soon) Roa... | [17] |
In Memory Of Ginny

Donations
Latest Donations
dmccallum - 10.00
JackH - 25.00
snwcmpr - 10.00
Anonymous - 2.00
Anonymous - 5.00
dmccallum - 10.00
JackH - 25.00
snwcmpr - 10.00
Anonymous - 2.00
Anonymous - 5.00
Users Online
Guests Online: 7
Members Online: 0
Total Members: 8,394
Newest Member: Bill grubbe
Members Online: 0
Total Members: 8,394
Newest Member: Bill grubbe
View Thread
Who is here? 1 guest(s)
 RTD info (Resistive Temperature Device)
|
|
| seedlings |
Posted on 04/19/2010 8:32 AM
|
 1 1/2 Pounder  Posts: 4226 Joined: June 27, 2007 |
How do RTDs compare to Thermocouples? Are they "better," or just different way to reference temperature? The seller of the salvage PID I bought on eBay tested it with a RTD, so I know that works. CHAD Roaster: CoffeeAir II 2# DIY air roaster
Grinder: Vintage Grindmaster 500 Brewers: Vintage Cory DCU DCL, Aeropress, Press, Osaka Titanium pourover |
|
|
|
| Ringo |
Posted on 04/19/2010 9:19 AM
|
 Pounder  Posts: 474 Joined: January 14, 2010 |
Rtd are better, little more accuracy. But they cost a lot more and for roasting you do not need that much accuracy. I am going to use RTD s on my roaster for one reason I use them at work and understand them. On the Ambex site there are some really good articals on the difference between the two but most important some hints on setting the PID for roasting. Placement in the drum. http://www.ambexr...ading.html
Edited by seedlings on 04/19/2010 9:46 AM |
|
|
|
| seedlings |
Posted on 04/19/2010 9:58 AM
|
|
1 1/2 Pounder Posts: 4226 Joined: June 27, 2007 |
Ringo, good articles. Can I get the "wrong" RTD? A "PT100" seems common. CHAD Roaster: CoffeeAir II 2# DIY air roaster
Grinder: Vintage Grindmaster 500 Brewers: Vintage Cory DCU DCL, Aeropress, Press, Osaka Titanium pourover |
|
|
|
| Ringo |
Posted on 04/19/2010 10:49 AM
|
|
Pounder Posts: 474 Joined: January 14, 2010 |
I think no, There are 3 wire 4 wire. I only use 3 wire, so can not know much else. The range of RTD is much wider so always reading within range. One is better range than the other but all are good. I have never wired a 4 wire, so I de not know how. I saw on ebay 2 wire RTD's, I do not think this is possible. I think you have to have 3 wires for RTD, 2 wires is a TC. I am not an expert here, when the kilns were installed, they came with RTD's . I just replace one if it goes bad. For a honeywell controller you have to put a 250 ohm resister accross the leads. I think the world is set for TC, if you want to use RTD most of the time you need the resistor. Easy pick up at Radio Shack. |
|
|
|
| JimG |
Posted on 04/19/2010 12:13 PM
|
|
1 1/2 Pounder Posts: 834 Joined: October 23, 2008 |
Quote seedlings wrote: How do RTDs compare to Thermocouples? Are they "better," or just different way to reference temperature? RTD's can definitely be more accurate. But the platinum elements themselves are fragile so they need more protection to avoid damage. RTD's are also nice because they measure absolute temperature, where thermocouples measure relative temps and need a reference junction. Resistance of the wire leads connecting the platinum element to the instrument can throw things off on an RTD sensor, so 3-wire and 4-wire configurations are used to allow the instrument to compensate for lead resistance. Good RTD's are expensive, and (at least in my experience) are not available in as many configurations as thermocouples. Thermocouples are cheap, durable, and nearly idiot proof. They are inherently not as accurate as RTD's, but are more than good enough for roasting purposes. Temp variations from probe placement in a roaster will be many times larger than the error spec's for a t/c system. Thermocouples need a reference junction. Circuitry in modern instruments handles this well, but there still can be issues when the ambient temperature at the instrument is outside its comfort zone. Again, though, for measuring temps in a roaster this is not of major concern. My personal preference is K thermocouples for roasters. With a spool of type K wire, you can go crazy with rolling your own sensors and putting them in all kinds of places in the roaster. Or you can buy sensors in all kinds of configs for (seemingly) pennies on eBay. Jim |
|
|
|
| Ringo |
Posted on 04/19/2010 1:08 PM
|
|
Pounder Posts: 474 Joined: January 14, 2010 |
I agree with Tony. And have a question for him, So I can make my own TC as long as I have the TC wire. Just solder the ends together. So you can make them for next to nothing. |
|
|
|
| seedlings |
Posted on 04/19/2010 1:24 PM
|
|
1 1/2 Pounder Posts: 4226 Joined: June 27, 2007 |
A quick "rtd sensor" search on eBay results a varied price array. There are some offerings for less than $20. I think I'll wait to get the PID, then see if it doesn't allow for a change in input type. CHAD Roaster: CoffeeAir II 2# DIY air roaster
Grinder: Vintage Grindmaster 500 Brewers: Vintage Cory DCU DCL, Aeropress, Press, Osaka Titanium pourover |
|
|
|
| Ringo |
Posted on 04/19/2010 1:35 PM
|
|
Pounder Posts: 474 Joined: January 14, 2010 |
It think will allow you to use TC. Much more common than RTD. |
|
|
|
| randytsuch |
Posted on 04/19/2010 2:21 PM
|
 1/2 Pounder  Posts: 394 Joined: June 20, 2009 |
Quote Ringo wrote: I agree with Tony. And have a question for him, So I can make my own TC as long as I have the TC wire. Just solder the ends together. So you can make them for next to nothing. Is the solder lead free? In a "real" thermocouple, the ends are really welded together. I think Omega sells a machine to do it, but it's expensive, around $1000. I saw someone talk about making a thermocouple with a bank of big caps, or a big power supply, which could supply a surge of current, generating enough heat to fuse the two wires together. I think a spot welder would do the same thing. The problem with solder is that it will introduce another metal, which will add error to the measurement. I guess if you twisted the two wires very tightly together, and then use solder to mechanically hold the wires together, might work fine. In the ideal thermocouple, you only use the metals used for that type of thermocouple. So, if you are using a type K, you need to buy the type K yellow connectors, if you have any connectors in the path. The type K connectors are made from the same material as the wire, so they don't create any errors. I made a thermocouple just by buying a spool of wire from omega, and twisting the ends together. Worked fine, I used it to measure the water temp for an espresso shot. If I was going to use it for a roaster, and it was in contact with the beans, I would figure out a way to fuse the wires together, or buy an already made bead thermocouple. In real life, in a roaster, I'm not sure how much difference all of this makes. I'm really looking for relative information, how temps vary roast to roast, so as long as the reading are consistent, then, to me, it really wouldn't matter if my readings were 10 degrees off, or not. It is easier to share information if everyone was reading exactly the same temp data, but since we use different roasters, with the TC's in different locations, it makes it hard to really share this data anyway. I was looking at RTD information at wikipedia, and they had a section comparing RTD's to TC's. One advantage TC's had was better response time. Wikipedia thought that RTD's are slower then TC's. RTD's main advantage is accuracy. For a roaster, I would choose the faster response time over a couple of degrees of accuracy. One last thing, if you get into making thermocouples. I found that the Chinese type K's you get from ebay use the opposite color codes then the stuff from Omega. I found somewhere that the international TC color codes are different from the US color codes, so it made sense. Randy |
|
|
|
| JimG |
Posted on 04/19/2010 3:34 PM
|
|
1 1/2 Pounder Posts: 834 Joined: October 23, 2008 |
Twisting, then folding over the stripped ends together works fairly well, depending on how much abuse they experience. But easy to make, and cheap, and good enough for roasting (especially if for a temporary setup). Soldering does not work for most t/c alloys, just as a practical matter. I still haven't found a flux that will "wet" K alloy wires. In theory, though, there is virtually no error introduced if the solder joint is thin, even though it is a third metal. So long as the two solder-to-alloy junctions in the joint are at the same temperature, it is just as good as direct alloy-to-alloy junctions. The key is keeping the solder thin and the temp the same at both solder junctions. Also got to keep in mind that common solders melt at or below 400F, so would be a poor choice for making roaster t/c's. If you can get your hands on a carbon rod, and a 12V car battery (24V is better), you can do the same thing as the Omega t/c bead welder. Connect (with wire) the carbon rod to the neg (-) battery terminal, and a pair of needle nose pliers to the pos (+) battery terminal. Twist the ends of the t/c wires together (or just hold them close) and grasp the tips with the pliers. Strike a quick arc with the wire tips against the rod, and it will fuse the tips into a nice little bead. CAUTION: the arc is dang bright, so close your eyes. And do this far away from the battery (if using a car battery) so the arc doesn't ignite the H2 gas in/around the battery. My setup uses a big bank of capacitors charged to 24V (probably the one Randy read about), but the current requirements for t/c welding are realllllly small, so even a smallish bank of caps would work, I suspect. Jim |
|
|
|
| Ringo |
Posted on 04/19/2010 3:58 PM
|
|
Pounder Posts: 474 Joined: January 14, 2010 |
This is good info, I think I learn something everyday on this forum. |
|
|
|
| randytsuch |
Posted on 04/19/2010 6:19 PM
|
|
1/2 Pounder Posts: 394 Joined: June 20, 2009 |
Quote JimG wrote: If you can get your hands on a carbon rod, and a 12V car battery (24V is better), you can do the same thing as the Omega t/c bead welder. Connect (with wire) the carbon rod to the neg (-) battery terminal, and a pair of needle nose pliers to the pos (+) battery terminal. Twist the ends of the t/c wires together (or just hold them close) and grasp the tips with the pliers. Strike a quick arc with the wire tips against the rod, and it will fuse the tips into a nice little bead. CAUTION: the arc is dang bright, so close your eyes. And do this far away from the battery (if using a car battery) so the arc doesn't ignite the H2 gas in/around the battery. Jim That really doesn't sound like something I want to try ;) I was wondering if I could use a Big Ass Power Supply to do this? You don't want much current, I have 30 gauge wire, and it will open with too much current. Seems like you want a fairly high voltage, with low current. How much voltage do you charge the caps up to? Randy |
|
|
|
| seedlings |
Posted on 04/19/2010 8:24 PM
|
|
1 1/2 Pounder Posts: 4226 Joined: June 27, 2007 |
Can I simulate an RTD with resistors to clear the "OPEN" message on the PID? CHAD Roaster: CoffeeAir II 2# DIY air roaster
Grinder: Vintage Grindmaster 500 Brewers: Vintage Cory DCU DCL, Aeropress, Press, Osaka Titanium pourover |
|
|
|
| JimG |
Posted on 04/19/2010 9:36 PM
|
|
1 1/2 Pounder Posts: 834 Joined: October 23, 2008 |
Quote randytsuch wrote: I was wondering if I could use a Big Ass Power Supply to do this? You don't want much current, I have 30 gauge wire, and it will open with too much current. Seems like you want a fairly high voltage, with low current. How much voltage do you charge the caps up to? For 30 gauge wire, I'd probably try 15V for starters, then work up (or down) til you find the sweet spot. I use 21V for 24 gauge wire. You'll know if the voltage is set too high because the ends of the leads will disappear instead of fusing together  Never tried a PSU. Each weld drops the charge on the caps by ~1V. I think I have between 1 and 2 farads in my capacitor bank, so someone can cipher out the energy required for each weld if so motivated. Jim |
|
|
|
| JimG |
Posted on 04/19/2010 9:39 PM
|
|
1 1/2 Pounder Posts: 834 Joined: October 23, 2008 |
Quote seedlings wrote: Can I simulate an RTD with resistors to clear the "OPEN" message on the PID? Yes, but pick a resistor value that is in the right range or the OPEN will change to out of range or something similar. You can simulate a thermocouple with a short loop of copper wire. The instrument will report its own reference junction temperature when wired up this way. This can be a helpful troubleshooting tool also. Jim |
|
|
|
| seedlings |
Posted on 04/20/2010 8:01 AM
|
|
1 1/2 Pounder Posts: 4226 Joined: June 27, 2007 |
There are 3 positions. Given a temperature vs resistance table, would the resistor be connected between 1 & 2? Then it looks like a short between 2 & 3? http://www.omega....52-254.pdf 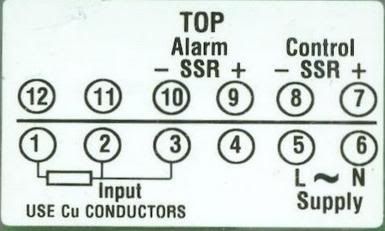 CHAD Edited by seedlings on 04/20/2010 8:02 AM Roaster: CoffeeAir II 2# DIY air roaster
Grinder: Vintage Grindmaster 500 Brewers: Vintage Cory DCU DCL, Aeropress, Press, Osaka Titanium pourover |
|
|
|
| randytsuch |
Posted on 04/20/2010 9:34 AM
|
|
1/2 Pounder Posts: 394 Joined: June 20, 2009 |
Quote seedlings wrote: There are 3 positions. Given a temperature vs resistance table, would the resistor be connected between 1 & 2? Then it looks like a short between 2 & 3? CHAD That's how I would do it. I would start with a 100 ohm resistor, and see if you get around 0 C. Randy |
|
|
|
| Ringo |
Posted on 04/20/2010 10:56 AM
|
|
Pounder Posts: 474 Joined: January 14, 2010 |
I just checked the resistance of an RTD, I got 108 OHMs between the red wire and both the white wires, Its is around 85 deg F were I checked. So 100 ohms should work well. |
|
|
|
| seedlings |
Posted on 04/20/2010 10:58 AM
|
|
1 1/2 Pounder Posts: 4226 Joined: June 27, 2007 |
That worked Randy, read "0", and 200 ohm read "266", which is right on. Now, I need to figure out how to get into another menu to see if input type can be adjusted. All the menu has is: PROC (up/down doesn't do anything) SP (adjustable) AL1 (adjustable) AL2 (adjustable) I tried holding the menu button down during power up, and holding down buttons for 5sec. CHAD Roaster: CoffeeAir II 2# DIY air roaster
Grinder: Vintage Grindmaster 500 Brewers: Vintage Cory DCU DCL, Aeropress, Press, Osaka Titanium pourover |
|
|
|
| randytsuch |
Posted on 04/20/2010 11:36 AM
|
|
1/2 Pounder Posts: 394 Joined: June 20, 2009 |
I'm a little worried by the picture you posted on the pinouts. On the PID's I've used, it shows the connection for both TC's and RTD's. Since your PID only shows how to connect a RTD, it may only support a RTD. Randy |
|
|
|
| seedlings |
Posted on 04/20/2010 12:28 PM
|
|
1 1/2 Pounder Posts: 4226 Joined: June 27, 2007 |
I found an actual manual: http://hpsweb.hon...1i6226.pdf And it IS capable of other inputs, which is very nice. My cobbled TC wires are giving readings either too high (900F) or too low (-300F), so I think there's high resistance open, or I'm not getting a good connection at the back, or I don't know what type of wire this was from my multimeter probe. Tried polarity both ways. I do have setup questions regarding alarm adjustment range (direct acting, reverse acting, deviation and band). CHAD Edited by seedlings on 04/20/2010 12:30 PM Roaster: CoffeeAir II 2# DIY air roaster
Grinder: Vintage Grindmaster 500 Brewers: Vintage Cory DCU DCL, Aeropress, Press, Osaka Titanium pourover |
|
|
|
| JimG |
Posted on 04/20/2010 12:46 PM
|
|
1 1/2 Pounder Posts: 834 Joined: October 23, 2008 |
Quote seedlings wrote: My cobbled TC wires are giving readings either too high (900F) or too low (-300F), so I think there's high resistance open, or I'm not getting a good connection at the back, or I don't know what type of wire this was from my multimeter probe. Tried polarity both ways. Try shorting the t/c inputs together using a short loop of any kind of wire. Regardless of which type of t/c wire the instrument is expecting, it should show room temperature on the display. Jim |
|
|
|

| Jump to Forum: |
Powered by PHP-Fusion Copyright © 2024 PHP-Fusion Inc
Released as free software without warranties under GNU Affero GPL v3
Designed with ♥ by NetriXHosted by skpacman