
Login

Shoutbox
You must login to post a message.
renatoa
04/18/2024 12:36 AM
bijurexim, greyberry2, N C, 
renatoa
04/17/2024 9:27 AM
 , branchu
renatoa
04/14/2024 5:56 AM
TheOtherJim and papajim,
 !
!
!allenb
04/11/2024 6:33 PM
Zemona

renatoa
04/11/2024 9:19 AM
Mrbones and sgupta,  ?
?
?Forum Threads
Newest Threads
Rainfrog's Roastmast...War on Farmers by Su...
Kaleido Roaster PID ...
Green coffee sellers
Wet beans - Estimati...
Hottest Threads
| Skywalker roaster... | [292] |
| Skywalker, the AL... | [214] |
| Skywalker Roasts | [94] |
| Rainfrog's Roastm... | [53] |
| My first popcorn ... | [47] |
In Memory Of Ginny

Donations
Latest Donations
dmccallum - 10.00
JackH - 25.00
snwcmpr - 10.00
Anonymous - 2.00
Anonymous - 5.00
dmccallum - 10.00
JackH - 25.00
snwcmpr - 10.00
Anonymous - 2.00
Anonymous - 5.00
Users Online
Guests Online: 3
Members Online: 0
Total Members: 8,211
Newest Member: bijurexim
Members Online: 0
Total Members: 8,211
Newest Member: bijurexim
View Thread
Who is here? 1 guest(s)
 air roaster
|
|
| dja |
Posted on 08/28/2010 11:15 PM
|
 1 1/2 Pounder  Posts: 701 Joined: November 07, 2008 |
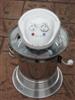
here's where I am ar with this roaster idea that I have had for quite sometime. anyway I started this thing out after buying the pyrex tube that you will see in the included photo. Anyway the thing is going to hopefully work basicly like a giant hot air popper, I tried it with about a pound of greens throwed in it, usign the shop vac to blow the beans around, had good circulation, so I will just have to see. Anyway here's a picture of what i am trying to do.
dja attached the following image:

Edited by dja on 08/28/2010 11:17 PM I pour Iron and roast Coffee Beans
 If life seems normal your not going fast enough Mario Andrette |
|
|
|
| Koffee Kosmo |
Posted on 08/28/2010 11:27 PM
|
 Administrator Posts: 1620 Joined: December 31, 2008 |
Very good job I am yet to start my air roaster that is based on Roaster Robs design However at this stage I am still loving the results I am getting from my Hybrid Turbo roaster KK I home roast and I like it. Designer of the KKTO
Roaster Build information https://homeroast...ad_id=1142 https://docs.goog...lide=id.i0 Blog - http://koffeekosm...gspot.com/ Bezzera Strega, Mazzer Robur Grinder, Pullman Tamper Convex, (KKTO) Turbo Oven Home Roaster. |
|
|
|
| Unta |
Posted on 08/29/2010 5:34 AM
|
 1 1/2 Pounder Posts: 788 Joined: January 26, 2010 |
very similar to a sketch I did a few months back when chad was designing his electric air roaster...just remember to gasket that glass in the top and bottom plates, it will expand. Awesome fab job. sean
Unta attached the following image:

Edited by Unta on 08/29/2010 5:35 AM Sean Harrington
educate. |
|
|
|
| allenb |
Posted on 08/29/2010 10:11 AM
|
 Administrator Posts: 3858 Joined: February 23, 2010 |
Ditto on the great fab job! What is your plan for dumping and heat source? Allen 1/2 lb and 1 lb drum, Siemens Sirocco fluidbed, presspot, chemex, cajun biggin brewer from the backwoods of Louisiana
|
|
|
|
| seedlings |
Posted on 08/29/2010 5:32 PM
|
 1 1/2 Pounder Posts: 4226 Joined: June 27, 2007 |
I am going to love watching this beast come together! CHAD Roaster: CoffeeAir II 2# DIY air roaster
Grinder: Vintage Grindmaster 500 Brewers: Vintage Cory DCU DCL, Aeropress, Press, Osaka Titanium pourover |
|
|
|
| JETROASTER |
Posted on 08/30/2010 7:57 AM
|
 Administrator Posts: 1780 Joined: March 06, 2010 |
Looks very elegant! ....Video friendly in fact! -Scott |
|
|
|
| seedlings |
Posted on 08/30/2010 8:56 AM
|
|
1 1/2 Pounder Posts: 4226 Joined: June 27, 2007 |
David, what's the bottom plate look like where the air comes up into the tube? CHAD Roaster: CoffeeAir II 2# DIY air roaster
Grinder: Vintage Grindmaster 500 Brewers: Vintage Cory DCU DCL, Aeropress, Press, Osaka Titanium pourover |
|
|
|
| dja |
Posted on 09/03/2010 8:14 AM
|
|
1 1/2 Pounder Posts: 701 Joined: November 07, 2008 |
here is what the (lets call it) the middle section. Looks like. there is a peice of screen wire which is helt into the recess you see cut into the bottom of the part in the picture, it is helt in place by an aluminum ring that is helt in place by two set screws. right now the only change I see to the way it works is to change the screen from hardware cloth to stainless steel from Small Parts.com. Once I am able to control the air flow I will know if I will have to change this to something else. so right now no reason to get expensive and buy the good stuff yet.
dja attached the following image:

Edited by dja on 09/03/2010 8:20 AM I pour Iron and roast Coffee Beans
If life seems normal your not going fast enough Mario Andrette |
|
|
|
| dja |
Posted on 09/03/2010 8:20 AM
|
|
1 1/2 Pounder Posts: 701 Joined: November 07, 2008 |
top side of middle section, as they say at NASA the bean side.
dja attached the following image:

Edited by dja on 09/03/2010 8:21 AM I pour Iron and roast Coffee Beans
If life seems normal your not going fast enough Mario Andrette |
|
|
|
| seedlings |
Posted on 09/03/2010 8:24 AM
|
|
1 1/2 Pounder Posts: 4226 Joined: June 27, 2007 |
Wow. I lust for fabrication skills. Brilliant! (waits for video) CHAD Roaster: CoffeeAir II 2# DIY air roaster
Grinder: Vintage Grindmaster 500 Brewers: Vintage Cory DCU DCL, Aeropress, Press, Osaka Titanium pourover |
|
|
|
| dja |
Posted on 09/03/2010 8:37 AM
|
|
1 1/2 Pounder Posts: 701 Joined: November 07, 2008 |
to answer Allen's question about dumping. the top just sits on the heat section which is the bottom 4.5 inch tube, the top is heavy enough to sit there without moving, plus it sits in a 1/4" deep recess that I cut in the top plate of the heater section. From what I learned yesterday I will be able to bring the air in from the side, and not have to go up thru the bottom which I didn't want to do as it would of added another 6" in height to the thing, and as it is its almost 3' tall (add some lights and call it a Xmas tree). how to mount the heat coil, gonna have to cut the thing up and weld it inside that steel tube, then figure out how to string it for maximum coverage with the shortest possible amount of NiChrome. plus I need to find some ceramic pass thru insulators, of I guess I could just do it Junkyard and let the wires hang out the bottom, I already have a hole there that I used to bolt the plates together so I could mill em to the same size. oh yea one more thing, anymore questions? Now if I could just get back to melting Iron! Edited by dja on 09/03/2010 8:41 AM I pour Iron and roast Coffee Beans
If life seems normal your not going fast enough Mario Andrette |
|
|
|
| dja |
Posted on 09/04/2010 8:38 AM
|
|
1 1/2 Pounder Posts: 701 Joined: November 07, 2008 |
while two of the last three brain cells were figthing for ownership of my body the other one has I think figured out how to mount the heating coil into the heater section of this nightmare that I have launched myself adrift in. My main problem is I have about 6 feet of 19 gauge NiC coiled wire, now if I just start hacking on this I will end up with a whole bunch of little useless peices, and to the same point if I cut it in half I will either have two peices that won't make enough heat which I am going to have to start triming on and then we have the little short useless peices, I guess just close my eyes and cut the thing didn't cost me anything, so if I stat long and keep shortening it somewhere I will find the correct length. I pour Iron and roast Coffee Beans
If life seems normal your not going fast enough Mario Andrette |
|
|
|
| dja |
Posted on 09/04/2010 8:48 AM
|
|
1 1/2 Pounder Posts: 701 Joined: November 07, 2008 |
and I quote The roaster-chamber base; Is that a little something you popped out of a CNC? Great funnel shape!! -Scott no it wasn't cut on a CNC Machine, I turned it on a 9X20 lathe that I have. The shape and size of the cone actually came from a plastic funnel that I bought at the grocery store and cut to fit inside the Pyrex tube and into a hole that was originally in the bottom plate on the tube. the recess in the bottom came from the fact that I didn't want to have to turn almost and inch off of the bottom to thin it down, which would of left me with a one peice roaster, as it is I am easily able to change the screen to a differant size of from screen to a perferated plate. and it has a soft connection that dosen't require any latches due to the weight keeping it together. have a nice day I pour Iron and roast Coffee Beans
If life seems normal your not going fast enough Mario Andrette |
|
|
|
| JETROASTER |
Posted on 09/04/2010 8:52 AM
|
|
Administrator Posts: 1780 Joined: March 06, 2010 |
Dan posted this link recently. It's a great candy store plus some good charts and info. http://www.infrar...aters.com/
Edited by JETROASTER on 09/04/2010 8:56 AM |
|
|
|
| dja |
Posted on 09/04/2010 8:59 AM
|
|
1 1/2 Pounder Posts: 701 Joined: November 07, 2008 |
found that site like 4 years ago
I pour Iron and roast Coffee Beans
If life seems normal your not going fast enough Mario Andrette |
|
|
|
| dja |
Posted on 09/04/2010 9:00 AM
|
|
1 1/2 Pounder Posts: 701 Joined: November 07, 2008 |
matter of fact I need to order up some high temp wire and terminals from them, gotta be safe when playing with roasters you know
I pour Iron and roast Coffee Beans
If life seems normal your not going fast enough Mario Andrette |
|
|
|
| Unta |
Posted on 09/04/2010 9:03 AM
|
|
1 1/2 Pounder Posts: 788 Joined: January 26, 2010 |
yeah the whole privacy content thing is confusing..ive had my fair share of problems with it. video worked...movement looks good!how are you controling air flow? sean Sean Harrington
educate. |
|
|
|
| allenb |
Posted on 09/04/2010 9:17 AM
|
|
Administrator Posts: 3858 Joined: February 23, 2010 |
Quote dja wrote: My main problem is I have about 6 feet of 19 gauge NiC coiled wire, now if I just start hacking on this I will end up with a whole bunch of little useless peices, and to the same point if I cut it in half I will either have two peices that won't make enough heat which I am going to have to start triming on and then we have the little short useless peices, What voltage, 220, 221? What wattage? 1/2 lb and 1 lb drum, Siemens Sirocco fluidbed, presspot, chemex, cajun biggin brewer from the backwoods of Louisiana
|
|
|
|
| dja |
Posted on 09/04/2010 11:56 PM
|
|
1 1/2 Pounder Posts: 701 Joined: November 07, 2008 |
Quote Unta wrote: yeah the whole privacy content thing is confusing..ive had my fair share of problems with it. video worked...movement looks good!how are you controling air flow? sean In the video I was trying to control by bleeding air off by holding the vac hose to the side, that won't work in the real world so vac will be plugged into the trusty variac. Quote Allenb wrote: What voltage, 220, 221? What wattage? Edited by dja on 09/05/2010 12:03 AM I pour Iron and roast Coffee Beans
If life seems normal your not going fast enough Mario Andrette |
|
|
|
| dja |
Posted on 09/09/2010 9:51 PM
|
|
1 1/2 Pounder Posts: 701 Joined: November 07, 2008 |
AllenB, if you have a Sunbeam C-30 the guy at DaySeal has the new gaskets for them, anyone else out there that has this coffee maker and would like a new gasket contact www.DAYSEAL.com check out this site.
Edited by dja on 09/09/2010 9:53 PM I pour Iron and roast Coffee Beans
If life seems normal your not going fast enough Mario Andrette |
|
|
|
| dja |
Posted on 09/09/2010 9:56 PM
|
|
1 1/2 Pounder Posts: 701 Joined: November 07, 2008 |
AllenB; I think it was you that asked how I was going to install the NiC coil. Here is a picture of just how that is going to happen, the thing is made so that I can shorten the length of the coil without unstringing it. It will mount in the center of the bottom plate of the heat chamber, now if only the thing will work and was finished so i could move onto small and less complicated project like the steam engine that I want to build.
dja attached the following image:

Edited by dja on 09/09/2010 10:00 PM I pour Iron and roast Coffee Beans
If life seems normal your not going fast enough Mario Andrette |
|
|
|
| allenb |
Posted on 09/09/2010 10:20 PM
|
|
Administrator Posts: 3858 Joined: February 23, 2010 |
Quote dja wrote: AllenB; I think it was you that asked how I was going to install the NiC coil. Here is a picture of just how that is going to happen, the thing is made so that I can shorten the length of the coil without unstringing it. It will mount in the center of the bottom plate of the heat chamber, now if only the thing will work and was finished so i could move onto small and less complicated project like the steam engine that I want to build. Thanks for the vac pot gasket tip. Mine is Cory though but he said he would make one for me down the road. Good idea on the heating element being able to be adjusted easily for wattage! Allen Edited by allenb on 09/09/2010 10:44 PM 1/2 lb and 1 lb drum, Siemens Sirocco fluidbed, presspot, chemex, cajun biggin brewer from the backwoods of Louisiana
|
|
|
|
| dja |
Posted on 09/10/2010 7:11 AM
|
|
1 1/2 Pounder Posts: 701 Joined: November 07, 2008 |
I'm going to try to figure out how much of the coil to cut off today if I can steal the time, (have a 12" lathe that I picked up in Ft Worth yesterday to unload and get inside). I was going to put the insulators on all thread but then I got to thinking (which is danguros) that that was a pretty stupid idea, cause if the coil length had to be changed I would have to unstring the thing. So I made a new rod so that it is threaded on both ends one to screw into the bottom plate, and the other end for the top insulator, the second insulator is drilled out to fit the rod and has a set screw in it. Now if I have to change the length of the coil all I have to do is lossen the set screw and slide the insulator along while slowly re weaving the coil. not rocket sicence but it will work. That setup should with the right length on the NiChrome provide plenty of heat, wish I had some of the thin Ceramic fiber insulator to wrap around the inside of the steel tube. Anyway its back to work on the patterns for the air intake casting I need too hook up the Vac Hose. 
I pour Iron and roast Coffee Beans
If life seems normal your not going fast enough Mario Andrette |
|
|
|
| seedlings |
Posted on 09/10/2010 7:24 AM
|
|
1 1/2 Pounder Posts: 4226 Joined: June 27, 2007 |
David, Are you using 220V or 120V? 'Next time' I'll have a custom heat element like yours. I like it. CHAD Roaster: CoffeeAir II 2# DIY air roaster
Grinder: Vintage Grindmaster 500 Brewers: Vintage Cory DCU DCL, Aeropress, Press, Osaka Titanium pourover |
|
|
|
| dja |
Posted on 09/10/2010 1:07 PM
|
|
1 1/2 Pounder Posts: 701 Joined: November 07, 2008 |
if you call being made by a red neck Custom, just my tinkering at the kitchen table Chad. gonna hook it to 220 but would like to drop it to 110 if possible as that would make it lots easier to string an extenstion cord out to the back yard for launch day. I made the heater so that if I have to change the length of the element I don't have to unstring it to reset the gap between the insulators. Which I think is going to get a big work out till I find the right length on the NiC coil. Happy Roasting as Little Jaun Valdez says down in them Columbian High Lands:Clap: Edited by dja on 09/10/2010 1:07 PM I pour Iron and roast Coffee Beans
If life seems normal your not going fast enough Mario Andrette |
|
|
|

| Jump to Forum: |
Similar Threads
| Thread | Forum | Replies | Last Post |
|---|---|---|---|
| Kaleido Roaster PID parameters | Roasting Coffee | 2 | 04/13/2024 3:07 PM |
| Skywalker roaster mods | Other Roasters | 293 | 04/07/2024 4:31 PM |
| Skywalker, the ALM chinese one pound roaster | Other Roasters | 215 | 04/02/2024 1:48 AM |
| My first popcorn mod roaster (vahegan) | Fluidbed Roaster | 48 | 03/24/2024 12:04 PM |
| Fatamorgana electric drum roaster | Other Roasters | 2 | 03/24/2024 10:03 AM |
Powered by PHP-Fusion Copyright © 2024 PHP-Fusion Inc
Released as free software without warranties under GNU Affero GPL v3
Designed with ♥ by NetriXHosted by skpacman