
Login

Shoutbox
You must login to post a message.
renatoa
07/26/2024 3:49 PM
Bill grubbe and Jk, 
allenb
07/26/2024 5:15 AM
Spiderkw Welcome to HRO!

renatoa
07/24/2024 8:31 AM
ramiroflores and John123,

 ?
?
?renatoa
07/21/2024 1:18 AM
 , Luislobo
renatoa
07/19/2024 11:28 AM
Koepea,
Forum Threads
Newest Threads
Skywalker roaster modsBackground Roast Iss...
Hello from Arkansas
TC4ESP
Green coffee reviews
Hottest Threads
| Skywalker roaster... | [376] |
| TC4ESP | [115] |
| War on Farmers by... | [47] |
| Adventures in flu... | [26] |
| Hello! (soon) Roa... | [17] |
In Memory Of Ginny

Donations
Latest Donations
dmccallum - 10.00
JackH - 25.00
snwcmpr - 10.00
Anonymous - 2.00
Anonymous - 5.00
dmccallum - 10.00
JackH - 25.00
snwcmpr - 10.00
Anonymous - 2.00
Anonymous - 5.00
Users Online
Guests Online: 3
Members Online: 0
Total Members: 8,394
Newest Member: Bill grubbe
Members Online: 0
Total Members: 8,394
Newest Member: Bill grubbe
View Thread
Who is here? 1 guest(s)
 Another 1.5kg or 3lb drum roaster from scratch
|
|
| oldgrumpus |
Posted on 07/29/2012 9:11 PM
|
|
1/2 Pounder  Posts: 225 Joined: July 25, 2012 |
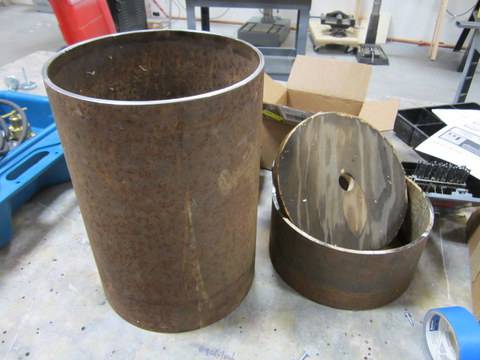
I'm embarking on the well travelled road... Unfortunately I've never travelled it. Not very far along and I already need some help. Completed, my goal is something like this roaster (but not as elegant). http://www.coffee...solar-2-kg If you click on Solar Layout, you will see a pdf of a CAD drawing. Given the capacity of the Solar is close to my goal, I think I'd just like to scale back the drum dimension in the length by 25%. I've estimated the drum on the solar based on the bean-dump door radius. which is close to 10". I've found my drum at a local water well driller. He had my metal on his scrap rack. I took it to work and put it on the lathe to trim up the end. It measures 10-1/4" i.d. with a 1/8" wall. It's been cut to 15 inches which by my calculations should be about right for a 3 lb roaster, but.... It looks like it will be LONGER than the Solar! I'd love some knowledgable help from the sages that live here... Thanks! Ralph Clever Coffee Dripper
Grinder: Macap M4 Roaster: Completed drum roaster project photos shown here: Photos https://goo.gl/ph...Da6K4wfqw5 Videos https://www.youtu...Bd1NrdpSUH Build thread https://homeroast...post_38189 |
|
|
|
| oldgrumpus |
Posted on 07/29/2012 9:28 PM
|
|
1/2 Pounder Posts: 225 Joined: July 25, 2012 |
Sorry about not having photos in the posts yet, but you can see what I have here: https://goo.gl/ph...Da6K4wfqw5
Edited by oldgrumpus on 09/03/2021 8:37 PM Clever Coffee Dripper
Grinder: Macap M4 Roaster: Completed drum roaster project photos shown here: Photos https://goo.gl/ph...Da6K4wfqw5 Videos https://www.youtu...Bd1NrdpSUH Build thread https://homeroast...post_38189 |
|
|
|
| ginny |
Posted on 07/29/2012 9:43 PM
|
 Founder Posts: 3476 Joined: October 24, 2005 |
Ralph... welcome it sure looks like you will have one heck of a roaster. will love to watch your progress. thanks for sharing this adventure. ginny  |
|
|
|
| oldgrumpus |
Posted on 07/30/2012 6:31 PM
|
|
1/2 Pounder Posts: 225 Joined: July 25, 2012 |
Here are the photos from the shop...
oldgrumpus attached the following images:


Clever Coffee Dripper
Grinder: Macap M4 Roaster: Completed drum roaster project photos shown here: Photos https://goo.gl/ph...Da6K4wfqw5 Videos https://www.youtu...Bd1NrdpSUH Build thread https://homeroast...post_38189 |
|
|
|
| seedlings |
Posted on 07/31/2012 8:11 AM
|
 1 1/2 Pounder  Posts: 4226 Joined: June 27, 2007 |
Wow! First off Ralph, let me say 'nice shop!' You certainly have the tools and skills available to master this behemoth. Since I haven't made a drum roaster, I can only speculate. It seems the diameter of the pipe you chose is perfect, but I wonder about the thickness. It could be that a thick wall like that will give you trouble because of how much heat it retains. I'm sure you can 'be careful' while learning your roaster, and make it work. You may lose some ability to boost or reduce heat on the fly, but that's only a guess from me. This will be another wicked-fun project to watch take shape! CHAD Roaster: CoffeeAir II 2# DIY air roaster
Grinder: Vintage Grindmaster 500 Brewers: Vintage Cory DCU DCL, Aeropress, Press, Osaka Titanium pourover |
|
|
|
| Dan |
Posted on 07/31/2012 8:39 AM
|
|
1 1/2 Pounder Posts: 1662 Joined: October 24, 2005 |
I worry about the thickness, too. What is that? 3/16" casing? BTW: I have the next sized smaller lathe, the 12 x 36 gearhead. |
|
|
|
| allenb |
Posted on 07/31/2012 10:30 AM
|
 Administrator Posts: 3869 Joined: February 23, 2010 |
Quote oldgrumpus wrote: It measures 10-1/4" i.d. with a 1/8" wall. It's been cut to 15 inches which by my calculations should be about right for a 3 lb roaster, but.... It looks like it will be LONGER than the Solar! I'd love some knowledgable help from the sages that live here... From what I'm seeing with the Solar images the drum diameter and length are probably very close to being equal. For 4 lbs at 10" ID (785 cubic inches). I would think 10" length would be plenty. Add a couple extra if you want some headroom. See Stuartgrants thread for some comparisons: http://forum.home...ad_id=1546 Allen 1/2 lb and 1 lb drum, Siemens Sirocco fluidbed, presspot, chemex, cajun biggin brewer from the backwoods of Louisiana
|
|
|
|
| allenb |
Posted on 07/31/2012 10:36 AM
|
|
Administrator Posts: 3869 Joined: February 23, 2010 |
OOPS, After reading further down the thread in Chad's post it looks like it may require some more research. "Note that some drums often run optimized at less than capacity. i.e. many roasters using a RK 6# drum may run a 4# charge of beans for optimal performance. Other roasters (Open sky or Jim) were designed around a specific load." CHAD Allen 1/2 lb and 1 lb drum, Siemens Sirocco fluidbed, presspot, chemex, cajun biggin brewer from the backwoods of Louisiana
|
|
|
|
| Ringo |
Posted on 07/31/2012 12:33 PM
|
 Pounder  Posts: 474 Joined: January 14, 2010 |
The drum I built is 8 inch dia, 1 foot long. I can roast 1 pound to 6 pounds. I believe if the metal was thinner I could roast even a smaller roast. Its hard for me to explain but I will try. I think you want the volume of beans roasting to be able to control the heat in a drum. If I put 3/4 of a pound in my drum I can roast them fine but if at any point I add too much heat the roast will run away. When I roast around 4 pounds its so easy, it takes big changes to change the heat going into the beans. Hit 1st crack and want too really slow the roast to get more roast development it easy. With a big heavy drum lightly loaded its very easy to stall the roast or go too fast. I recently got a chance to roast on a couple of commercial machines, how were they different? I could change the heat add see the rates change in 20 seconds. On my roaster it takes maybe 45 seconds to see a change. I do not really know why but guess I have more steel in my roaster. All this to say I am really not sure but if I had 10 inch pipe and wanted to roast 3 pounds I would make it 10 inches long. So there is less steel. Steel is a good thing also, you never want to stall a roast, I believe this kills the flavor. Thicker steel is a heat sink to even up heating. I also believe that the radiant heat a prewarmed drum gives off when you drop the green beans in is great for drying them out. One other thing is, you will want to use a bean probe, if the drum is too long the beans will not make a pile that you can stick the probe in. Enjoy the build. Looks like a great project.
All you need in life is ignorance and confidence, and then success is sure. Mark Twain
|
|
|
|
| oldgrumpus |
Posted on 08/30/2012 2:26 PM
|
|
1/2 Pounder Posts: 225 Joined: July 25, 2012 |
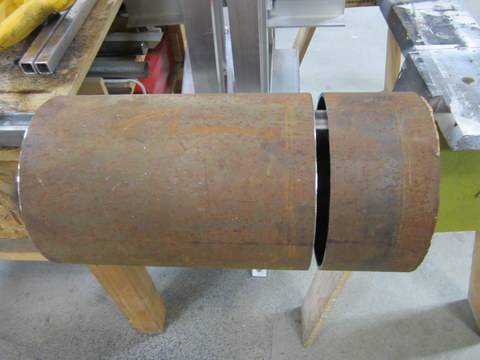
Well, turning the drum on the lathe is finally done. The wall thickness is now 1/8". Didn't think of it before, but the well casing scrap pcs have some internal stresses not only from the manufacturing process (it is a resistance welded-seam. Also, the well-drilling process adds some stress + the cutting torch that trimmed the excess pipe in the field added even more. Not that this matters to the beans  but when turning on the lathe, the pipe changed shape just a bit with each pass of the tool which made it impossible to obtain a precise wall thickness. The variation ended up being about plus or minus 10 thousandths. I put a brushed finish on it inside and out. Next come the perforated end and the vanes. I'm still trying to decide between the Probat and Diedrich styles, but I'm leaning toward the Diedrich. but when turning on the lathe, the pipe changed shape just a bit with each pass of the tool which made it impossible to obtain a precise wall thickness. The variation ended up being about plus or minus 10 thousandths. I put a brushed finish on it inside and out. Next come the perforated end and the vanes. I'm still trying to decide between the Probat and Diedrich styles, but I'm leaning toward the Diedrich.
Clever Coffee Dripper
Grinder: Macap M4 Roaster: Completed drum roaster project photos shown here: Photos https://goo.gl/ph...Da6K4wfqw5 Videos https://www.youtu...Bd1NrdpSUH Build thread https://homeroast...post_38189 |
|
|
|
| Ringo |
Posted on 08/30/2012 6:10 PM
|
|
Pounder Posts: 474 Joined: January 14, 2010 |
Sounds like you have a great start. 1/8 inch walls are perfect to me and I do not believe the small variation will cause any problems. I need to take mine appart and turn it down.
All you need in life is ignorance and confidence, and then success is sure. Mark Twain
|
|
|
|
| snwcmpr |
Posted on 08/31/2012 7:29 AM
|
 1 1/2 Pounder Posts: 925 Joined: March 03, 2011 |
If you know you have stress in the drum ... will the roasting relieve some stress, while roasting, resulting in more distortion? If so, would it be wise to relieve the stress, then do the final turning and boring of the fitting diameters? Just a thought. Ken in NC --------------
Backwoods Roaster "I wish I could taste as well as I wish I could roast." As Abraham Lincoln said "Do not trust everything you read on the internet". |
|
|
|
| oldgrumpus |
Posted on 08/31/2012 9:32 AM
|
|
1/2 Pounder Posts: 225 Joined: July 25, 2012 |
At this point, I think I'm done "fussing". It really is only an extremely minor thing that only a machinist would even notice. My only concern down the road is making sure that the open end of the drum I.D. rotates without a wobble. I don't even think that will present any great difficulty, but time will tell.
Clever Coffee Dripper
Grinder: Macap M4 Roaster: Completed drum roaster project photos shown here: Photos https://goo.gl/ph...Da6K4wfqw5 Videos https://www.youtu...Bd1NrdpSUH Build thread https://homeroast...post_38189 |
|
|
|
| allenb |
Posted on 08/31/2012 10:02 AM
|
|
Administrator Posts: 3869 Joined: February 23, 2010 |
Quote oldgrumpus wrote: At this point, I think I'm done "fussing". It really is only an extremely minor thing that only a machinist would even notice. My only concern down the road is making sure that the open end of the drum I.D. rotates without a wobble. I don't even think that will present any great difficulty, but time will tell. All of my drums have required truing the open end to some extent. I've had good luck with a couple of very simple methods. One was to chuck the drum shaft into my drill press. I mounted my small bench grinder via c-clamps onto the drill press platen with one of the wheel guards removed to expose the upper side of the wheel. I had it high enough so that by gently tapping the platen it would move the grinder wheel closer and higher up as needed. I simply turned the drill press pulley by hand slowly with very light grinding pressure until I had grinding marks on the entire circumference. Worked like a champ. The other was similar but I left the drum mounted in the roaster and extended the drum past the roaster opening and clamped the bench grinder in close proximity to the drum face. I then tapped the bench grinder base to slowly move it into the drum face a little at a time. This worked great also and resulted in no visible runout. Allen 1/2 lb and 1 lb drum, Siemens Sirocco fluidbed, presspot, chemex, cajun biggin brewer from the backwoods of Louisiana
|
|
|
|
| snwcmpr |
Posted on 08/31/2012 12:00 PM
|
|
1 1/2 Pounder Posts: 925 Joined: March 03, 2011 |
I was a machinist. It may wobble after it relieves itself. (Like after it roasts a few times) Then that may cause a bind. If that isn't a problem, then it's not a problem. But, why do it later if you have the setup now? Simply heating the pipe with the torch should relieve it, then chuck it up and turn the dimensions that fit. If you have to do it later, you will lose your dimensions when you clean up the out-of-round condition. Just my thoughts. Maybe your design won't need that precision. Ken --------------
Backwoods Roaster "I wish I could taste as well as I wish I could roast." As Abraham Lincoln said "Do not trust everything you read on the internet". |
|
|
|
| oldgrumpus |
Posted on 08/31/2012 2:31 PM
|
|
1/2 Pounder Posts: 225 Joined: July 25, 2012 |
allenb and snwcmper... You both have good advice. I didn't think that any stress could in-fact show up at roasting temperatures... snwcmpr... You're also right regarding doing it now rather than later. I can put the shaft through while on the lathe and bring the acetylene torch over and warm the end up some. I hope there's not a lot of change in the current shape, since at 1/8" there isn't too much left to correct a more substantial rounout. Clever Coffee Dripper
Grinder: Macap M4 Roaster: Completed drum roaster project photos shown here: Photos https://goo.gl/ph...Da6K4wfqw5 Videos https://www.youtu...Bd1NrdpSUH Build thread https://homeroast...post_38189 |
|
|
|
| snwcmpr |
Posted on 08/31/2012 3:37 PM
|
|
1 1/2 Pounder Posts: 925 Joined: March 03, 2011 |
Quote I didn't think that any stress could in-fact show up at roasting temperatures... Actually you would be getting 'stress relief', but you are right, MAYBE not at roast temp. But, if it did, how much run-out would be a problem? You don't know how much stress is already there. Ken --------------
Backwoods Roaster "I wish I could taste as well as I wish I could roast." As Abraham Lincoln said "Do not trust everything you read on the internet". |
|
|
|
| oldgrumpus |
Posted on 08/31/2012 6:47 PM
|
|
1/2 Pounder Posts: 225 Joined: July 25, 2012 |
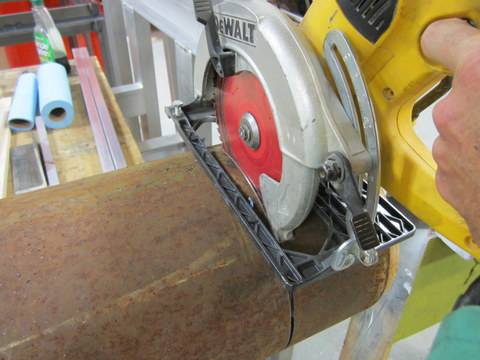
Here's the drum. The BIG solid rod is only used for an aid to turning in the lathe.
oldgrumpus attached the following images:


Edited by oldgrumpus on 08/31/2012 6:54 PM Clever Coffee Dripper
Grinder: Macap M4 Roaster: Completed drum roaster project photos shown here: Photos https://goo.gl/ph...Da6K4wfqw5 Videos https://www.youtu...Bd1NrdpSUH Build thread https://homeroast...post_38189 |
|
|
|
| oldgrumpus |
Posted on 08/31/2012 6:57 PM
|
|
1/2 Pounder Posts: 225 Joined: July 25, 2012 |
Quote Actually you would be getting 'stress relief' Oops. That's what I meant to say.... Clever Coffee Dripper
Grinder: Macap M4 Roaster: Completed drum roaster project photos shown here: Photos https://goo.gl/ph...Da6K4wfqw5 Videos https://www.youtu...Bd1NrdpSUH Build thread https://homeroast...post_38189 |
|
|
|
| snwcmpr |
Posted on 09/01/2012 7:03 AM
|
|
1 1/2 Pounder Posts: 925 Joined: March 03, 2011 |
Nice work.
--------------
Backwoods Roaster "I wish I could taste as well as I wish I could roast." As Abraham Lincoln said "Do not trust everything you read on the internet". |
|
|
|
| allenb |
Posted on 09/01/2012 9:03 AM
|
|
Administrator Posts: 3869 Joined: February 23, 2010 |
Mornin Ralph, When I posted the Jethro, barnyard method of truing the drum end I had forgotten you're working in a machinist environment. OTOH, maybe some folks reading it who don't have an equipped shop may find it useful. Great looking drum and can't wait to see it spinning some beans. Allen 1/2 lb and 1 lb drum, Siemens Sirocco fluidbed, presspot, chemex, cajun biggin brewer from the backwoods of Louisiana
|
|
|
|
| oldgrumpus |
Posted on 09/04/2012 7:50 PM
|
|
1/2 Pounder Posts: 225 Joined: July 25, 2012 |
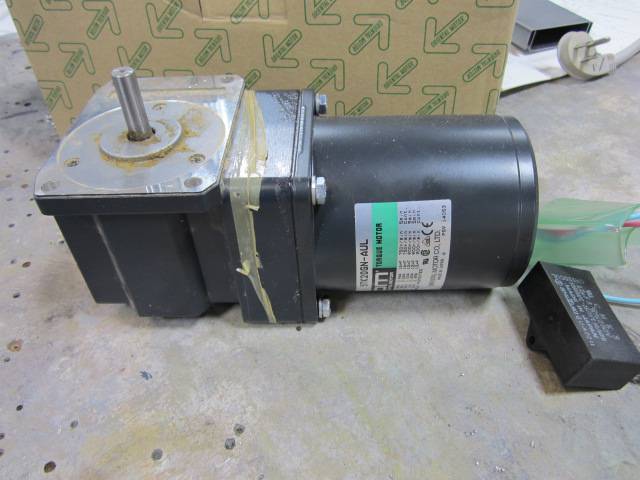
I've got two of these right angle gear motors. They are "torque motors" and turn about 120 rpm at the shaft so I'll have to do adjust the speed with appropriate sprockets. The aluminum cone is an unused spinner from an airplane propeller and will be the green bean hopper.
oldgrumpus attached the following images:

Clever Coffee Dripper
Grinder: Macap M4 Roaster: Completed drum roaster project photos shown here: Photos https://goo.gl/ph...Da6K4wfqw5 Videos https://www.youtu...Bd1NrdpSUH Build thread https://homeroast...post_38189 |
|
|
|
| Ringo |
Posted on 09/05/2012 6:37 AM
|
|
Pounder Posts: 474 Joined: January 14, 2010 |
Thats what I used, worked great. Put a sprocket that double the size of the one on the drive on the drum shaft and you are at 60 rpm. I believe 60 is good. Lots of tork so when a bean gets between the drum and the face you will have all the power you need.
All you need in life is ignorance and confidence, and then success is sure. Mark Twain
|
|
|
|
| oldgrumpus |
Posted on 09/05/2012 2:54 PM
|
|
1/2 Pounder Posts: 225 Joined: July 25, 2012 |
Ringo, do you remember what pitch the chain links were? I looked at mcmaster.com and there are SO many choices. 1/2" pitch looks good, but I dunno if that's a good choice or not.
Clever Coffee Dripper
Grinder: Macap M4 Roaster: Completed drum roaster project photos shown here: Photos https://goo.gl/ph...Da6K4wfqw5 Videos https://www.youtu...Bd1NrdpSUH Build thread https://homeroast...post_38189 |
|
|
|
| Ringo |
Posted on 09/05/2012 8:53 PM
|
|
Pounder Posts: 474 Joined: January 14, 2010 |
I just measured the one I used it 1/2 inch pitch. It's just a little bigger than chain for a bike. I believe it is still overkill but works good. One warning on this layout. This gave me trouble when I built mine. The bearing on the front of the drum must be held tight. My original design was to have the plate flot. When a bean get between the drum and the face load on the chain increases. This pulls the drum side ways, when the drum pulls side ways it locks up because the drum hits the face plate. I had to Screew my face plate down to the frame to fix this. You could also put sprocket between two bearings on the back side to prevent the pull but then you would have three bearings on the roaster. Also do not tighten the set screews on the back side of the drum bearings, as the drum heats up it gets bigger it needs to be free in the back set solid in the front to adjust the gap between the drum and face.
All you need in life is ignorance and confidence, and then success is sure. Mark Twain
|
|
|
|

| Jump to Forum: |
Powered by PHP-Fusion Copyright © 2024 PHP-Fusion Inc
Released as free software without warranties under GNU Affero GPL v3
Designed with ♥ by NetriXHosted by skpacman