
Login

Shoutbox
You must login to post a message.
renatoa
07/26/2024 3:49 PM
Bill grubbe and Jk, 
allenb
07/26/2024 5:15 AM
Spiderkw Welcome to HRO!

renatoa
07/24/2024 8:31 AM
ramiroflores and John123,

 ?
?
?renatoa
07/21/2024 1:18 AM
 , Luislobo
renatoa
07/19/2024 11:28 AM
Koepea,
Forum Threads
Newest Threads
Skywalker roaster modsBackground Roast Iss...
Hello from Arkansas
TC4ESP
Green coffee reviews
Hottest Threads
| Skywalker roaster... | [375] |
| TC4ESP | [115] |
| War on Farmers by... | [47] |
| Adventures in flu... | [26] |
| Hello! (soon) Roa... | [17] |
In Memory Of Ginny

Donations
Latest Donations
dmccallum - 10.00
JackH - 25.00
snwcmpr - 10.00
Anonymous - 2.00
Anonymous - 5.00
dmccallum - 10.00
JackH - 25.00
snwcmpr - 10.00
Anonymous - 2.00
Anonymous - 5.00
Users Online
Guests Online: 4
Members Online: 0
Total Members: 8,393
Newest Member: Bill grubbe
Members Online: 0
Total Members: 8,393
Newest Member: Bill grubbe
View Thread
Who is here? 1 guest(s)
 $30 Starbucks (Saeco) Sirena
|
|
| HoldTheOnions |
Posted on 01/07/2015 12:38 PM
|
|
1/2 Pounder  Posts: 205 Joined: October 26, 2014 |
Check out my sweet craigslist find. To say this thing is pristine is an understatement. They said they only used it a couple of times and I'm inclined to believe them, there is no wear on any button, knob, or surface, no accumulation of junk anywhere, no scratches, no dings, no dents. I also removed the screen, no junk, and opened the boiler and virtually no scale. The pic shows all the scale that was in it. The whole thing inside and out is as close to brand spanking new as you can get. My only concerns are the age of the tubing and whether the electronics will hold up, both fixable. I was looking for something I could build a double boiler machine with, e.g. refurbed baby, by combining the parts I already had from my delonghi. I really wanted a 3-way solenoid, but the price on this was too good to pass up. Saving $150+, I think I can continue to live without it. It does have a full sized portafilter, programmable dosing, analog temp gauge, which I think is really cool, a fully articulating steam wand, and powder coated aluminum case. It's kinda weird because it also has a thermoblock for steaming, but you still can't brew and steam at the same time, so not really sure the point. But it has a cavernous interior, and I'm pretty sure I can fit everything in this case. The styling is a little funky though and I'm still undecided on it, so I'll see if it grows on me. If not, then future plans include updating the case. Current plans include re-plumbing, with at least copper to the brew boiler, adding opv, adding pressure gauge, adding arduino based pid, and upgrading steam wand. Budgeting it out, I am looking at around $150 for everything. I had saved some money for my roaster, but think I'm gonna switch gears and work on this first. I'll post more details as I do it. As far as performance goes, currently it is pretty comparable to my $65 Delonghi, which is to say if I had spent $400 upgrading to this, then I don't think I would be very happy. But, if I get the temp and pressures straightened out, then I should be able to pull a decent straight shot. It's okay if you're jealous :-)       |
|
|
|
| HoldTheOnions |
Posted on 01/07/2015 7:40 PM
|
|
1/2 Pounder Posts: 205 Joined: October 26, 2014 |
So I took the whole thing apart to see what was what and did some testing. My original concept was to simply replace the thermoblock with the delonghi boiler and install a check valve between the two, then I would only need one pump and not need switching logic or additional ssr to cycle between the heating elements. Unfortunately, the steam element switches off at the same time as the brew element during the initial warm-up, and then when you hit the steam button, the relay is timed, so it is also turning off before it can heat up a full sized boiler to steam temp. I put the machines side by side and extended the steam wires over to the delonghi boiler and it only heated to around 140f. However, it occurred to me that I could simply wire a diode in line with the steam element and cut the current by half. A trick I read somewhere else. After doing this, the draw on the delonghi boiler was only 4.23 amps, which means I can simply hard wire the steam boiler and rely on the thermostat to cycle it, which will make it simpler and cheaper. Even with half the current, it only took 3:11 to heat to steam temp, which is completely acceptable. The steam switch is on a mini-board, that I don't have the skills to rewire, so I will have to install separate switch somewhere. I don't really want to modify the panel, so probably put it underneath the right wing. My plan is to first do the plumbing and pressure, and then do the arduino as phase 2 for the temps. Tomorrow will probably go to HD and see what I can get there, and then order the rest. Edited by HoldTheOnions on 01/07/2015 7:46 PM |
|
|
|
| turtle |
Posted on 01/08/2015 9:38 AM
|
 1 1/2 Pounder  Posts: 652 Joined: November 06, 2013 |
NICE SCORE!!!!!! Not a bad machine for someone just starting out as it is an enhanced/pressure basket machine, Did you get the portafilter "bits" (disk and rubber cork)? It would be GREAT for someone like yourself who wants to play around inside to make it better. Small boiler makes for very rapid heat up time which was a big plus for that machine. I will follow your progress with the mods. Mine has been sitting here for the past half decade though :( 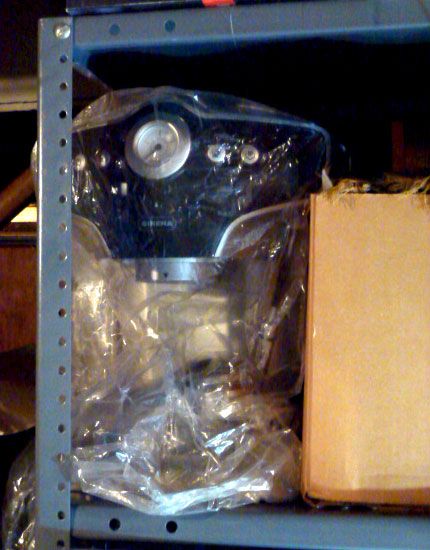
Mick - "Drinking in life one cup at a time"
"I'd rather be roasting coffee" Roaster 1: San Franciscan SF-1 Roaster 2: Hottop B-2K+ Roaster 3: 2 kilo Chinese drum Grinders: Mazzer Major - Forte BG (x3) Pour over: Hario - Bee House - Chemex - Kalita - Bodum Drip: Bunn CWTF15-1 & CW15-TC (commercials) Espresso: Pasquini Livia 90 auto Vacuum: Cona - Bodum Press: Frieling - Bodum Colombia |
|
|
|
| HoldTheOnions |
Posted on 01/08/2015 8:36 PM
|
|
1/2 Pounder Posts: 205 Joined: October 26, 2014 |
Whaaaat? Have you been holding out on me? :-) Thanks. It came with everything except the box, including this funky dosing thingamabob. My grinder can grind fine enough to pull an unpressurized shot on this (at least with the current pressure setting), but I don't have the right sized tamper and setting up the shots was a pia, so I am using the pressurization insert until I get that sorted. Also, I don't know if the grind is consistent enough for a good shot, which apparently is important, I wouldn't know at this point. If I get the temps and pressures worked out and the shots are still sour, then I am probably going to do...nothing. Logic being, I only drink sugared lattes anyway, so I am going to try to get a good straight shot if I can do it for cheap, but not if I gotta spend a bunch of money on a new grinder. I went to Home Depot and that was a waste of time, so went to Lowes and they have all the fittings I need, except for the boiler fittings. I need something like a 1/4 male to 1/8 male, and a copper washer to fit, but I wasn't seeing anything. Also, the fittings/valves on amazon didn't specifically state whether they contained lead or not, so there's that. I am also contemplating using two pumps. I kinda like the idea of completely separating the two systems and there is a good place on the side to mount two toggle switches. What I don't like about this idea is it would make the pump switch on the steam valve non-functional. In only two days I've grown quite fond of being able to control the pump with the steam knob. It is a simple magnetic switch and I may be able to make use of it again with arduino, but I would have to figure that out. Biggest issue with two pumps is if everything will fit. I dismantled the delonghi, and the boiler and pump will fit no problem by themselves, but I don't think I can also get a heat sinked ssr in there with a pump, boiler, and opv. I could use an adjustable thermostat, which I believe would fit and that would also save me $25 over a pid, but clearly that would not give the same precision. That's what I am currently debating, one pump and pid, or two pumps and no pid. Not sure on that one. Also, watched video of someone who took their 6 year-old pump apart and it was full of rust from the springs. So I am definitely going to take a look inside that. If it's a mess, then I will be only using one pump for certain, because I don't want to buy another one. |
|
|
|
| HoldTheOnions |
Posted on 01/12/2015 1:48 AM
|
|
1/2 Pounder Posts: 205 Joined: October 26, 2014 |
I put in the other boiler. For now, I just dropped it in place of the thermoblock and hard wired it (black, white, and green wires). Point of this being a simple proof of concept of whether I like this configuration or not. Want to use it for a week or so and then decide if I think I need to go through the additional work of a second pump. Right now, I'm thinking two pumps would be a little better, but probably not worth the considerable extra hassle of getting it in there. In reality it would only save 20-30 seconds for each drink. Other thing is I could not fit the steam boiler directly behind the brew boiler as originally planned, it was too wide by about 2 millimeters, and I had to shift it up and to the left, making installing the second pump considerably more difficult. Just noticed the lead is disconnected in pic, that was just while filling the boiler, not something you should try to replicate in your wiring :-) The difference in steam power is night and day, seriously. With the thermoblock, it was next to impossible to get any kind of roll going on the milk, it just has no power. The only thing I don't know is how often I need to refill the boiler. Was thinking I would steam 2 or 3 milks, cool it down and open it up and see where the water is. Then I could time how long it takes to refill it. It may be enough to run pump for a few seconds while purging the wand and then just fill it up at the start of each day. Have to play with it. I have no plans for auto-fill at this point.  I also opened the pump and all is well, no rust or any junk in it. It's good because this is a 52 watt pump and my other one is a 41 watt, so my bragging rights are intact.  Final issue is pressure gauge placement. There is really no where to put it on the front panel, other than the far left corner, which me thinks would look silly. The only other place is on the top warming plate, which I am not crazy about either. I would like to be able to see the thing when pulling shots, but I may have to tuck it inside and just use it to get things set up. |
|
|
|
| turtle |
Posted on 01/12/2015 10:17 AM
|
|
1 1/2 Pounder Posts: 652 Joined: November 06, 2013 |
Portafilter is standard 52mm so finding a tamper should be a snap as that is the "normal" size (unlike a Francis Francis and a few others that use an odd ball sized portafilter). I lightly tamped (mostly leveled) when I used mine as a pressure basket. Pulls were very acceptable using just about every grind and source for coffee from grocery store to home roasted. Pressure basked likes a little coarser grind (think Hario not espresso) If your shots are sour you may not have given enough time for the machine to come to temp (sour is usually an under extraction issue). I found 30-45 minutes was enough for it to get to brewing temp all around because things were so small (small boiler). Another trick I did was to hit the steam function for a while then back to the pull function and "flush" the temp back down a little before pulling a shot. Are you placing the portafilter in the machine to heat up also? As far as US sizes of threads. It is a European machine so think METRIC. No point cross threading as this will come back and byte you in the future with leaks etc. This is going to be a very interesting build and I look forward to following your progress. Mick - "Drinking in life one cup at a time"
"I'd rather be roasting coffee" Roaster 1: San Franciscan SF-1 Roaster 2: Hottop B-2K+ Roaster 3: 2 kilo Chinese drum Grinders: Mazzer Major - Forte BG (x3) Pour over: Hario - Bee House - Chemex - Kalita - Bodum Drip: Bunn CWTF15-1 & CW15-TC (commercials) Espresso: Pasquini Livia 90 auto Vacuum: Cona - Bodum Press: Frieling - Bodum Colombia |
|
|
|
| HoldTheOnions |
Posted on 01/13/2015 3:27 PM
|
|
1/2 Pounder Posts: 205 Joined: October 26, 2014 |
I tried what you said, but no matter what I do I can't get a higher reading than about 186. I temporarily replaced the thermostat with the delonghi thermostat and was getting 191, but I couldn't really taste any difference in the shot. Here is the thing though, I was actually getting a little bit of steam coming out of the brew head with the delonghi thermostat. So I am actually thinking that maybe my thermometer is reading low. I may take the thermometer out of my roaster and try verify it. Point being, I don't really know if my temps are good or not, but if I am getting some steam, then thinking the temps probably are high enough, leaving the pressures and or grind quality. I am also looking at using high quality flexible tubing instead of copper. Something like this http://www.hosecr...aided_Hose. The reason being the barbs on the boiler and steam valve are fixed. I can't replace the barb on the steam valve and I don't want to replace the valve, because it has the magnetic switch on it and it is a quarter turn knob that works very well. Also, drilling out the barb on the boiler will result in a hole larger than the fitting, so I will have to step down off of it. In short, I am thinking the whole thing will end up being a messy pia. The flexible tubing is rated to 3000 psi, which is better than copper, so I think it will work fine and be significantly easier to install. Finally, it will only cost around $10, so I think it is worthwhile to give it a try. The other thing I forgot to mention previously was that I also delonghified the steam wand. I drilled out the threads and it compresses nicely on to the wand. The panarello was horrible, even if I plugged the hole. People bag on the delonghi frother, but if you plug the holes on it, then it actually works extremely well and gives very nice microfoam. And putting it on the long fully articulating wand also solves the issue of it being too short. I have used it a couple days now and see no reason to replace the wand with a silvia unit at this point, as I am perfectly happy with it now.  Finally, here is my new tamper :-)  |
|
|
|
| HoldTheOnions |
Posted on 01/15/2015 1:09 PM
|
|
1/2 Pounder Posts: 205 Joined: October 26, 2014 |
Ordered tubing, yay! They sent the wrong size :-( but they are fixing it :-) Also, after eliminating my steam warm-up lag, I am realizing now that with small single boiler still have much lag in waiting for brew boiler to heat up after doing pretty much anything. Put water in cup, wait, flush grouphead, wait, reheat portafilter, wait, etc. It's made worse because the machine logic won't let you manually run water through the brew head if the machine is not up to temp (at least not that I have been able to figure, should probably read the manual at some point ;-) ). The lights blink and you can't do anything. So two things, 1) I am going to try to bolt the steam thermoblock to the bottom of the steam boiler and using it as a preheater for the brew boiler. It won't be powered, but it should get plenty hot for this purpose. It may be that it actually gets too hot and I have to work through that issue 2) I am going to add a switch to run the pump manually. If I am just flushing stuff and heating stuff, then the water is plenty hot for that. Having to wait for it to get back to brew temp every time for those things is plain silly. I am waiting to see if the tubing will work well before I order more stuff. I also have a couple ideas for using the barbs with copper tubing if the flex tubing doesn't work out. Also, I watched this video https://www.youtu...HmY1Fqs2Gk and am looking at doing the same. I was going to mount a pressure gauge in the machine, but if I can't see it, then I think this is a better idea since I won't have to open the machine up to check it. My other thought was I can set the valve and keep it there for consistency in testing. I welcome any comments on this topic. Finally, I am looking at this ECM Giotto OPV, http://www.espres...-opv-valve, the design seems good for my application and it seems like good quality. To clarify that judgement is based purely on the diameter of the housing, so I am assuming it has more robust internals, but that logic could be completely faulty. In general, I am not finding any info as to which OPV's are good or not, so I also welcome any comments on this topic. |
|
|
|
| HoldTheOnions |
Posted on 01/17/2015 1:13 PM
|
|
1/2 Pounder Posts: 205 Joined: October 26, 2014 |
Follow up on the two boiler single pump setup. I am not really happy with it. I tried using the steam button to pulse the pump, which works fine at first, but upon further testing I have found that it is putting too much water in the steam by the end of it, so I don't like that. Other issue is, with the pump turned off, water is wicking from the brew boiler to the steam boiler, so after I steam I have to run the pump to refill the brew boiler, not the steam boiler, which contributes to the problem of having to constantly wait for the brew boiler to heat up. Reality is this config is functionally sound, but has all the shortcomings of a single boiler setup. So I am going to see if I can fit the second pump when the tubing arrives. This would be the simplest solution, but obviously I can't just jump straight to the simplest solution, that would be silly, so I am also going to play with the order of the boilers and the thermoblock, have a couple ideas on that. 1) From pump to thermoblock then split to the delonghi and brew 2) From pump to delonghi and then split to the thermoblock and brew 3) Attaching a metal pipe/tube perpendicular to the thermoblock heating element and wrapping copper around that. Reason being I measured the thermoblock and it only holds 1/2 an oz of water, so would need to increase that 4) Using a check valve on the brew boiler to keep the water from exiting the brew boiler. Finally, I tried silvering copper to barbs without success. I couldn't get it to wick in well enough. Also, I can't weld and high heat epoxy would work, but both would be permanent, so I am ruling those out as options. I searched for more ideas, but didn't find anything. If anyone has any, I would appreciate it. I am having so much fun :-) |
|
|
|
| HoldTheOnions |
Posted on 01/21/2015 6:05 PM
|
|
1/2 Pounder Posts: 205 Joined: October 26, 2014 |
I built my pressure contraption and found that pressure builds until it hits almost 9 bar and then safety valve opening and pressure dropping to around 7 bar by the end of the pull. I was thinking I would find that pressure would be too high based upon other posts about gaggias, but it does not appear to be the case. I am assuming the pressure is not maintaining because it's a crappy valve, but I don't really know for sure. Need to look into this. Also received the tubing and will be playing around with different configs next couple weeks. It has good flexibility and I think is the best way to go for this project. I will probably just post pics of the final build. |
|
|
|
| HoldTheOnions |
Posted on 01/24/2015 4:44 PM
|
|
1/2 Pounder Posts: 205 Joined: October 26, 2014 |
PTFE Tubing and Official HRO Fundraiser: The good is that it bends nice and I am confident will perform as well and probably better than copper as far as pressure and temperature stability go. Anyone correct me if that is wrong. That said, it is a little difficult to work with. To get it on you have to heat it with a heat gun and muscle it on there. Not too hard, but not easy either. The biggest issue is that the only way I have figured to get it off is to cut it off. For this reason, I allowed a couple inches on each tube so I could do that in the future without having to retube. So, unfortunately getting it on the current plastic opv didn't work out so good. The barb snapped right off. Wanted to test it out before ordering new opv, but now gotta go for it and hope it all works out ok. Will also be without espresso for at least a week to 10 days. So I am pleaing with everyone out there to please donate to me your unused starbucks cards that you received for Christmas. It will only take a few minutes of your time to dig through the junk drawer and find them, and you could be saving a life. Obviously, I won't be drinking the coffee, but I can only pray the cute baristas and stale pastries will ease my suffering during this troubling time. Thank you for your generosity. |
|
|
|
| HoldTheOnions |
Posted on 02/05/2015 2:29 PM
|
|
1/2 Pounder Posts: 205 Joined: October 26, 2014 |
PHASE I COMPLETE! Sorry, a little blurry and too lazy to redo it. Also wiring a little messy, I got really tired of plugging and unplugging the front panel and it was in the way, so I wired it for manual mode while getting it installed and there are leds jury rigged to the boilers that will go away. As you can see in this pic, I connected the boilers to each other and the steam using stainless braided PTFE tubing. As indicated, I didn't like working with it at first, but now that I am getting procedure down it's not that bad. I also changed the wiring so that the steam boiler is receiving 8 amps and put the diode on the brew boiler so it is operating at 4 amps. It works better this way because I was loosing gas at the end of the steam because it couldn't heat fast enough and since I added a preheating coil, as shown below, the brew boiler doesn't suffer at all with less power. Next is the preheating coil. I simply put it under the steam boiler and silvered it together to improve heat transfer and eliminate any possible rattling from the pump vibration. It fit tight as was, so I just had to silicone everything in place. The quality craftsmanship really shines through from that angle. The only negative is that the cost of this went way over budget due to all the fittings I needed for it. I have to add it up, but I think I am close to $40 on this thing. The huge positive is that it works great and better than I expected it would. I can do all my flushing and warming before thermostat trips and then just trigger element to heat right before brewing. It takes 43 seconds for brew boiler to heat up, so I just grind and load portafilter during this time to give me essentially no wait. Of course, PID would also improve this greatly by eliminating the dead band of the thermostat. Next is the OPV. You can clearly see the difference between the old OPV and the new one and it regulates pressure perfectly. I am finally able to pull a good straight shot at home with this mod. The only negative with this is I had to put it down below in the same location as the old one, I just couldn't figure a way to make it fit above. So adjust is a PIA, but I only have to do it occasionally, so there's that. Finally, for now I again replaced the gaggia thermostat with the delonghi thermostat. After thinking about it, it didn't make sense I was getting so much steam when I didn't have that issue with the delonghi and it is almost exactly the same setup. So I tried it again and this time no steam, so thinking there was an air pocket or something causing the issue. Now it gets hotter and actually takes the analog temp gauge to about 1/2 notch from max. So if I were to regulate temp hotter with PID, the temp gauge would become useless. All in all, I am extremely happy with this, the mods have met or exceeded every performance objective I had. I will post a schedule of the current cost after I add everything up. Edited by ginny on 04/04/2015 7:42 PM |
|
|
|
| HoldTheOnions |
Posted on 02/09/2015 7:29 PM
|
|
1/2 Pounder Posts: 205 Joined: October 26, 2014 |
Cost to date, Sirena - $30 PTFE - $22 OPV - $31 Fittings - $61 (ouch) Total $144 |
|
|
|
| HoldTheOnions |
Posted on 02/09/2015 7:36 PM
|
|
1/2 Pounder Posts: 205 Joined: October 26, 2014 |
Phase II will be arduino. Decided to try to completely replace the computer with arduino so I can program everything how I like, primarily so can run pump even when brew boiler heating, make use of steam switch as manual pump, and maybe down the road switch the thermoblock to have active preheating. I got really good help from arduino guys on Element14 on how to recycle the sensors already in the machine, which will save some money. I wasn't sure how I could make everything fit in this case, but realized I could use mechanical relays for the pump and steam boiler and then a single ssr sinked to the warming tray/case for brew boiler and everything should fit ok. |
|
|
|
| turtle |
Posted on 02/19/2015 7:32 PM
|
|
1 1/2 Pounder Posts: 652 Joined: November 06, 2013 |
I am glad it is you and not me in this position.... Serina was fine as delivered (for me) but I could not imagine moding it to the level you are heading into And I am hoping to incorporate my Arduino into my SF-1 restore Mick - "Drinking in life one cup at a time"
"I'd rather be roasting coffee" Roaster 1: San Franciscan SF-1 Roaster 2: Hottop B-2K+ Roaster 3: 2 kilo Chinese drum Grinders: Mazzer Major - Forte BG (x3) Pour over: Hario - Bee House - Chemex - Kalita - Bodum Drip: Bunn CWTF15-1 & CW15-TC (commercials) Espresso: Pasquini Livia 90 auto Vacuum: Cona - Bodum Press: Frieling - Bodum Colombia |
|
|
|
| HoldTheOnions |
Posted on 03/06/2015 1:59 PM
|
|
1/2 Pounder Posts: 205 Joined: October 26, 2014 |
TMP36 Temp Device: Working on getting the individual components going and so far everything has been pretty easy. The coding has been mostly cut and paste with a few searches and all hardware issues resolved on Element14. I just wanted to comment on the TMP36. This is turning out to be pretty good. Out of the box it is accurate to within 5f; however, the variance is typically closer to 2f with an occasional 5f variance reading. So to get close to a 1/10f variance, one simply needs to average the last 20 readings. If using a 1/10 second delay, then total delay of 2 seconds, which I think will work quite well. Benefit is these cost $5-6 delivered, whereas a thermocouple setup is closer to $20, so saving $25 to $30 on the project. Also, these are much simpler to get setup. Only concern is long-term reliability on the steam boiler, which is to be determined. |
|
|
|
| HoldTheOnions |
Posted on 04/04/2015 6:31 PM
|
|
1/2 Pounder Posts: 205 Joined: October 26, 2014 |
Ok, so been playing with arduino, mostly have it figured out on the espresso machine, just need to pull all the pieces together into final code. But I'm currently playing with it on my roaster to figure out if I want bother with it there. Had some other ideas around the house too, we'll see. I thought about getting another one, but don't really want to buy more stuff and not end up using it. Couple things. Too much heat was transferring to the pump off the preheater when the pump didn't run for extended periods, so I had to flip the pump around and extend ptfe as a thermal break. Easy fix and no problems since. As far as the diode goes, it burned out. Replaced it and burned out again. I noted that they got really hot, so I am assuming it has to sinked when running high current, which makes sense, heat has to go somewhere. But I figured out the kitchen is on a 30amp circuit and all outlets are limited by GFI, except the fridge outlet, which is not GFI. The espresso machine is sitting right next to the fridge, so I just plugged it into that outlet and no problems with 16amp draw. It heats faster this way anyway, so worked out good. I modified the preheat coil. It worked pretty good passively but when I add the active preheating it didn't really didn't improve the heating at all, it just wasn't transferring the heat well enough. I learned about low-temp brazing after I made the new pre-heater, but too late to go back and try that now. So I got rid of the coil and started running water directly through the thermoblock, issue is the connectors were weak and I actually snapped one off. So I just cut off both ends and fished copper through the thermoblock and filled the empty space with silver. Another easy fix. On the old thermocoil I got around 190-200 ml before temps started dropping, and with the new one it's right around 275ml. I think it would be better if I could run the pipe through the thermoblock and then wind it around on top, but I didn't have the space for it because it is a fatter setup. And it really isn't necessary as 275ml gives me all I need to use the machine continuously. The preheater is still passively heated by the steam boiler when the pump isn't running, which sits on top. To gain active heating in lieu of arduino, I realized I could just wire the dolonghi 4-way switch and get that. So in position 1, power to steam boiler and brew boiler, in position 2 machine is off, in position 3 power to brew boiler (I put it here in the morning for just coffee), in position 4 power to brew boiler, preheater, and pump. I like the low profile aesthetics of the delonghi switch vs a toggle switch on the side of the machine anyway, so will continue to use it in the future as the main power switch. I am getting eager for temperature control. Edited by ginny on 04/04/2015 7:41 PM |
|
|
|
| HoldTheOnions |
Posted on 04/07/2015 8:05 PM
|
|
1/2 Pounder Posts: 205 Joined: October 26, 2014 |
Some of my pics have disappeared :( |
|
|
|
| ginny |
Posted on 04/07/2015 8:17 PM
|
 Founder Posts: 3476 Joined: October 24, 2005 |
yes, way too big and would not load. I sent you a PM about this issue. let me know if you have photos that are within out parameters... ginny |
|
|
|
| HoldTheOnions |
Posted on 04/07/2015 9:16 PM
|
|
1/2 Pounder Posts: 205 Joined: October 26, 2014 |
Ok thanks. |
|
|
|
| JackH |
Posted on 04/08/2015 3:03 AM
|
 Administrator Posts: 1809 Joined: May 10, 2011 |
Your photos at the beginning were sized correctly. These latest photos had a large file size and took a long time to load/display on the screen. There is a procedure in our FAQ section on how to use Microsoft paint to scale down the size. Under the heading "More Information about Photos". http://forum.home...?cat_id=16 If you have Photoshop there is a function called "save for web" that scales down the image for the internet. Let me know if I can help with the images. ---Jack
KKTO Roaster. |
|
|
|
| HoldTheOnions |
Posted on 04/08/2015 1:29 PM
|
|
1/2 Pounder Posts: 205 Joined: October 26, 2014 |
Thanks for offering, but I generally had the feeling I was wasting my time with this as it's not likely beneficial to anyone. I'll just use this as a good excuse to put it out of its misery. ;-) |
|
|
|
| ginny |
Posted on 04/08/2015 2:29 PM
|
|
Founder Posts: 3476 Joined: October 24, 2005 |
Hi: I think anytime you rebuild a super score and show your work it a boost to all especially those that have never done this stuff it pushes them a bit... gee don't quit... ginny  |
|
|
|
| JackH |
Posted on 04/08/2015 3:19 PM
|
|
Administrator Posts: 1809 Joined: May 10, 2011 |
You had 860 views so I think that many here are interested in your project. Glad to help with your photos if you want to re-post them. I would keep going, this is what we are here for. ---Jack
KKTO Roaster. |
|
|
|

| Jump to Forum: |
Powered by PHP-Fusion Copyright © 2024 PHP-Fusion Inc
Released as free software without warranties under GNU Affero GPL v3
Designed with ♥ by NetriXHosted by skpacman