
Login

Shoutbox
You must login to post a message.
renatoa
07/26/2024 3:49 PM
Bill grubbe and Jk, 
allenb
07/26/2024 5:15 AM
Spiderkw Welcome to HRO!

renatoa
07/24/2024 8:31 AM
ramiroflores and John123,

 ?
?
?renatoa
07/21/2024 1:18 AM
 , Luislobo
renatoa
07/19/2024 11:28 AM
Koepea,
Forum Threads
Newest Threads
Skywalker roaster modsBackground Roast Iss...
Hello from Arkansas
TC4ESP
Green coffee reviews
Hottest Threads
| Skywalker roaster... | [375] |
| TC4ESP | [115] |
| War on Farmers by... | [47] |
| Adventures in flu... | [26] |
| Hello! (soon) Roa... | [17] |
In Memory Of Ginny

Donations
Latest Donations
dmccallum - 10.00
JackH - 25.00
snwcmpr - 10.00
Anonymous - 2.00
Anonymous - 5.00
dmccallum - 10.00
JackH - 25.00
snwcmpr - 10.00
Anonymous - 2.00
Anonymous - 5.00
Users Online
Guests Online: 7
Members Online: 0
Total Members: 8,394
Newest Member: Bill grubbe
Members Online: 0
Total Members: 8,394
Newest Member: Bill grubbe
View Thread
Who is here? 1 guest(s)
Page 1 of 2: 12
|
 Anthony's Coffee Machine
|
|
| turtle |
Posted on 03/12/2015 9:19 AM
|
 1 1/2 Pounder  Posts: 652 Joined: November 06, 2013 |
Quote The basket slides into rails that are spot welded on either side of the brew head 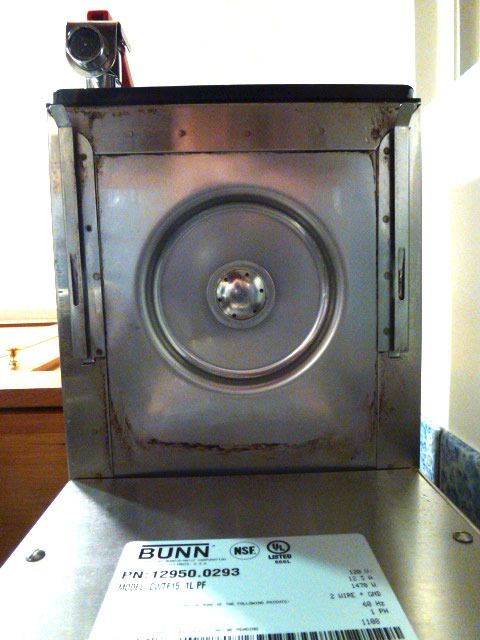 Here is a pic of my older 10 cup home model. Plastic but I think it shows the slots better 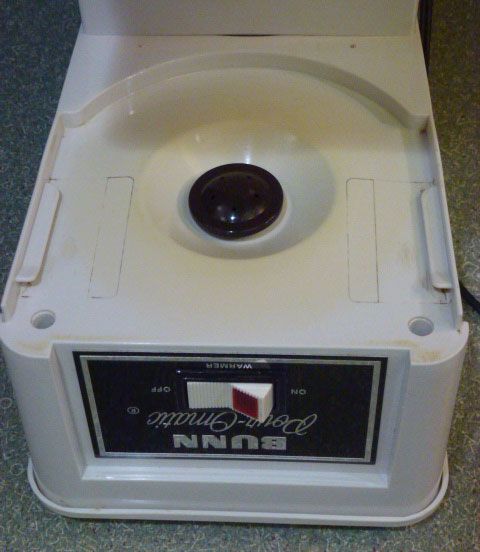
Mick - "Drinking in life one cup at a time"
"I'd rather be roasting coffee" Roaster 1: San Franciscan SF-1 Roaster 2: Hottop B-2K+ Roaster 3: 2 kilo Chinese drum Grinders: Mazzer Major - Forte BG (x3) Pour over: Hario - Bee House - Chemex - Kalita - Bodum Drip: Bunn CWTF15-1 & CW15-TC (commercials) Espresso: Pasquini Livia 90 auto Vacuum: Cona - Bodum Press: Frieling - Bodum Colombia |
|
|
|
| AnthonyD |
Posted on 03/12/2015 12:06 PM
|
|
1/4 Pounder  Posts: 79 Joined: March 16, 2013 |
Awesome, thanks! |
|
|
|
| oldgearhead |
Posted on 03/17/2015 6:27 PM
|
 1 1/2 Pounder Posts: 1128 Joined: February 10, 2011 |
For what its worth info: A Bloomfield brew basket is 7 and 5/16th inches across the width that slides into the flanges. probably the same as Bunn. They use the same 20115 filter. |
|
|
|
| AnthonyD |
Posted on 03/22/2015 6:31 PM
|
|
1/4 Pounder Posts: 79 Joined: March 16, 2013 |
Hi Everyone! New update. I big hold up has been the threaded connections on the heater. I can't find a fitting that would fit them. So I cut them off, and made fittings for them by drilling 3/16" holes into 1/8" brass caps. After a couple of failed attempts at soldering them on, I decided I am just going to JB Weld them. The pipe coming out of the heater is stainless so I would probably need to use a solder wither higher silver content. But I don't really want to spend the money on it for just two small fittings. JB Weld can handle the heat and wont be in direct contact with the water. I finished the frame and sheet metal for the most part. My first attempt at the front face plate failed miserably, when I tried cutting the opening for the LCD display with a jigsaw. I remade the front plate and ordered a hand nibbler (link) to try again, which should be in tomorrow. Also bought a larger display which will let me do a menu system (link) The stainless tube I bought is too thick for me to bend, so I ordered some thin walled brass which will be here by tuesday. I think brass will will look nice, giving the machine a two tone look. To mount the brew basket, I am going to make a stand with stainless rod. I bought some 308L-16 electrodes to attempt to weld it. I have the heater mounted with a bracket I made with some aluminum flat bar. It is raised up so it will be close to the top to keep the coffee pot warm. The other sides of the heater will be insulated with ceramic fiber. The first thermocouple amp I ordered finally arrived from china. I am going to mount it with a bare thermocouple in the spray head. That way I can calibrate between the temp of the heater and brew temp. Cheers!
AnthonyD attached the following images:


|
|
|
|
| allenb |
Posted on 03/22/2015 8:06 PM
|
 Administrator Posts: 3869 Joined: February 23, 2010 |
Wow, looking good! That's too bad about the heat exchanger connections. Something to be aware of. Some plastics have a nasty tendency of outgassing for years when subjected to high temperature water. The outgassing is most likely not a health issue but can add a funky plastic taste to the brew. There have been many home coffee brewers from various manufacturers over the years that have suffered from this defect. Hopefully the plastic tubing you're using going to the brew head won't do that but I would do some test brews without coffee and smell/taste the water to rule it out. My preference would be copper tubing. Allen 1/2 lb and 1 lb drum, Siemens Sirocco fluidbed, presspot, chemex, cajun biggin brewer from the backwoods of Louisiana
|
|
|
|
| AnthonyD |
Posted on 03/22/2015 11:32 PM
|
|
1/4 Pounder Posts: 79 Joined: March 16, 2013 |
Yea, I knew some types of tubing give that plastic taste, especially the cheap clear kind. I'll have to experiment with a few types to find one that works. I think my espresso machine uses John Guest tubing for the steam and water lines. |
|
|
|
| ginny |
Posted on 03/23/2015 9:38 AM
|
 Founder Posts: 3476 Joined: October 24, 2005 |
looking great Anthony... nice work. ginny  |
|
|
|
| turtle |
Posted on 03/23/2015 4:29 PM
|
|
1 1/2 Pounder Posts: 652 Joined: November 06, 2013 |
Looking good. stainless steel tubing with a flare connection would be your best bet for taste followed by copper and brass tubing (also flared). Mick - "Drinking in life one cup at a time"
"I'd rather be roasting coffee" Roaster 1: San Franciscan SF-1 Roaster 2: Hottop B-2K+ Roaster 3: 2 kilo Chinese drum Grinders: Mazzer Major - Forte BG (x3) Pour over: Hario - Bee House - Chemex - Kalita - Bodum Drip: Bunn CWTF15-1 & CW15-TC (commercials) Espresso: Pasquini Livia 90 auto Vacuum: Cona - Bodum Press: Frieling - Bodum Colombia |
|
|
|
| AnthonyD |
Posted on 03/29/2015 6:09 PM
|
|
1/4 Pounder Posts: 79 Joined: March 16, 2013 |
Update! I welded the basket mount this weekend, the 308L-16 electrodes worked pretty well for the stainless. My welding skills still need work, haven't welded since I built my roaster last year. When I welded the ring it slipped out of center. But it looks ok while the basket is in. Also did a pressure test today and had a couple of leaks so I resealed everything. Cracked the jb weld trying to tighten the fitting so I will have to wait till tomorrow to do another test. I ordered a tubing bender but it wont be in for another week. So I am using some copper and elbows for testing. When I was working a peacock, decided to visit. I never seen one around here before. I am using polyethylene pipe in the tubing. I decided to not run copper/brass/stainless pipe for the water line as advised for taste, because I am afraid I would lose to much heat. Cheers!
AnthonyD attached the following images:


Edited by AnthonyD on 03/29/2015 6:18 PM |
|
|
|
| AnthonyD |
Posted on 12/06/2016 12:34 AM
|
|
1/4 Pounder Posts: 79 Joined: March 16, 2013 |
Hi Everyone! I finally got around to finishing my coffee machine! I was running into issues with how to handle pressure build up while heating the water. And it took me a while to source a normally open solenoid valve rated for the temperature (and within my budget). Now the output from the heater goes to a tee and then a normally open valve that goes back to the reservoir, and a normally closed valve that runs to the basket. I only have one thermocouple on it right now so I had to manually calibrate it so the water is ~205F while brewing. The heat coil cannot handle heating the water on the fly to brew temp so it brews in cycles. A link to the photos http://imgur.com/... And a quick vid of it brewing: https://www.youtu...LmUJTphgqI Well it's not quite done, I still have some adjustments to make and need to calibrate the flow rate for measuring the batch. Also need to bend the tube going to the the brew basket a bit more so its centered. I shimmed it for now. But it brews! Cheers!
AnthonyD attached the following images:


Edited by AnthonyD on 12/06/2016 12:49 AM |
|
|
|
| oldgearhead |
Posted on 12/07/2016 6:10 AM
|
|
1 1/2 Pounder Posts: 1128 Joined: February 10, 2011 |
Wow! Nice job! It looks like you are using a commercial brew basket. Are you using a commercial spray head as well. I noticed a dramatic improvement when I replaced the shower head with the latest version. About the only thing I would change is the carafe. I have learned to like the glass-lined air-pot type of carafe, because they are very good at keeping the product hot for hours... No oil on my beans...
|
|
|
|
| AnthonyD |
Posted on 12/07/2016 3:12 PM
|
|
1/4 Pounder Posts: 79 Joined: March 16, 2013 |
Yes, I am using a commercial basket and spray head as recommended by everyone earlier in the thread. Spray head: https://www.amazo...00HNQ91U4/ Basket: https://www.amazo...008DVGJGC/ (found it cheap on ebay) I was thinking about switching to one of those vacuum carafes. I originally went with glass so I could watch it brew. I could also raise the heater to contact the top panel to keep it warm. I also forgot to mention I originally had issues connecting to the heater because of the metric threads. So cut them off and flared them so I could connect a silicone tube with a hose clamp. I got the flaring tool cheap from harbor freight. It was a cheap fix with no leaks. |
|
|
|

Page 1 of 2: 12
| Jump to Forum: |
Powered by PHP-Fusion Copyright © 2024 PHP-Fusion Inc
Released as free software without warranties under GNU Affero GPL v3
Designed with ♥ by NetriXHosted by skpacman