
Login

Shoutbox
You must login to post a message.
renatoa
04/25/2024 2:03 AM
AGZ and Intercolcoffee

allenb
04/23/2024 7:01 PM
Paul Kalb

renatoa
04/23/2024 4:34 AM
Coffee_Rabbit_Hole
and Michaelion,
and Michaelion,
renatoa
04/21/2024 2:35 AM
compactjack and GreenGenie
 ?
?
?allenb
04/19/2024 8:27 AM
eximwind
Forum Threads
Newest Threads
Skywalker roaster modsHello from Montreal ...
War on Farmers by Su...
Kaleido Roaster PID ...
Rainfrog's Roastmast...
Hottest Threads
| Skywalker roaster... | [302] |
| Skywalker, the AL... | [214] |
| Skywalker Roasts | [94] |
| Rainfrog's Roastm... | [54] |
| War on Farmers by... | [40] |
In Memory Of Ginny

Donations
Latest Donations
dmccallum - 10.00
JackH - 25.00
snwcmpr - 10.00
Anonymous - 2.00
Anonymous - 5.00
dmccallum - 10.00
JackH - 25.00
snwcmpr - 10.00
Anonymous - 2.00
Anonymous - 5.00
Users Online
Guests Online: 3
Members Online: 0
Total Members: 8,227
Newest Member: AGZ
Members Online: 0
Total Members: 8,227
Newest Member: AGZ
View Thread
Who is here? 1 guest(s)
 My 1lb Fluid Bed Roaster: Update with Video!
|
|
| alexcampbell |
Posted on 06/24/2015 11:46 PM
|
|
Newbie  Posts: 42 Joined: December 16, 2013 |
So... after about 1.5 years roasting on my PID popperyI running roast logger through an arduino, I have decided to build my dream roaster. Build criteria: Minimum 2lb capacity, but able to roast less than half a pound if needed. Fluid Bed Must look badass Cyclone style chaff collection Must not require removing any parts of roaster to dump Dumping must not be clunky $500 budget So far, I have acquired the following: Tangential, multistage vacuum motor 3300W plastic welding heat element Water-jet cut stainless parts 2- sanitary weld unions assorted stainless pipes and rods for fabrication. 240V 40 amp SSR Still Require: Stainless nuts Some sort of Human Machine Interface Chassis Assorted 240V wiring Now, I would consider myself a novice fabricator and welder, but I have designed and built many projects over the years including fabrication, automation and electronics. I am completely new to TIG welding. My design took a lot of consideration and ideally, I would have had the plenum chambers CNC machined. This would have allowed them to be more compact and eliminated a lot of the most challenging fabrication, but my $500 budget would not allow that. To circulate the beans and allow for a centre dump, I opted to build an intake style poppet valve in a conical orifice plate. There will be a pipe that exits the bottom of the roaster into a cooling tray. 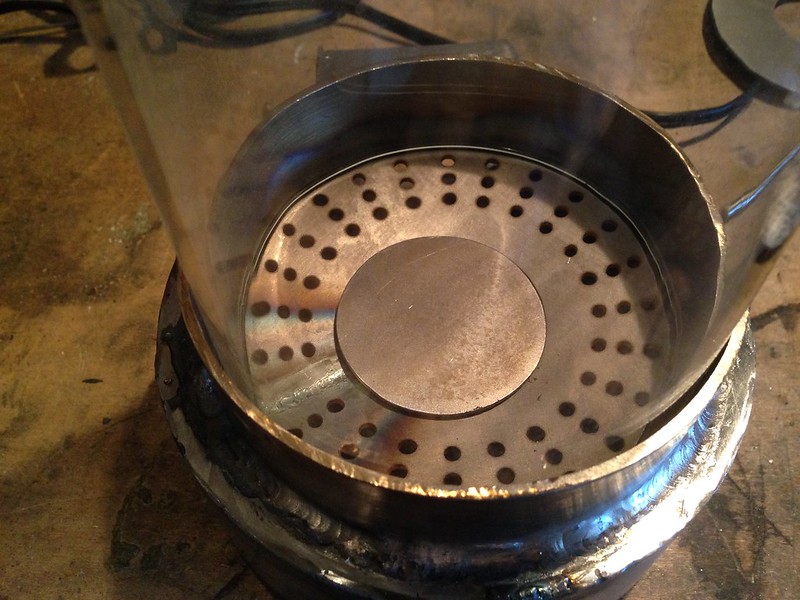 DumpMechanism DumpMechanism The orifice plates were cut to be tapered at 10 degrees to facilitate bean ejection. 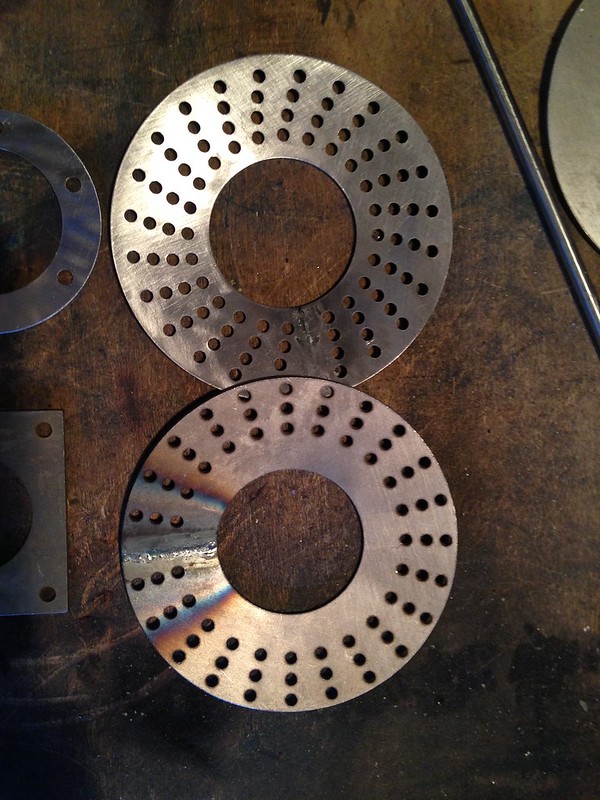 OrificePlates OrificePlates The system uses two plenums. The bottom allows air to evenly circulate through the orifice plate, creating a peripherally focused sprouting bed. 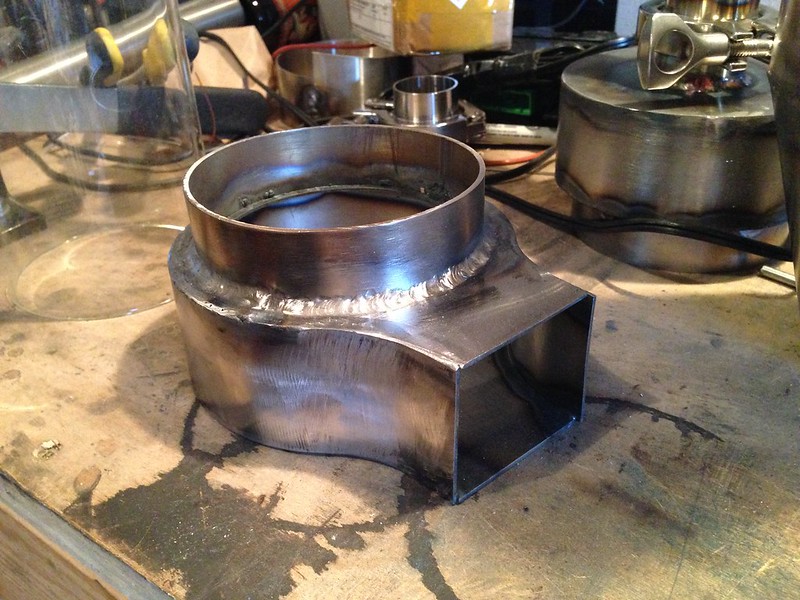 /url] /url]The top plenum will allow a bean dump into the main roast chamber, as well as divert chaff to the collection system. [url=https://flic.kr/p/ud7Fy4] 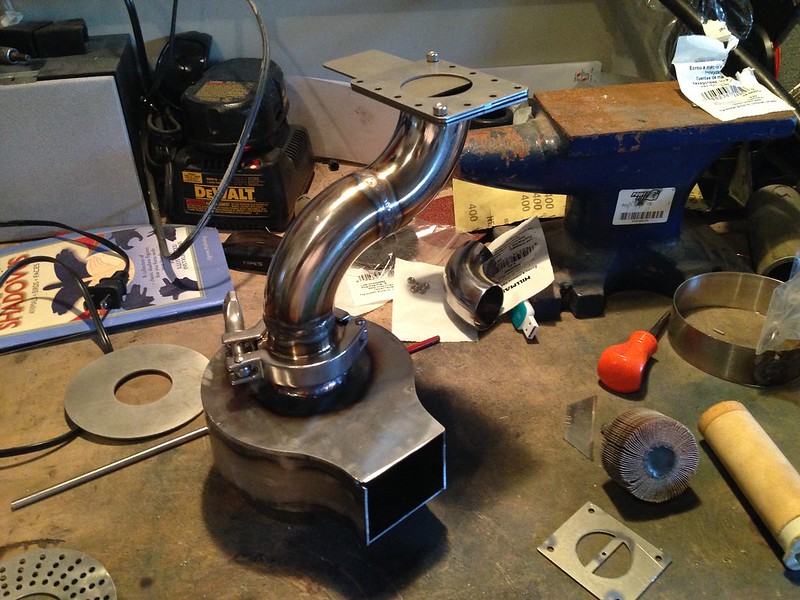 IMG_1562 IMG_1562 You may ask why I used the two elbows for the bean loader? I thought it looked good and balanced the large chaff collector visually. The bean loader is a slide valve. I will weld nuts onto the bottom plate for the stainless cap screws. 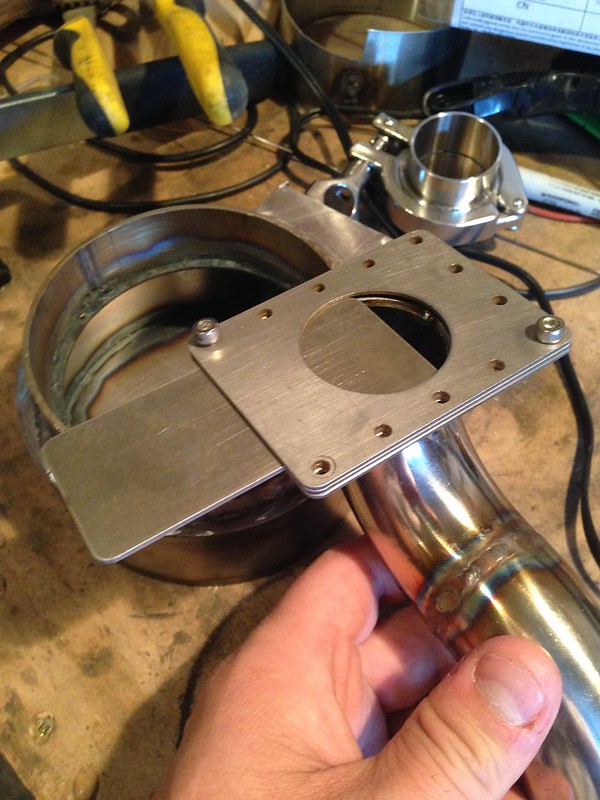 IMG_1557 IMG_1557 So far, everything has cost roughly $350. Bake around: $25 Water jet cutting all parts from 18 ga stainless $195 Stainless piping $40 cut to size Stainless elbows and sanitary fittings $50 Heating element $45 Vacuum motor - Free from local classifieds SSR $11 I have learned a lot so far on this project. Mostly about welding and finishing stainless. I had a lot of issues getting my TIG welder dialled in. Now I am using a #8 gas lens for most tasks, and I have learned that cleaning the crap out of your base metal before welding is a must. My next big task is coming up with a system to back purge my pieces when welding tubes. I have learned the hard way that you MUST back purge stainless to create a shield on the back side, unless you like grinding dingleberries out of tiny places. 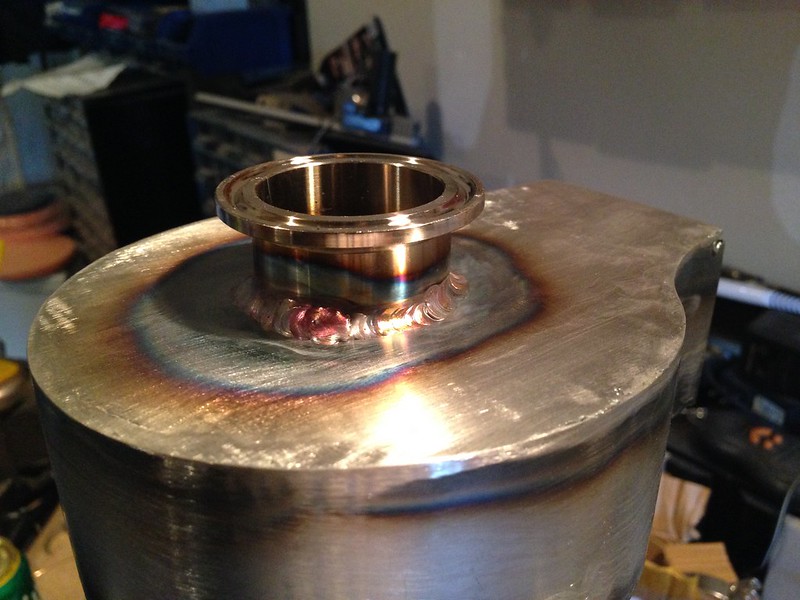 WeldPorn WeldPorn For the controls, my initial plan is to continue using an arduino with roast logger. It works so well with the PID that I would be hard pressed to improve on it. I do, however, want to go stand alone. I am thinking either a raspberry pi running roast logger with a touchscreen, or getting an HMI panel for an old PLC I have laying around. With the HMI, (Human Machine Interface) you can build a screen with buttons, store recipes and display graphs etc. The panel I have been eyeing up is $300, so it would be considered a complete luxury. http://www.maplesystems.com/products/graphic-hmi/index_product-details_hmi5043lb_dk.htm 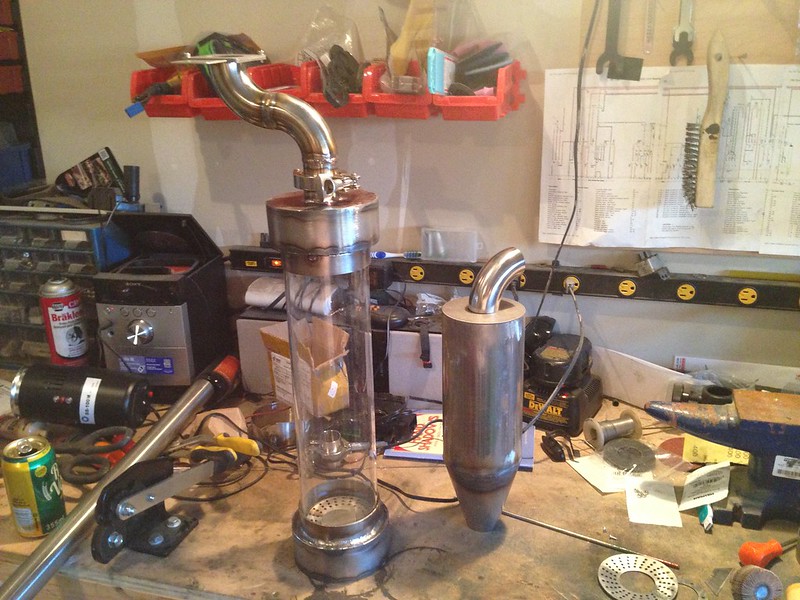 overall overall I will keep this thread updated with details as I get into building the chassis, electronics and troubleshooting. Edited by alexcampbell on 04/12/2018 5:24 PM |
|
|
|
| oldgearhead |
Posted on 06/25/2015 6:56 AM
|
 1 1/2 Pounder  Posts: 1128 Joined: February 10, 2011 |
Very nice build! My only concern would be the Bake-A-Round. If its like mine it might be too small for 900 gram loads of large beans. But I have other constraints with loads over 500 grams so I haven't really pushed its capacity. Great job! No oil on my beans...
|
|
|
|
| allenb |
Posted on 06/25/2015 7:50 PM
|
 Administrator Posts: 3859 Joined: February 23, 2010 |
You've got one extremely cool, hi-tech looking fluidbed! I'm looking forward to seeing some beans circulating. How has the initial bean spouting tests gone so far. I'm very curious as I've never seen an RC with a perf plate in that configuration with no holes in the middle where your dump gate is located. This would make a very interesting video to post! Keep us posted Allen 1/2 lb and 1 lb drum, Siemens Sirocco fluidbed, presspot, chemex, cajun biggin brewer from the backwoods of Louisiana
|
|
|
|
| alexcampbell |
Posted on 06/25/2015 10:56 PM
|
|
Newbie Posts: 42 Joined: December 16, 2013 |
Thanks for the compliment. I used the bake-a-round simply because I bought it at the beginning of my design process. I was going to get some 4" pyrex, but I thought I would stick with the extreme bake-a-round design. My initial testing of the perf plate was in a 3" test chamber with pvc and a plexiglass plate. It was only the most extreme design with holes really close to the outer edges that got my desired effect. I anticipate that the 3.5" RC will show the out to in circulation I desire. One of the side effects I am hoping for is that the beans in the centre column above the plate will be less affected by ET, and show a more representative BMT. |
|
|
|
| JETROASTER |
Posted on 06/26/2015 9:47 AM
|
 Administrator Posts: 1780 Joined: March 06, 2010 |
Very nice looking machine coming along!! Nice innovations as well. In the pursuit of "Bad-Ass", consider looking through the Exhaust/Recirculation category. Lots of choices. 1.5", 2",3"...and beyond. Great options for V-clamps and flanges on the same order as the sanitary fittings. Tubing in aluminum and stainless (304). Polished straits, bends , turndowns. Really sexy stuff for relatively cheap. I picked up two cutout valves at $50.00ea. Boost actuated (@ roughly15psi). They're also available in vacuum actuated or electric. The valve seat is really tight, all stainless, and can be had as naturally open or closed. Good luck with your build. It looks awesome. Cheers, Scott
JETROASTER attached the following images:


|
|
|
|
| broeker |
Posted on 07/01/2015 11:31 PM
|
 1/4 Pounder  Posts: 75 Joined: June 23, 2014 |
Those valves are boss!! |
|
|
|
| alexcampbell |
Posted on 09/12/2015 6:12 PM
|
|
Newbie Posts: 42 Joined: December 16, 2013 |
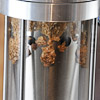
So, I have made some progress on the roaster. Here is the synopsis. First, don't mind the disaster that my workbench is right now. I have about 5 projects on the go. I ditched the central vac motor for a spa blower for a few reasons: The vac motor was overkill The vac motor was to big to fit into a nice footprint the spa blower is lower power and has a silencer. I had to fabricate a crazy 270 degree plenum to get the blower to enter my heater tube. The frame is made of aluminum square tubing for cost and weight. The cyclone works amazing with 100% collection of fine and large chaff. In the videos, I used some chaff from past roasts. Quick overview of the roaster (no commentary) 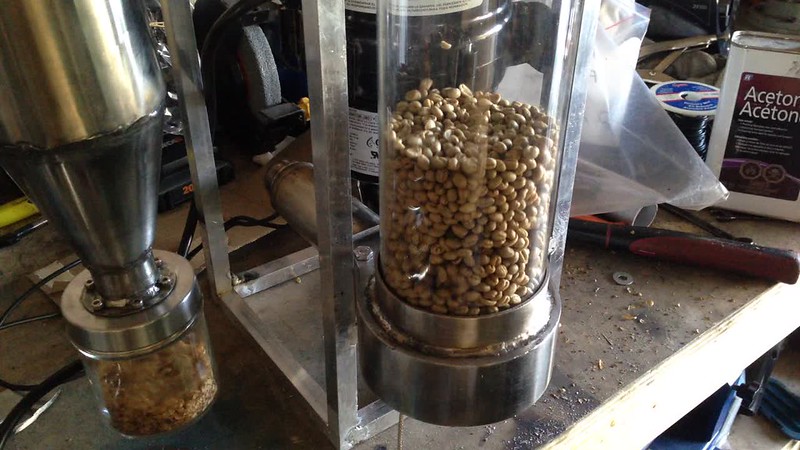 First circulation tests by Alex Campbell, on Flickr First circulation tests by Alex Campbell, on FlickrHere is the bean circulation. 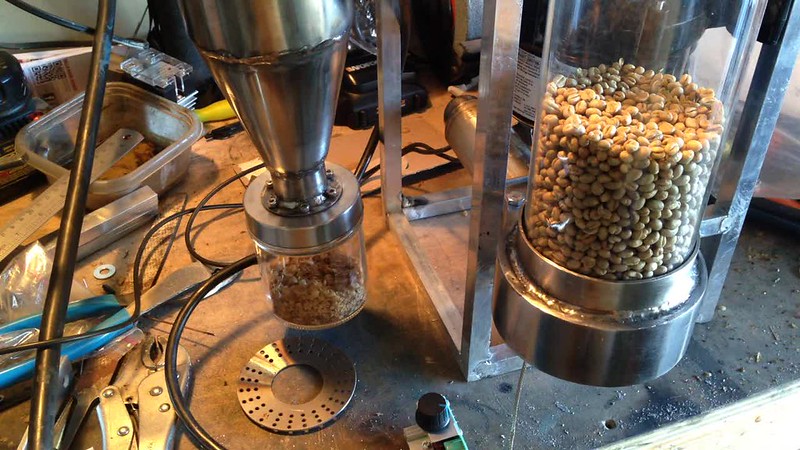 Untitled by Alex Campbell, on Flickr Untitled by Alex Campbell, on FlickrHere is the central dumping mechanism. 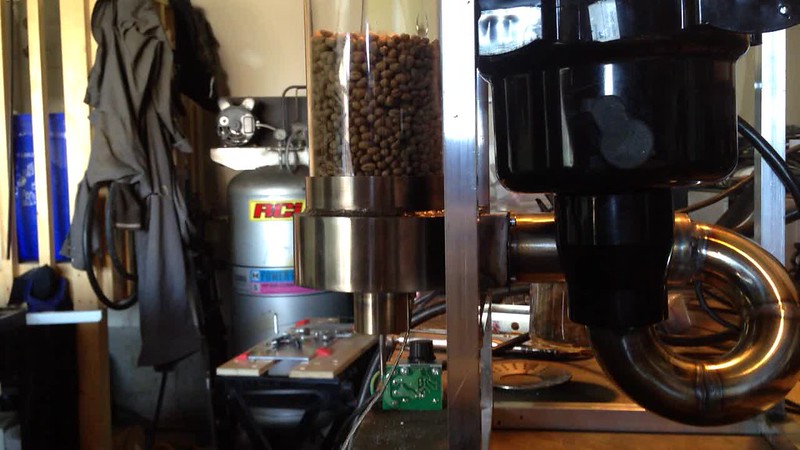 Draining the beans by Alex Campbell, on Flickr Draining the beans by Alex Campbell, on FlickrSo the next steps are to get my arduino hooked in to fire the heater and try a roast. Still to do: Gaskets on the roast chamber. The glass does not sit in perfectly and there is a lot of blow-by. Skin the outside. I will be sheeting the aluminum frame with stainless. Just going to drill and tap the frame for some stainless cap screws. Electrical. Mount all of the SSRS and electronics inside safely and wiring. There are a lot of other little things like cleaning up some welds (obviously, I am not an expert welder), lining some components up better, making a support for the cyclone, welding a cone for the bean loading valve, fabricating a linkage for the bean dumping valve and about 150 other little things. I should be able to do a quick roast tomorrow though. |
|
|
|
| oldgearhead |
Posted on 09/13/2015 6:54 AM
|
|
1 1/2 Pounder Posts: 1128 Joined: February 10, 2011 |
Good luck and a couple of 'O' rings and your good to go!
No oil on my beans...
|
|
|
|
| tamarian |
Posted on 09/13/2015 7:45 AM
|
|
1/2 Pounder  Posts: 320 Joined: January 21, 2012 |
This is beautiful. I love the dumping mechanism. Looking forward to seeing a full roast video when complete.
Wa'il. 1 Kg PID'ed gas-fired fluid bed roaster, GS/3MPS, K10F
|
|
|
|
| alexcampbell |
Posted on 09/15/2015 9:16 PM
|
|
Newbie Posts: 42 Joined: December 16, 2013 |
Well, first Roast is under my belt. The roaster certainly performed admirably and produced a remarkably even, uneventful roast. This was a PNG peaberry that I never really cared for, but bought several pounds of. I didn't weigh the coffee prior to the roast, but it was probably a little over a pound.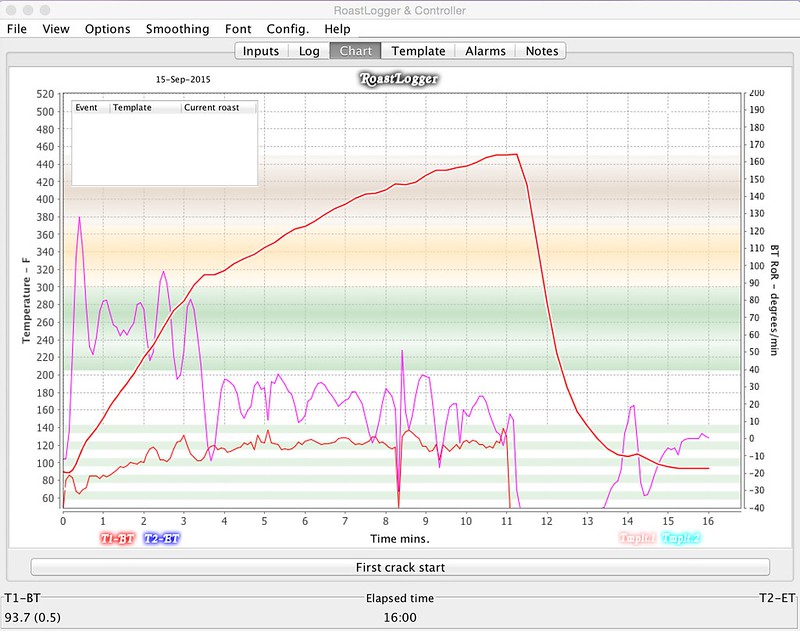 Screen Shot 2015-09-15 at 7.55.18 PM by Alex Campbell, on Flickr Screen Shot 2015-09-15 at 7.55.18 PM by Alex Campbell, on FlickrThis was literally taking my arduino setup from my poppery1 and hooking it up to the SSR on my new beast. The PID needs a bit of fine tuning and I would really like to get the blower speed automated. One issue I ran into was hearing the cracks. First crack was somewhere in the 415-420 range, which leads me to believe that my BT probe might be a little too short, as it only extends about 2 inches into the roast chamber. This would bias the reading towards ET. I think I will get a little bit longer one to try out. Once I get the shrouding on, I think I will be able to hear the cracks. I have a video on my phone, but it died. I promise a detailed video as soon as possible. |
|
|
|
| scotthal |
Posted on 09/16/2015 12:15 AM
|
|
Newbie Posts: 44 Joined: July 12, 2006 |
Q: initial green bean load weight? Am curious - I've never pushed a bake-a-round past ~600gm; my (hacked) prototypes were volume (not heat) limited.
Food for thought; coffee for concentration
|
|
|
|
| alexcampbell |
Posted on 01/19/2016 8:37 AM
|
|
Newbie Posts: 42 Joined: December 16, 2013 |
This is a continuation of my thread in the "Building a roaster" forum. I am having some very FB specific issues and this seems to be a way more active forum. http://forum.home...ad_id=4629 So.... several months and about a dozen roasts later, I have some observations and learnings. 1) The thermocouple location plays a way bigger role than I could have imagined. I have a 4 inch long thermocouple that only sticks about 1.5 inches into the RC from the bottom. The BT measurement is wildly inconsistent from batch to batch with an estimated error between 25 and 50 degrees F. My thoughts are that it is too heavily influenced by the ET. I have tried a 6 inch TC, but it was too slow to react, so I have ordered a new one. I will see if that helps. 2) The MAX31855 has a really annoying cold junction compensation that can't be bypassed causing huge errors as well. Living in Canada, I have been roasting in my garage with the door open. I am essentially using a hacked TC4 type setup. When the ambient temperature is only 42 in my roasting environment, the MAX31855 tried to incorrectly compensate by lowering the reported value. I used a cup of hot water as a control and hooked up 2 TCs. I then used a shot of electronic duster to chill the MAX31855. When the chip reached 42F, the temperature error was 30F. This is a pretty huge deal and potentially a deal breaker for using this particular chip. If I had it mounted in my roaster and it got really warm, it would report a much warmer temperature. It is also not a linear relationship, making it harder to compensate for in code. You can pull an internal temp off of the chip using code, so I am hoping to reverse engineer the compensation using the datasheet. Otherwise, the roaster works flawlessly. With a 42F ambient temp, the 3400W element does not break a sweat roasting 1LB. It usually sits at about 70% duty cycle. I will post some more photos and videos soon with some more information about the build. I am currently learning CAD and hope to make a CNC machined version of this roaster in the future. |
|
|
|
| LongLeafSoaps |
Posted on 01/19/2016 10:05 AM
|
|
1/4 Pounder Posts: 167 Joined: August 09, 2015 |
Quote JETROASTER wrote: Very nice looking machine coming along!! Nice innovations as well. In the pursuit of "Bad-Ass", consider looking through the Exhaust/Recirculation category. Lots of choices. 1.5", 2",3"...and beyond. Great options for V-clamps and flanges on the same order as the sanitary fittings. Tubing in aluminum and stainless (304). Polished straits, bends , turndowns. Really sexy stuff for relatively cheap. I picked up two cutout valves at $50.00ea. Boost actuated (@ roughly15psi). They're also available in vacuum actuated or electric. The valve seat is really tight, all stainless, and can be had as naturally open or closed. Good luck with your build. It looks awesome. Cheers, Scott Sexy is right! What an awesome little manifold! Carpe Diem With Coffee
|
|
|
|
| LongLeafSoaps |
Posted on 01/19/2016 10:10 AM
|
|
1/4 Pounder Posts: 167 Joined: August 09, 2015 |
Quote alexcampbell wrote: Must not require removing any parts of roaster to dump Dumping must not be clunky I love your design overall, but especially love the bean dump design! Bravo, very neat and clever 
Carpe Diem With Coffee
|
|
|
|
| alexcampbell |
Posted on 04/12/2018 5:26 PM
|
|
Newbie Posts: 42 Joined: December 16, 2013 |
I have made a video about the roaster design, build and operation. Missed in the video is that I use a 220V plug for the heater and a 110V for the blower. |
|
|
|
| greencardigan |
Posted on 04/13/2018 2:02 AM
|
 1 1/2 Pounder Posts: 1185 Joined: November 21, 2010 |
Thanks for sharing the video! I'm not sure how I've missed your roaster previously! What weight of green beans were being roasted in the vid? |
|
|
|
| renatoa |
Posted on 04/13/2018 3:20 AM
|
|
Administrator Posts: 3010 Joined: September 30, 2016 |
"I wasn't able to find a cone shape there was either a reasonable price or that was available online... " Check this post and the followup: https://forum.hom...post_64826 |
|
|
|
| alexcampbell |
Posted on 04/13/2018 8:21 AM
|
|
Newbie Posts: 42 Joined: December 16, 2013 |
That cyclone is really neat! I think I would probably need 2, but it might be interesting to set them up in parallel like a Dyson. Thanks for sharing. |
|
|
|
| alexcampbell |
Posted on 04/13/2018 8:22 AM
|
|
Newbie Posts: 42 Joined: December 16, 2013 |
The weight of the beans in the video is somewhere around 500g. It is the bleeding edge of what the machine can handle. |
|
|
|
| alexcampbell |
Posted on 05/14/2018 7:18 PM
|
|
Newbie Posts: 42 Joined: December 16, 2013 |
I need some help from the coffee roasting community. My coffee roaster has made the finals in a Canadian nation-wide invention competition. I have made the final 20 out of over 600 entries; now it is in online voting. The contest is by Princess Auto (basically Canadian Harbour Freight). If you would please take 30 seconds out of your day to vote and share to vote. http://ultimatefi...itouter.ca My project is about 6 rows down. Look for "Alex Campbell". As a bonus, there are some great shots and a video of my roaster. Each member of the public can vote daily. Thanks for giving a fellow coffee roaster some help!! Edited by JackH on 05/15/2018 6:12 AM |
|
|
|
| renatoa |
Posted on 01/14/2020 2:40 AM
|
|
Administrator Posts: 3010 Joined: September 30, 2016 |
We have an update  |
|
|
|
| jessep |
Posted on 01/14/2020 2:51 PM
|
|
Newbie Posts: 33 Joined: January 05, 2019 |
Is that you? I just watched that from the Facebook group. Very cool work, similar to where I'd like to end up eventually at least. I really like the bean exit chute and that cyclone separator. I've been all over the internets trying to find one that doesn't cost a fortune. Turns out spray driers use them, but they aren't cheap... Nice! |
|
|
|
| renatoa |
Posted on 01/14/2020 3:14 PM
|
|
Administrator Posts: 3010 Joined: September 30, 2016 |
I am not the author, just updated here with this recent video. There are ready made cyclone separators for less than $15, good for up to 1 kg roasters, check my posts. |
|
|
|

| Jump to Forum: |
Similar Threads
| Thread | Forum | Replies | Last Post |
|---|---|---|---|
| Skywalker roaster mods | Other Roasters | 303 | 04/25/2024 8:52 PM |
| Kaleido Roaster PID parameters | Roasting Coffee | 2 | 04/22/2024 1:40 AM |
| Skywalker, the ALM chinese one pound roaster | Other Roasters | 215 | 04/02/2024 1:48 AM |
| Coffee Crafters Fluid Bed Coffee Roasters | JAVA TRADING COMPANY | 4 | 03/29/2024 9:41 AM |
| My first popcorn mod roaster (vahegan) | Fluidbed Roaster | 48 | 03/24/2024 12:04 PM |
Powered by PHP-Fusion Copyright © 2024 PHP-Fusion Inc
Released as free software without warranties under GNU Affero GPL v3
Designed with ♥ by NetriXHosted by skpacman