Login
Shoutbox
You must login to post a message.
renatoa
07/26/2024 3:49 PM
Bill grubbe and Jk, 

allenb
07/26/2024 5:15 AM
Spiderkw Welcome to HRO!


renatoa
07/24/2024 8:31 AM
ramiroflores and John123,

 ?
?

 ?
?renatoa
07/21/2024 1:18 AM
 , Luislobo
renatoa
07/19/2024 11:28 AM
Koepea, 

Forum Threads
Newest Threads
Skywalker roaster modsBackground Roast Iss...
Hello from Arkansas
TC4ESP
Green coffee reviews
Hottest Threads
| Skywalker roaster... | [375] |
| TC4ESP | [115] |
| War on Farmers by... | [47] |
| Adventures in flu... | [26] |
| Hello! (soon) Roa... | [17] |
Donations
Latest Donations
dmccallum - 10.00
JackH - 25.00
snwcmpr - 10.00
Anonymous - 2.00
Anonymous - 5.00
dmccallum - 10.00
JackH - 25.00
snwcmpr - 10.00
Anonymous - 2.00
Anonymous - 5.00
Users Online
Guests Online: 5
Members Online: 0
Total Members: 8,393
Newest Member: Bill grubbe
Members Online: 0
Total Members: 8,393
Newest Member: Bill grubbe
View Thread
Who is here? 1 guest(s)
|
Transparent Fluid Bed Design
|
|
| CK |
Posted on 12/09/2018 4:04 PM
|
|
1/2 Pounder  Posts: 252 Joined: December 07, 2018 |
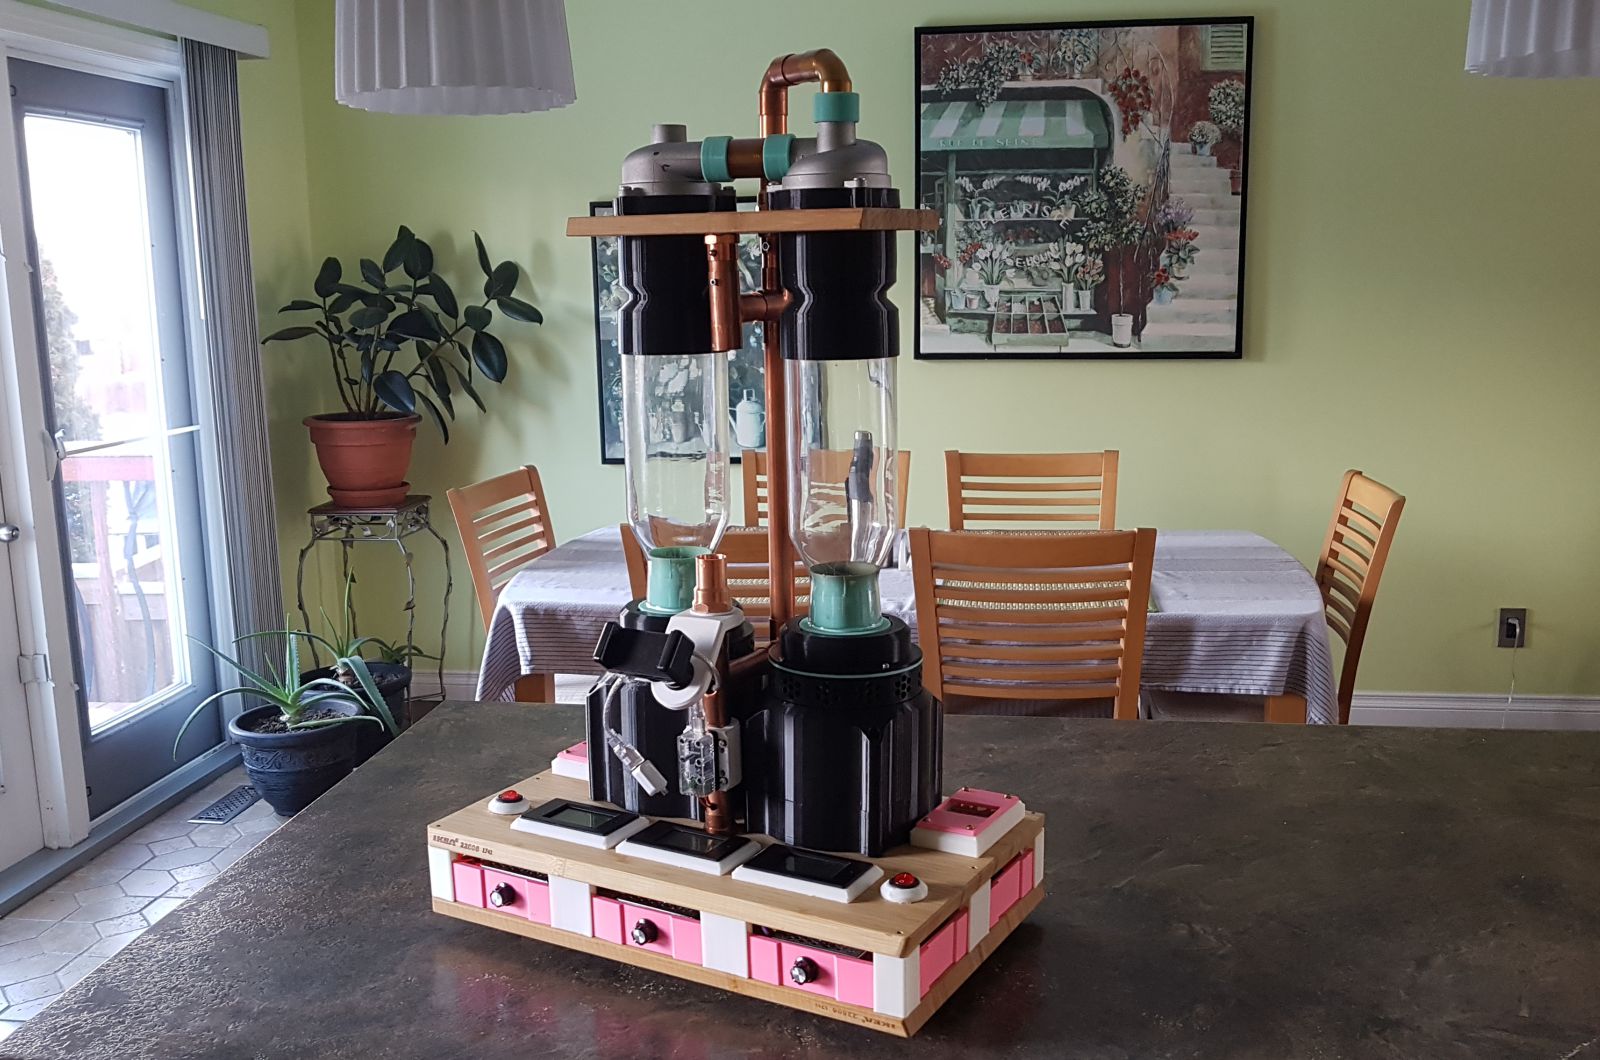
Hello fellow coffee roasters. Like many of you, I started roasting using modified hot air poppers. That was about 4 years ago, but I found the quality, quantity and controls quite limiting. It also took many batches and a long time to roast a kilo... an upgrade was needed. This fully manual 350g roaster was first designed using 3D CAD software. When the design felt right, I sourced for parts, 3D printed custom pieces, and hand crafted the current edition. Overall R&D took about a year, with multiple motors, iterations and materials being used and discarded. The specs for the build are; 3 x 4000w SCR controllers 2 x 1400w heat elements (taken from 2 hot air poppers) 1 x 240w stick vac blower I'll try to keep with the thread and any updates, for example when I have a new version running an Arduino with TC4. A video is coming too, but I'm still learning the video editing software...
CK attached the following image:
Edited by CK on 01/09/2019 12:57 PM |
|
|
|
| greencardigan |
Posted on 12/09/2018 6:39 PM
|
|
1 1/2 Pounder  Posts: 1185 Joined: November 21, 2010 |
Hey, it looks quite interesting! Looking forward to the video. |
|
|
|
| renatoa |
Posted on 12/10/2018 5:36 AM
|
|
Administrator  Posts: 3104 Joined: September 30, 2016 |
The cyclones mounting position seems strange for me, the airflow seems reversed, how will they work ? Where goes the chaff in this scenario ? :need confused/puzzled emoticon:  |
|
|
|
| CK |
Posted on 12/10/2018 8:46 AM
|
|
1/2 Pounder  Posts: 252 Joined: December 07, 2018 |
There is only one active cyclone on the left side. The other one was cut (right side) in half and you only see the top cap of the unit, there is no bottom. This was done so I could use the same high temperature 3D printed mounts for both sides... a little more cost, but keeps it looking symmetrical. |
|
|
|
| renatoa |
Posted on 12/10/2018 9:52 AM
|
|
Administrator  Posts: 3104 Joined: September 30, 2016 |
Still... how is the air path, and where goes the chaff is a mystery for me... I guess you want to implement some kind of air recirculation, but not get it... the big picture. For those interested into air recirculation without any headaches, filtering and smoke /catalytic burner, I might have a brilliant idea...  |
|
|
|
| CK |
Posted on 12/10/2018 10:12 AM
|
|
1/2 Pounder  Posts: 252 Joined: December 07, 2018 |
I'm at work now, but later I will provide detailed build images, and a video that shows the machine function throughout the roast cycle. This unit doesn't have air recirculation. It can roast a 350g batch to city+, while spending about 425 watts of power from the utility company. |
|
|
|
| renatoa |
Posted on 12/10/2018 11:01 AM
|
|
Administrator  Posts: 3104 Joined: September 30, 2016 |
That's really impressive, eager to see this achievement, almost unobtainium, until now I thought I am the least power hungry, with 900 W for 500 grams, in a TO setup. Or, maybe you mean 425 Watt-hour, which is more realistic, but has a different sense, assuming 10 minutes roast time it equates to 425 * 60 / 10 = 2550 W power consumption. |
|
|
|
| CK |
Posted on 12/10/2018 11:48 AM
|
|
1/2 Pounder  Posts: 252 Joined: December 07, 2018 |
Your 2nd paragraph is correct... about 6 batches an hour using around 2550 watts.
Edited by CK on 12/12/2018 6:58 AM |
|
|
|
| CK |
Posted on 12/12/2018 7:18 PM
|
|
1/2 Pounder  Posts: 252 Joined: December 07, 2018 |
A video of the transparent roaster during its first 300g test. Edited by CK on 12/25/2018 5:06 PM |
|
|
|
| Clay |
Posted on 12/12/2018 9:02 PM
|
|
Newbie  Posts: 13 Joined: December 08, 2008 |
Nicely done, cool design.
ECM Synchronika
Ceado E6X Bunn VPR APS Bread Machine Heat gun formerly, here to find a better mouse trap. |
|
|
|
| renatoa |
Posted on 12/13/2018 12:38 AM
|
|
Administrator  Posts: 3104 Joined: September 30, 2016 |
D'oooohhh... dumb me... I thought you roast in both sides, that why I was puzzled about air/chaff circulation...  This was the source of confusion: "2 x 1400w heat elements" Does the RC cover, taken from a second cyclone, requires a cut job, or you succeeded to dismount the cyclone in the two component parts ? |
|
|
|
| greencardigan |
Posted on 12/13/2018 4:12 AM
|
|
1 1/2 Pounder  Posts: 1185 Joined: November 21, 2010 |
Impressive. It looks like a very well thought out design! |
|
|
|
| CK |
Posted on 12/13/2018 5:19 PM
|
|
1/2 Pounder  Posts: 252 Joined: December 07, 2018 |
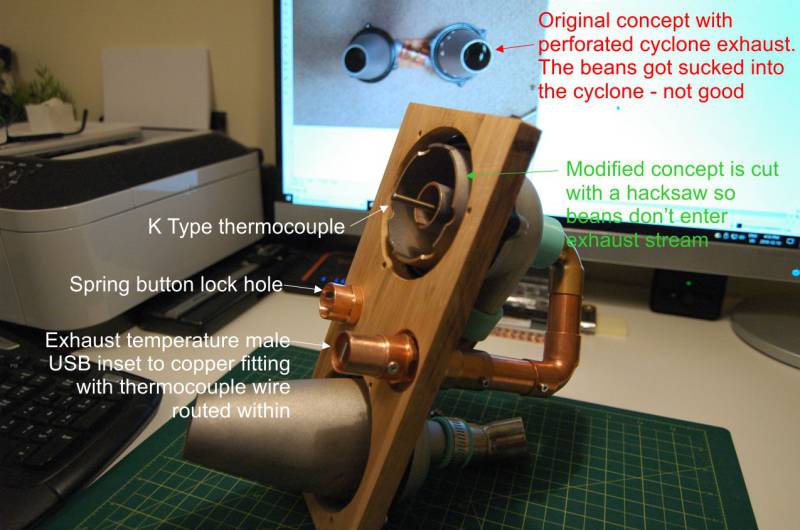
Quote Does the RC cover, taken from a second cyclone, requires a cut job, or you succeeded to dismount the cyclone in the two component parts ? The aluminum cyclone is one piece and needed cutting. Here's an image of the underside of the RC and CC lid with the solution that worked in this setup.
CK attached the following image:
Edited by CK on 12/15/2018 3:53 PM |
|
|
|
| CK |
Posted on 12/13/2018 5:39 PM
|
|
1/2 Pounder  Posts: 252 Joined: December 07, 2018 |
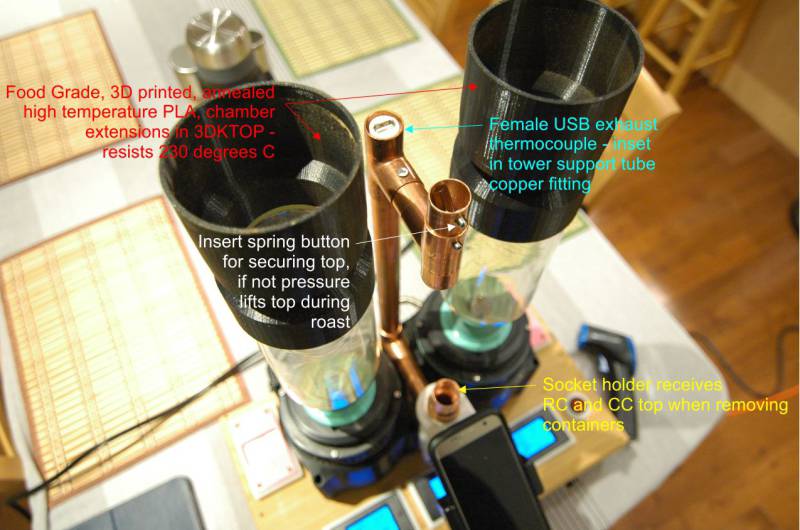
Here's a view of the connection point for the RC and CC top.
CK attached the following image:
Edited by CK on 12/15/2018 3:54 PM |
|
|
|
| allenb |
Posted on 12/13/2018 6:42 PM
|
|
Administrator  Posts: 3869 Joined: February 23, 2010 |
Very nice indeed! I really like the spouting action. It stays very fluid throughout the roast with a large % of the bean mass being lifted which is hard to accomplish with many builds. Let us know how the roasts turn out. 1/2 lb and 1 lb drum, Siemens Sirocco fluidbed, presspot, chemex, cajun biggin brewer from the backwoods of Louisiana
|
|
|
|
| CK |
Posted on 12/13/2018 6:57 PM
|
|
1/2 Pounder  Posts: 252 Joined: December 07, 2018 |
Thank you allenb. The roasts turn out really good compared to my old hot air popper roasts. (No comparison really) This machine allows me to draw out the profile in a proper way... slowly, albeit manually at present. I have to say there is a lot to learn about roasting, and what is best for my bean varieties from Peru. Any suggestions? The spouting action was made better by using SS mesh from a MAF (mass air flow) from a spare car part. Very fine wire and strong. This allowed me to narrow the inlet with minimal resistance, upping the air velocity, and imparting more kinetic energy to a focused point in the center of the bean mass. The limits of the food grade high temperature silicone in green is supposed to be stable to 450F, but I called the company and a technician/engineer said it should be fine with fluctuations to just about 500F. The inlet area part may be re-cast using a lead-free pewter that is good to a higher temp to allow more versatility in future roasts. |
|
|
|
| Wiz Kalita |
Posted on 12/14/2018 3:59 AM
|
|
Newbie  Posts: 49 Joined: August 06, 2018 |
Very nice! Looks both beautiful and user friendly. |
|
|
|
| renatoa |
Posted on 12/14/2018 5:20 AM
|
|
Administrator  Posts: 3104 Joined: September 30, 2016 |
Honeycomb MAF mesh is looking cool  http://www.saxonp...us120.html |
|
|
|
| snwcmpr |
Posted on 12/14/2018 3:27 PM
|
|
1 1/2 Pounder  Posts: 925 Joined: March 03, 2011 |
Nice job. 6 batches an hour? 10 minute roast, including unload/load? --------------
Backwoods Roaster "I wish I could taste as well as I wish I could roast." As Abraham Lincoln said "Do not trust everything you read on the internet". |
|
|
|
| CK |
Posted on 12/14/2018 9:55 PM
|
|
1/2 Pounder  Posts: 252 Joined: December 07, 2018 |
Quote 6 batches an hour? 10 minute roast, including unload/load? Not really. That was one example of roast time to show power consumption. It really depends on the profile that is desired... long roast or short roast. This is controlled manually with the POT's for desired heat level. There is also a few minutes (2-3) to cool in the RC, and say a couple minutes for unloading/loading and assembling the RC. So with that profile, 4 complete batches per hour would be reasonable. Thanks. |
|
|
|
| CK |
Posted on 12/17/2018 10:02 PM
|
|
1/2 Pounder  Posts: 252 Joined: December 07, 2018 |
Quote Hey, it looks quite interesting! Looking forward to the video. The video has been updated. Here's a picture of what internals are inside the body.
CK attached the following image:
Edited by CK on 12/20/2018 2:50 PM |
|
|
|
| CK |
Posted on 12/20/2018 2:55 PM
|
|
1/2 Pounder  Posts: 252 Joined: December 07, 2018 |
Here's a view of the air passage holes with duct work removed.
CK attached the following image:
|
|
|
|
| CK |
Posted on 12/20/2018 3:35 PM
|
|
1/2 Pounder  Posts: 252 Joined: December 07, 2018 |
This is the top side taken apart to insulate the heater. Without ceramic insulation the regular PLA plastic covers melt/deform easily. I did experiment with high temp 3DK TOP PLA filament. It is food grade, and can withstand temps to 230C, however, when annealed, it shrinks about 3-4% which makes it a challenge to design to specification.
CK attached the following image:
Edited by CK on 01/09/2019 2:43 PM |
|
|
|
| CK |
Posted on 12/22/2018 11:26 PM
|
|
1/2 Pounder  Posts: 252 Joined: December 07, 2018 |
Here's a video showing the custom HEPA filter on the intake side. Edited by CK on 03/17/2019 1:45 PM |
|
|
|
| greencardigan |
Posted on 12/23/2018 3:37 AM
|
|
1 1/2 Pounder  Posts: 1185 Joined: November 21, 2010 |
Great info! Can you tell us more about the logging setup you are using? It looks like a thermocouple connected to a tablet? And what are the three displays for? |
|
|
|
| Jump to Forum: |
Powered by PHP-Fusion Copyright © 2024 PHP-Fusion Inc
Released as free software without warranties under GNU Affero GPL v3
Designed with ♥ by NetriXHosted by skpacman


