
Login

Shoutbox
You must login to post a message.
renatoa
07/26/2024 3:49 PM
Bill grubbe and Jk, 
allenb
07/26/2024 5:15 AM
Spiderkw Welcome to HRO!

renatoa
07/24/2024 8:31 AM
ramiroflores and John123,

 ?
?
?renatoa
07/21/2024 1:18 AM
 , Luislobo
renatoa
07/19/2024 11:28 AM
Koepea,
Forum Threads
Newest Threads
Skywalker roaster modsBackground Roast Iss...
Hello from Arkansas
TC4ESP
Green coffee reviews
Hottest Threads
| Skywalker roaster... | [375] |
| TC4ESP | [115] |
| War on Farmers by... | [47] |
| Adventures in flu... | [26] |
| Hello! (soon) Roa... | [17] |
In Memory Of Ginny

Donations
Latest Donations
dmccallum - 10.00
JackH - 25.00
snwcmpr - 10.00
Anonymous - 2.00
Anonymous - 5.00
dmccallum - 10.00
JackH - 25.00
snwcmpr - 10.00
Anonymous - 2.00
Anonymous - 5.00
Users Online
Guests Online: 5
Members Online: 0
Total Members: 8,394
Newest Member: Bill grubbe
Members Online: 0
Total Members: 8,394
Newest Member: Bill grubbe
View Thread
Who is here? 1 guest(s)
 My first roaster ever - a very cheap fluid bed
|
|
| rk27 |
Posted on 08/08/2020 11:15 AM
|
 Newbie  Posts: 12 Joined: July 27, 2020 |
Hi, Many thanks to this community and people who share their builds. I was about to build a roaster after I found some videos on YouTube - sifters, airguns, bread machines... and at one point I found roastuino project with RC made of french press. So I was looking for a proper french press to buy and replicate this project, but I started to look for other glassware and found that Carafe from IKEA is better because of its reduced bottleneck. This is how I found this forum and amazing build by CK, Linnaeus along with many others. My attempt is not that solid though. I just wanted to build a kind of proof of concept. And it works. Now I need to learn how to roast in a proper way. Maybe later I?ll switch to Arduino and Artisan software. Currently maximum capacity is 300 grams. I use 3.4 kW heating element and 1 kW air blower. BOM is available at https://docs.goog...EZ8fc/edit Total cost is under $100 Videos of beans load tests https://yadi.sk/d..._VcMfFNeRA
rk27 attached the following images:


Edited by JackH on 08/08/2020 2:52 PM |
|
|
|
| JackH |
Posted on 08/08/2020 2:53 PM
|
 Administrator Posts: 1809 Joined: May 10, 2011 |
Nice work on the roaster! I corrected one of your photos and turned it 90deg. ---Jack
KKTO Roaster. |
|
|
|
| mtbizzle |
Posted on 08/08/2020 4:36 PM
|
|
1/4 Pounder  Posts: 101 Joined: April 22, 2020 |
That is a neat roaster! Thank you for adding the parts list too -- some one may find it very useful. And it also helps me learn some. Unfortunately I don't think exact parts list would work in USA, due to voltage difference (120 - 220).. I wonder if there are easy swaps for U.S. voltage.
Edited by mtbizzle on 08/12/2020 7:09 PM Roast: Kaldi wide, SR800 + projects
Grind: Lab sweet, Bentwood, giota w/ MP burrs, Commandante Pull: Decent, La Pavoni, Elektra Microcasa a Leva, Faemina anno 60, Kim Express |
|
|
|
| rk27 |
Posted on 10/19/2020 2:38 PM
|
|
Newbie Posts: 12 Joined: July 27, 2020 |
Thanks guys. Having roasted 3-4 kilos of Burundi I decided to upgrade. The main reason was to get rid of brushed motor which plastic housing didn't smell well until I thoroughly washed it. I also don't like brushes as they require to have a filter to catch small carbon particles at the exhaust. So, I switched to small DC18V 380W motor from a cordless vacuum. It ships with PWM controller board. The second reason was the addition of telemetry and Artisan to track roasting process. For that I ordered TC4+ and bluetooth board. And these gave me not just telemetry but also control over the heating element and fan. Finally, I printed new enclosure for the motor and almost ready to roast. But then it comes understanding that profiling is not an easy thing at all. I was initially thinking that ET probe in fluidbed roaster should sit at the heating element exit and therefore PID SV must be set to the target temperature where I want my beans to be at the end of the roasting process. Although I realize that it could introduce too much heat to the beans. Now after looking at other builds I see that originally ET stands for environmental temp, I thought it is exhaust. In a drum roaster ET probe is actually inside the drum, and for a fluidbed roaster ET probe usually sits on top of the exit from the roasting chamber. For BT probe in a future I'll probably try to add IR sensor like some other people did in their builds. For now I drilled small hole in my third ikea carafe (which I also finally broke and now I don't roasting chamber...) almost the same way as CK did, unfortunately I could not source those magnets, so I stick with a bolt-and-nut approach. Well, I'm now thinking about to use BT for PID which I don't think is right unless I start with lower SV, as for ET I'll put it on top of the carafe. I believe it will give me more understanding of the process and some food for the future changes. But the first thing now is to get another couple of those ikea carafes to start testing it. Some videos of a new build available here https://yadi.sk/d/b5qg_VcMfFNeRA?w=1
rk27 attached the following images:


Edited by rk27 on 10/19/2020 3:19 PM |
|
|
|
| rk27 |
Posted on 04/19/2021 2:33 PM
|
|
Newbie Posts: 12 Joined: July 27, 2020 |
well, like many other people I'm looking for a bean dump solution. I wonder if someone ever tried to use a sink drain with lever? it's made of brass and requires some modifications, such as replacing bung with mesh that sits on top of some sort of a shaft, also replacing all gaskets to heat resistant ones. but still it seems to be a good fit for beans discharge. what do you think? also worth checking if brass would be safe for this type of operation
rk27 attached the following image:

|
|
|
|
| allenb |
Posted on 04/19/2021 5:40 PM
|
 Administrator Posts: 3869 Joined: February 23, 2010 |
Hi rk, give it a try, it might turn out to be a good means of dumping a fluidbed. Let us know how things turned out using BT for SV?
1/2 lb and 1 lb drum, Siemens Sirocco fluidbed, presspot, chemex, cajun biggin brewer from the backwoods of Louisiana
|
|
|
|
| renatoa |
Posted on 04/20/2021 3:03 AM
|
|
Administrator Posts: 3104 Joined: September 30, 2016 |
Building a FB sampler for a fellow, after many headbanging how to measure reliable temperatures in such tiny 50 grams mass of beans, we gave up, and I developed a new "PID" mode, labelled P_on_S = Proportional on setpoint (Set Value). Other said, heater power % is driven mainly by profile set value, and a small, maximum 5%, correction from an integrative term, computed from the very aproximative measurement of the BT mixed with a lot of hot air specific to FB machines. The formula of output power of this controller is: HTR% = MIN_OT1 + kP * SV + Ki term MIN_OT1 is a minimum value of power required at start to ensure the preheat of the RC to about 100 C degrees, for our machine was 24% Kp was about 0.3, you can compute this value if you have a clue of the output power in the first crack moment. With these values, at first crack, assumed in the 200 C degrees ballpark for set value, the output power was 24 + 0.3 * 200 = 84%. On top of this value the integrative term could bring a correction of some percents, plus or minus. The results were better than any other BT or ET driven method we tried so far. If interested to try this, I can share the modified PID library. Edited by renatoa on 04/24/2021 8:47 AM |
|
|
|
| SkipG |
Posted on 04/24/2021 7:46 AM
|
|
Newbie Posts: 11 Joined: April 16, 2021 |
Quote renatoa wrote: Building a FB sampler for a fellow, after many headbanging how to measure reliable temperatures in such tiny 50 grams mass of beans, we gave up, and I developed a new "PID" mode, which I labelled Proportional on set value (P_on_S). Other said, heater power % is driven mainly by set value, and a small, maximum 5%, correction from an integrative term, computed from the very aproximative measurement of a BT mixed with a lot of hot air. The formula of output power of this controller is: HTR% = MIN_OT1 + kP * SV + Ki term MIN_OT1 is a minimum value of power required at start to ensure the preheat of the RC to about 100 C degrees, for our machine was 24% Kp was about 0.3, you can compute this value if you have a clue of the output power in the first crack moment. With these values, at first crack, in the 200 C degrees ballpark for set value, the output power was 24 + 0.3 * 200 = 84%. On top of this value the integrative term could bring a correction of some percents, plus or minus. The results were better than any other BT or ET driven method we tried so far. If interested to try this, I can share the modified PID library. I'm interested. Is the code specific for a particular PID? --SkipG |
|
|
|
| renatoa |
Posted on 04/24/2021 8:43 AM
|
|
Administrator Posts: 3104 Joined: September 30, 2016 |
Is a fork of Brett PID library used in TC4 |
|
|
|
| rk27 |
Posted on 05/04/2024 2:55 PM
|
|
Newbie Posts: 12 Joined: July 27, 2020 |
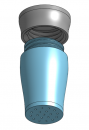
I made some updates to my roster, but nothing special except for a new device body.
rk27 attached the following images:


Edited by rk27 on 05/04/2024 3:01 PM |
|
|
|
| renatoa |
Posted on 05/05/2024 1:35 AM
|
|
Administrator Posts: 3104 Joined: September 30, 2016 |
Very nice ! I like wood bodies, of any equipment. Using the same cyclone, just out of curiosity, what gasket did you use for the outlet. ie. between the cyclone and the jar lid? For me this was the model that suited me best:https://www.plumb...seal-40mm/ |
|
|
|
| allenb |
Posted on 05/05/2024 7:39 AM
|
|
Administrator Posts: 3869 Joined: February 23, 2010 |
rk27, I'm very curious about how you remove coffee after a roast?
1/2 lb and 1 lb drum, Siemens Sirocco fluidbed, presspot, chemex, cajun biggin brewer from the backwoods of Louisiana
|
|
|
|
| rk27 |
Posted on 05/05/2024 8:03 AM
|
|
Newbie Posts: 12 Joined: July 27, 2020 |
Quote renatoa wrote: Using the same cyclone, just out of curiosity, what gasket did you use for the outlet. ie. between the cyclone and the jar lid? Good question renatoa! I simply covered all the parts with film and then sealed with heat-resistant silicone. After drying, I removed the film and got a somewhat suitable gasket. Jar lid is also sealed with silicone. |
|
|
|
| rk27 |
Posted on 05/05/2024 8:08 AM
|
|
Newbie Posts: 12 Joined: July 27, 2020 |
Quote Through the top hole. I dreamed of dumping beans from below, but did not find a simple solution. Now I insert a curved tube to the top hole and beans are blown out into the container I hold in hand. |
|
|
|
| renatoa |
Posted on 05/05/2024 8:11 AM
|
|
Administrator Posts: 3104 Joined: September 30, 2016 |
How do you stop beans to follow chaff path into the chaff collector jar ? |
|
|
|
| rk27 |
Posted on 05/05/2024 9:02 AM
|
|
Newbie Posts: 12 Joined: July 27, 2020 |
I now load no more than 150 grams of beans, the fan is at 60 percent of its power, and the heater is at 80 percent. Roasting takes about 4 minutes without any problems with the beans following the chaff path. It’s a bit of a trade off since both the blower and heater can handle 300g |
|
|
|
| HarryDog |
Posted on 05/06/2024 7:38 PM
|
 1/2 Pounder  Posts: 349 Joined: July 20, 2022 |
If you plug the second cyclone vent can you push the roasted beans out the chaff collection hole? Use a container with a vent so the air can pass out the container and trap the beans? Basket or strainer to test, 150g of beans is not too big of container. Does the Ikawa push beans into a jar, must have a vent close that opens and allows beans to fall into the jar? Never seen one apart. |
|
|
|
| dwhacks |
Posted on 06/08/2024 6:51 PM
|
|
Newbie Posts: 1 Joined: June 06, 2024 |
This is exactly what I would like to build! And I really like the look of your last revision, with the plywood and threaded rods assembly. Is the Carafe the 1L one from Ikea? the link in the BOM doesn't work for me. Also, what are the cyclones? The seem to be added after the BOM was made. Gaggiuino
|
|
|
|
| renatoa |
Posted on 06/09/2024 2:12 AM
|
|
Administrator Posts: 3104 Joined: September 30, 2016 |
Cyclones: vi.aliexpress.com...98664.html As things evolve quickly, soon will have cylons in our roasting equipment... https://en.wikipe...iki/Cylons ... and they have a plan  |
|
|
|

| Jump to Forum: |
Powered by PHP-Fusion Copyright © 2024 PHP-Fusion Inc
Released as free software without warranties under GNU Affero GPL v3
Designed with ♥ by NetriXHosted by skpacman