
Login

Shoutbox
You must login to post a message.
renatoa
07/26/2024 3:49 PM
Bill grubbe and Jk, 
allenb
07/26/2024 5:15 AM
Spiderkw Welcome to HRO!

renatoa
07/24/2024 8:31 AM
ramiroflores and John123,

 ?
?
?renatoa
07/21/2024 1:18 AM
 , Luislobo
renatoa
07/19/2024 11:28 AM
Koepea,
Forum Threads
Newest Threads
Skywalker roaster modsBackground Roast Iss...
Hello from Arkansas
TC4ESP
Green coffee reviews
Hottest Threads
| Skywalker roaster... | [375] |
| TC4ESP | [115] |
| War on Farmers by... | [47] |
| Adventures in flu... | [26] |
| Hello! (soon) Roa... | [17] |
In Memory Of Ginny

Donations
Latest Donations
dmccallum - 10.00
JackH - 25.00
snwcmpr - 10.00
Anonymous - 2.00
Anonymous - 5.00
dmccallum - 10.00
JackH - 25.00
snwcmpr - 10.00
Anonymous - 2.00
Anonymous - 5.00
Users Online
Guests Online: 5
Members Online: 0
Total Members: 8,393
Newest Member: Bill grubbe
Members Online: 0
Total Members: 8,393
Newest Member: Bill grubbe
View Thread
Who is here? 1 guest(s)
Page 1 of 2: 12
|
 My first (real) roaster
|
|
| timbarnes |
Posted on 11/08/2021 12:48 AM
|
|
Newbie  Posts: 38 Joined: October 25, 2021 |
After a couple of batches in a frying pan, and one in a flour sifter over the stove, I built a simple thing, based heavily on Larry Cotton's example, with a heat gun under a flour sifter, rotated by a 12V gear motor. The heat gun is currently unmodified, and I'm using a cheap motor controller to set the speed of the wobble disk agitator. First coffee from this roaster was drunk yesterday, and it was a very satisfying medium roast - beans from Sweet Maria's. Edited by timbarnes on 11/10/2021 12:57 PM |
|
|
|
| timbarnes |
Posted on 11/10/2021 12:58 PM
|
|
Newbie Posts: 38 Joined: October 25, 2021 |
...and here are a couple of photos.
timbarnes attached the following images:


|
|
|
|
| wbbh |
Posted on 11/11/2021 7:21 AM
|
|
Newbie Posts: 28 Joined: February 21, 2009 |
Nice! |
|
|
|
| BernardJ87 |
Posted on 11/11/2021 11:31 PM
|
|
Newbie Posts: 5 Joined: November 09, 2021 |
I'm glad you had a good time. My wife and I like sipping on our high-end coffee beverages. However, we have recently made the decision to begin saving money, and one of the most significant ways we are doing so is by reducing our coffee spending. Some of these cocktails appeal to me and I'd want to try to make them at home. I found various recipes online, but I'm still trying to figure out how to make the greatest espresso. I've heard nothing but good things about an espresso maker from a few of my acquaintances, so I've chosen to purchase one the following week. Now I'm really looking forward to it and accumulating recipes.
Edited by renatoa on 11/12/2021 3:55 AM |
|
|
|
| timbarnes |
Posted on 11/13/2021 11:20 PM
|
|
Newbie Posts: 38 Joined: October 25, 2021 |
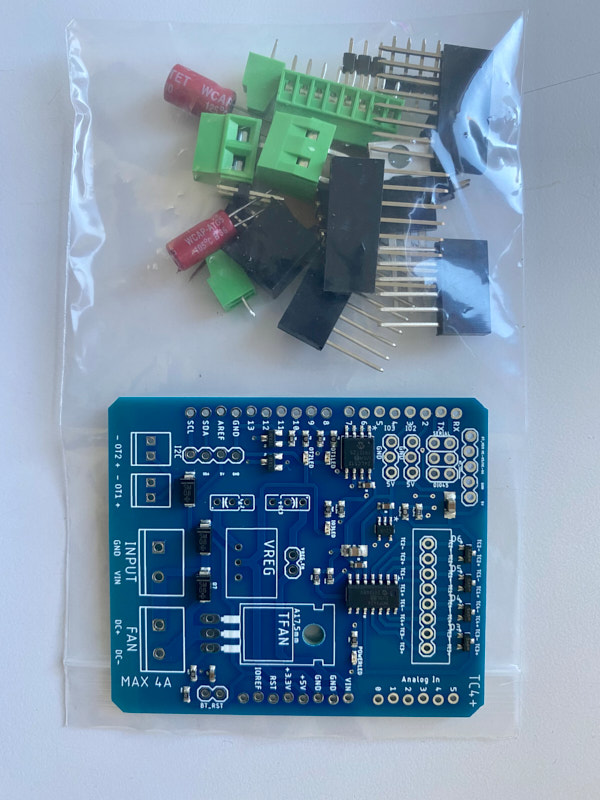
Preparing for an upgrade... This is the TC4+ kit, from Artisanal Technologies in the UK. My goal will be to have a standalone roaster operated by the TC4+ and aArduinoQ_PID via switches and potentiometers first, and then to hook up to Artisan running on a Raspberry Pi as a second step. But as Artisan is so convenient, I may get it all done at the same time. We'll see how it goes. First step is to build some hardware and put it in a box. I also need to add a second thermocouple to the roaster (Bean Temp) , and then I need to take the heat gun apart so I can separate the heating element from the fan, for independent control. Finally I should be able to integrate all the bits and have a slightly smarter roaster.
timbarnes attached the following image:
|
|
|
|
| Ploni |
Posted on 11/14/2021 4:38 AM
|
|
1/4 Pounder  Posts: 85 Joined: October 17, 2021 |
Good for you, timbarnes! Looks good. Enjoy! |
|
|
|
| timbarnes |
Posted on 11/16/2021 1:30 AM
|
|
Newbie Posts: 38 Joined: October 25, 2021 |
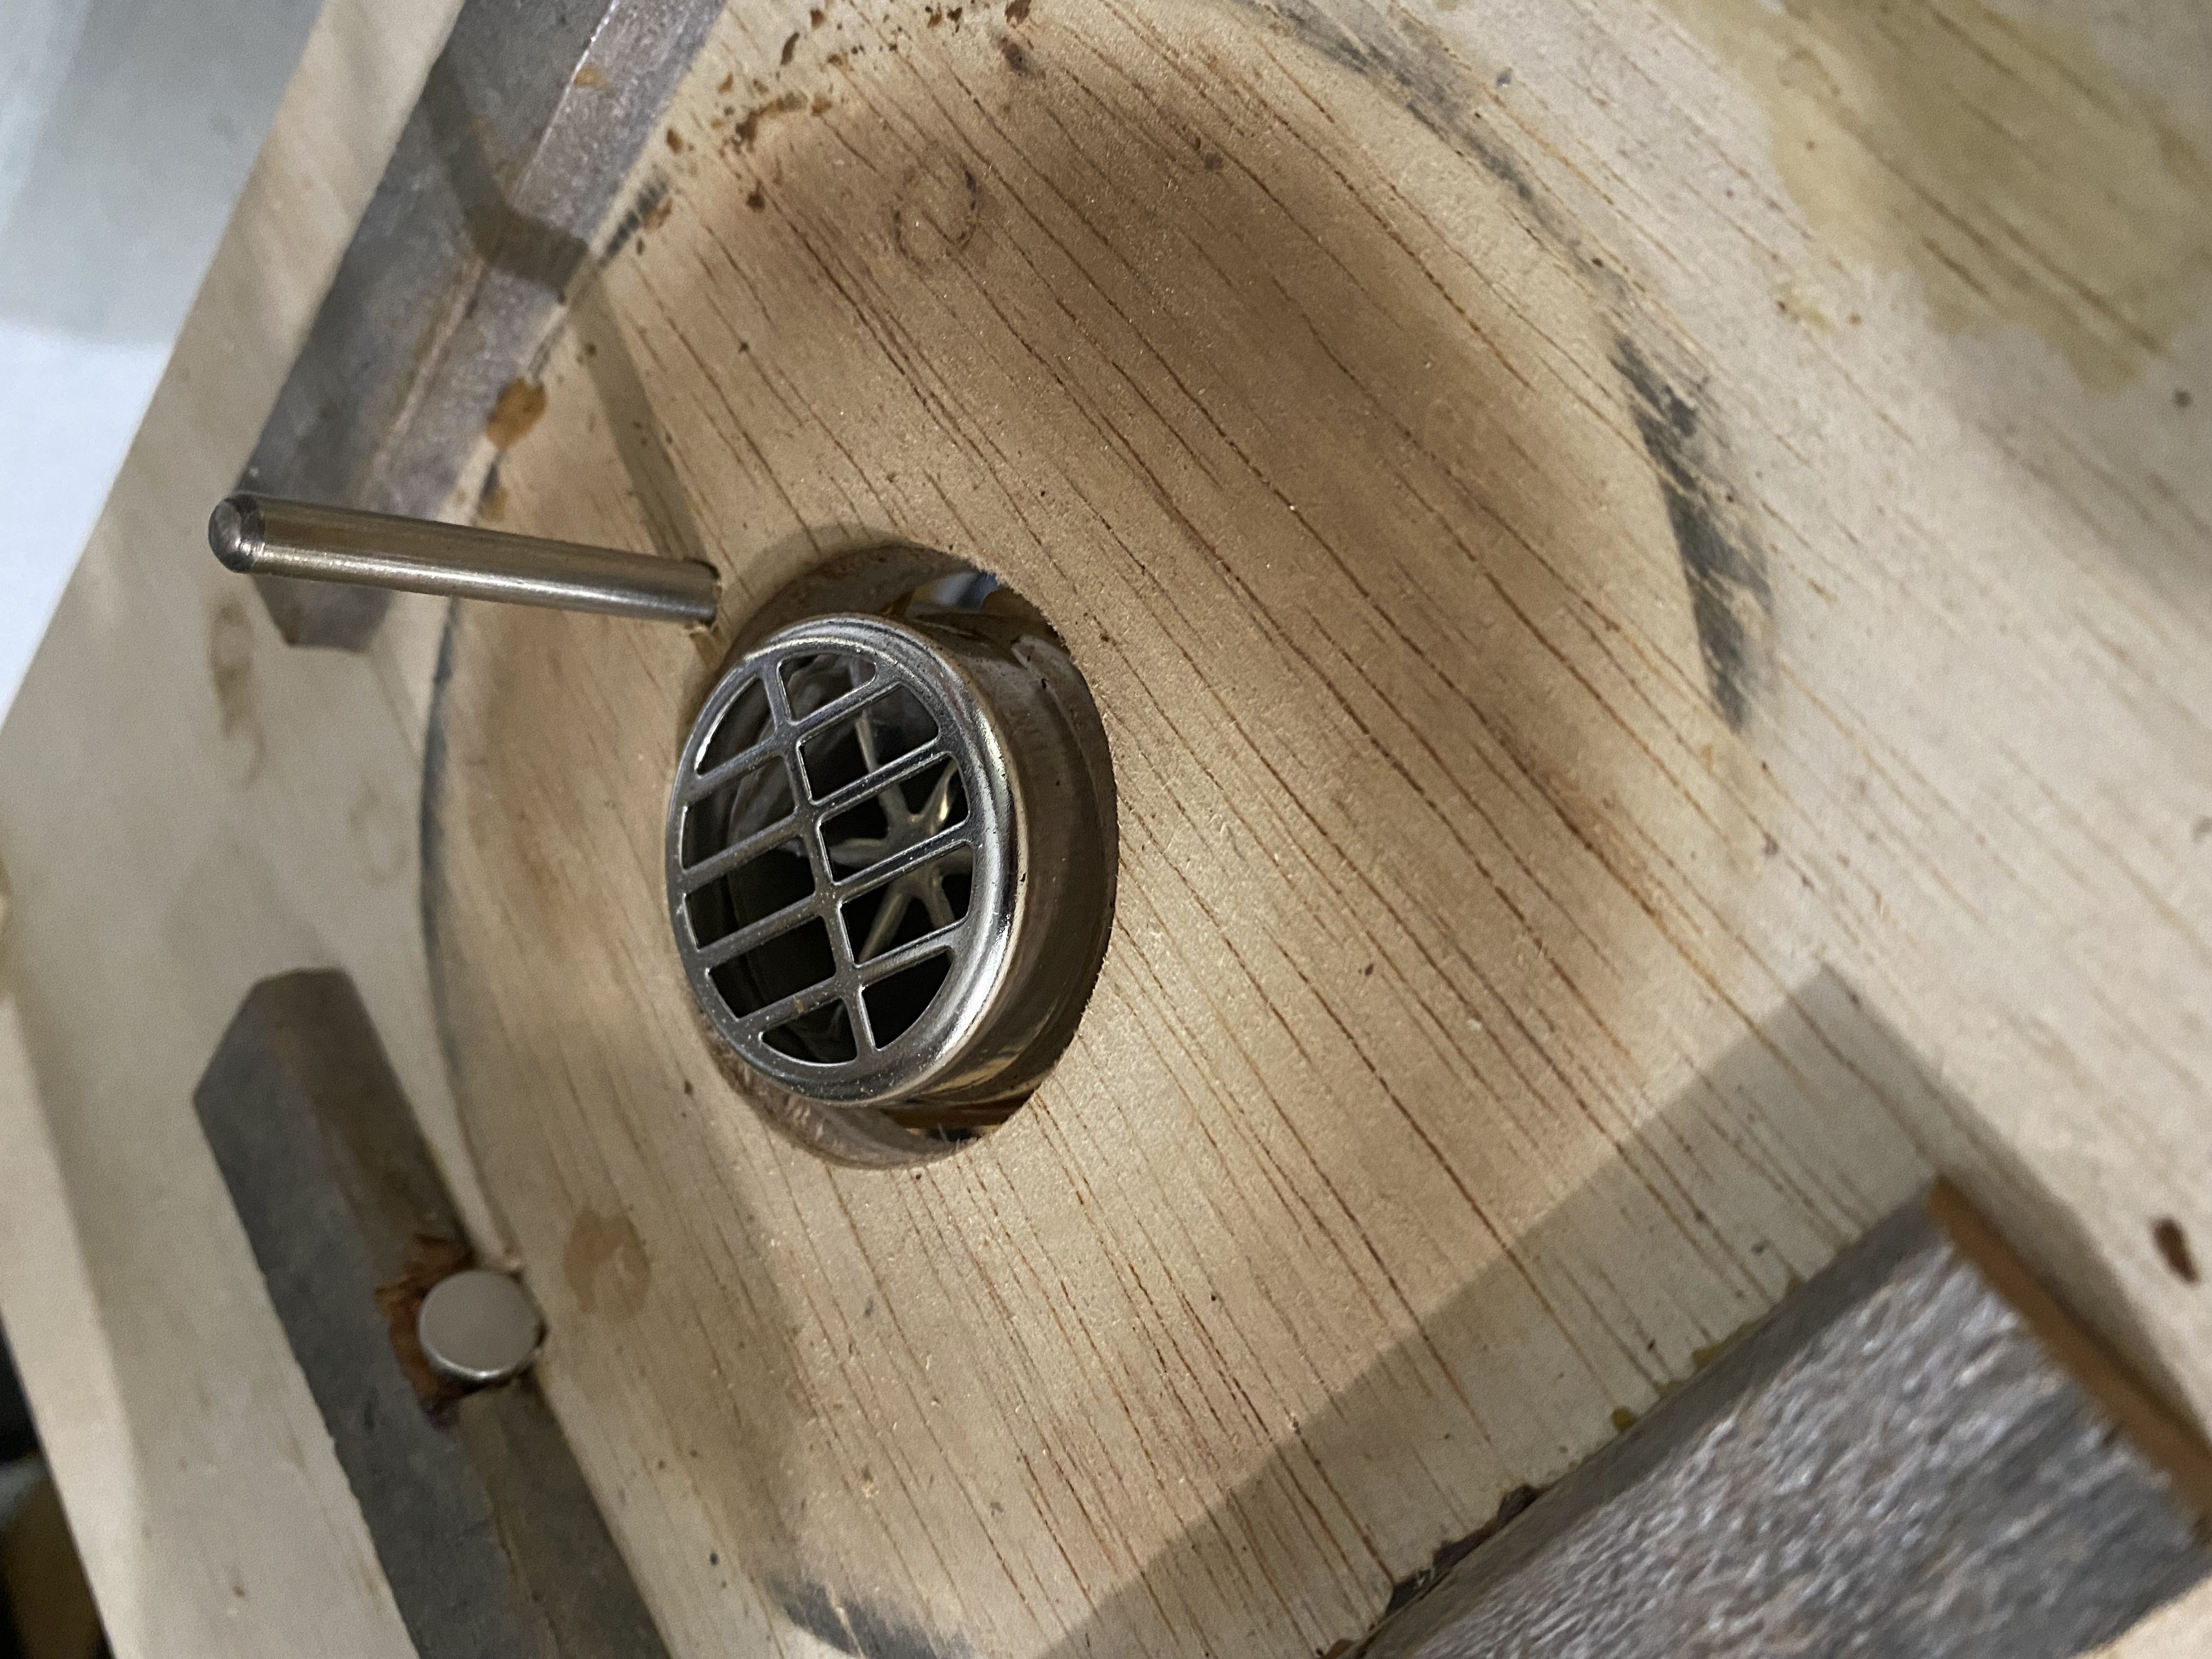
Next steps: I added a thermocouple to measure the air off the heat gun, and simply attached to a multimeter it gives me a good idea of what's going on. The low setting on my heat gun gives a temperature of about 205C, and the high temp. gives me about 265C, which I guess is pretty high for coffee. Another small mod: magnets to hold the sifter / roasting chamber in place. In the other picture you can see the follow-on - I've added a second thermocouple above / in the beans for bean temp. I'm also trying a different motor setup - the 12V motor I was using stalls with over 250g of beans, and a quick test indicates that the Black and Decker screwdriver will let me roast 350g at a time, which is about a week's supply of coffee. I haven't completed a roast yet with the follow-on components, but hope to find some time in the next couple of days.
timbarnes attached the following images:

|
|
|
|
| reesekPal |
Posted on 11/19/2021 5:18 PM
|
|
Newbie Posts: 2 Joined: October 29, 2021 |
Looks pretty good. You did a great job! |
|
|
|
| timbarnes |
Posted on 11/20/2021 1:09 AM
|
|
Newbie Posts: 38 Joined: October 25, 2021 |
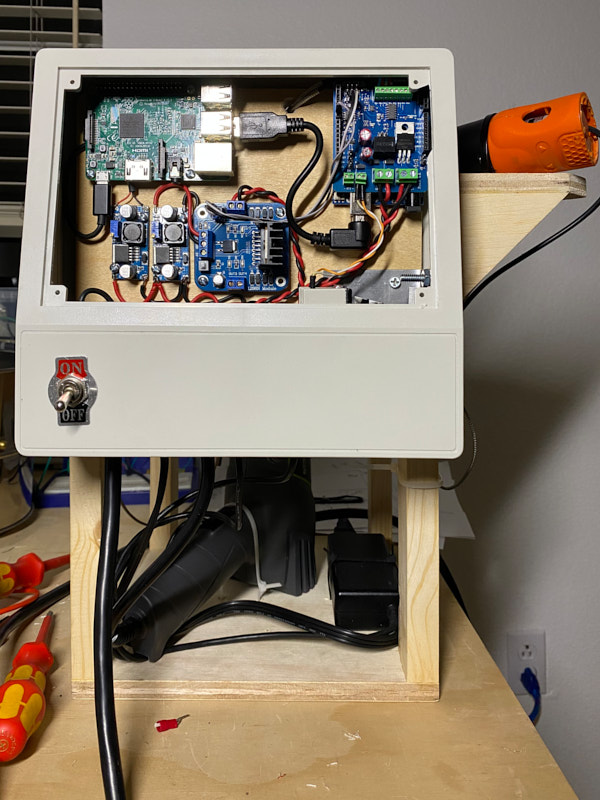
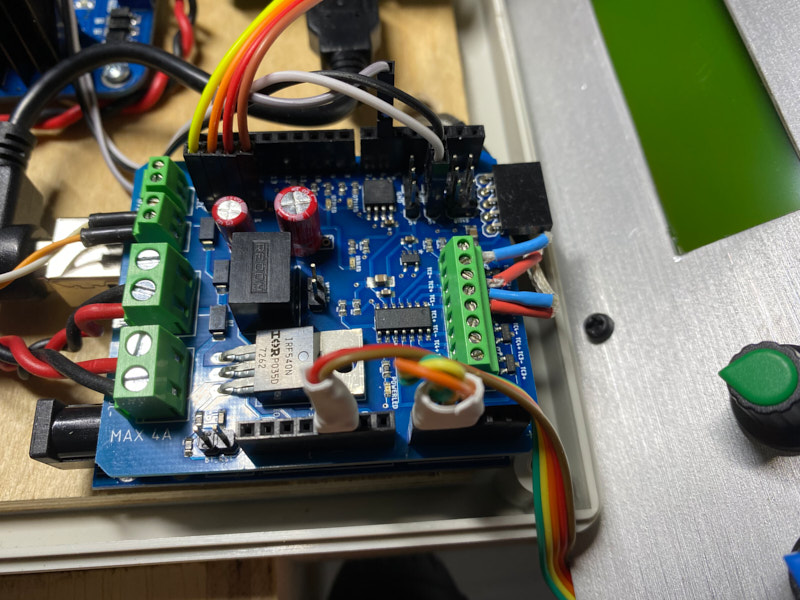
Here are some updates. I built up the TC4+ and connected it up with some other bits to give me control of the heat gun element, the heat gun fan, and an electric screwdriver (to rotate the beans). All in a box with an Arduino and a Raspberry Pi running Artisan. So far I've "dry tested" it - the manual controls work, and so does Artisan (accessed over VNC). The heater is programmed to switch off if the fan or rotator are below 50% speed. There is still a fair bit of cleanup to be done - securing cables, and maybe a bit of re-routing, but it basically works. The fan is operated by the fan control built in to the TC4+, and the rotation control uses a jellybean L298 board connected to a PWM pin. I modified the aArtisan code following renatoa's suggestion, to add an IO4 command, and support for a third potentiometer. I learned that running a heat gun on full inside the house will set off the smoke alarms (even though I couldn't smell smoke).
timbarnes attached the following images:


Edited by timbarnes on 11/30/2021 12:34 AM |
|
|
|
| renatoa |
Posted on 11/20/2021 2:09 AM
|
|
Administrator Posts: 3104 Joined: September 30, 2016 |
You should ask for the code, to save time  When I told you, was already done, not a suggestion. Good job ! |
|
|
|
| timbarnes |
Posted on 11/20/2021 8:34 AM
|
|
Newbie Posts: 38 Joined: October 25, 2021 |
Quote Thanks so much - I thought about it, but it was an opportunity to learn a bit more about C++ and Arduino libraries, so I am happy to have spent the time. I guess I could have spent the same time reviewing and understanding your code. In any case, it gave me something to do while I was waiting for parts to arrive. But either way, I appreciate your help and support. |
|
|
|
| renatoa |
Posted on 11/20/2021 9:55 AM
|
|
Administrator Posts: 3104 Joined: September 30, 2016 |
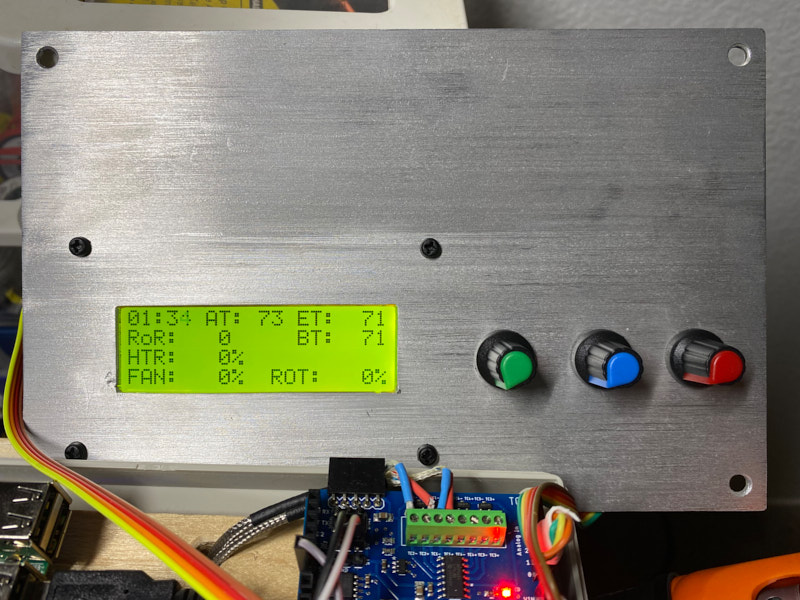
Ok, another one, maybe you find it interesting, if the remaining memory of Uno allows adding these. In the empty space above ROT:, my needs for roasting assistants led me to implement various useful info, that changes by roast phase. I have there first a dry end estimator, until dry end happens and pass, then a FC estimator, and finally, during dev phase I am showing DTR as time and %, and optionally the AUC, requested by a fellow. Having all this info on screen make the graph redundant, actually this was my design goal, to roast un-tethered. |
|
|
|
| timbarnes |
Posted on 11/20/2021 10:55 AM
|
|
Newbie Posts: 38 Joined: October 25, 2021 |
That does sound interesting. Could you share the code? In any case it would be good to compare how you do things with my hacks. I also want to be able to roast with or without Artisan. I did build a Raspberry Pi into the case so I can roast with my phone or an iPad over VNC - that way I don't need strictly to be tethered. One weakness of the current system: if I change a setting with the potentiometers, Artisan doesn't see the change. I haven't explored how the READ command in Artisan works and whether I can get settings back from the Arduino to Artisan. |
|
|
|
| renatoa |
Posted on 11/20/2021 11:39 AM
|
|
Administrator Posts: 3104 Joined: September 30, 2016 |
Should see, if the virtual device ArduinoTC4 56 is installed. This pseudo device reports to Artisan the actual OT1/OT2, aka HTR/FAN values, whatever is the method you are handling them, even by an AI that drives the roast. Will prepare an excerpt of the code, is too much buried in my code, to share as is. |
|
|
|
| timbarnes |
Posted on 11/20/2021 5:48 PM
|
|
Newbie Posts: 38 Joined: October 25, 2021 |
I do have ArduinoTC4 56 installed, and also 78 (for SV and Rotator). On more careful examination, the heater and fan values are coming through, but the rotator value is not. I write that value in logger() (from my aArtisanQ_PID version), but it's not being picked up. Looking at the source code for Artisan, there's code to read the arguments from the serial port, and interestingly the last value is read from the first argument, not the last argument. That means the last argument seems to be ignored, and is replaced by the ambient temperature. There's a comment that documents that this is the intended behavior. Looking at my Artisan display, it seems that the value that I think should show the rotation speed, is in fact showing the ambient temperature (it matches the AT value on the Arduino / TC4 display). Here's the code in question (from comm.py). The relevant line is towards the bottom, where the extraArduinoT6 variable is set to float(res[0]), rather than float(res[6]). Code Download source if 32 in self.aw.qmc.extradevices: # +ArduinoTC4_56 So I guess I can try to change the Artisan code - unless there's a better way to do it. |
|
|
|
| renatoa |
Posted on 11/21/2021 1:52 AM
|
|
Administrator Posts: 3104 Joined: September 30, 2016 |
Should read this before documenting my post in the other thread Let's have TC4 code specifics in a single place from now. |
|
|
|
| timbarnes |
Posted on 11/21/2021 11:49 AM
|
|
Newbie Posts: 38 Joined: October 25, 2021 |
I was wondering about where to post. I'll do as you suggest. Thanks so much for the quick replies! |
|
|
|
| timbarnes |
Posted on 11/22/2021 11:26 AM
|
|
Newbie Posts: 38 Joined: October 25, 2021 |
First roast yesterday with the new TC4+ / Artisan setup. Everything worked fine except that my BT thermocouple is wildly under-reporting the temperature. I think it's too far from the beans, and I didn't have a lid on the roasting chamber. The result was that first crack started when BT was reporting 125C. The roast went a lot further than I would usually because of the uncalibrated temp. curve, so I have my first full city+ roast. (I usually roast medium). I took a number of temperature readings during the roast, and have curve-fitted them to the approximate assumed temperatures. The transfer function has been added as a symbolic formula for BT. Next roast I'll add a lid and see if the compensation gets me into the right temp. range. |
|
|
|
| renatoa |
Posted on 11/22/2021 11:29 AM
|
|
Administrator Posts: 3104 Joined: September 30, 2016 |
"If your roasts aren't good enough, you BT probe isn't close enough." https://www.buzzf...get-closer |
|
|
|
| timbarnes |
Posted on 11/30/2021 12:32 AM
|
|
Newbie Posts: 38 Joined: October 25, 2021 |
Nice reference. I enjoy photography as well as coffee and electronics, but typically focus on landscape rather than street. I found that adding a mesh lid brought the BT probe temp. into alignment, and now my roasts seem to be running a lot better. A full lid traps hot air in the top of the roaster and causes under-roasting, but the mesh seems just right. I'm sure I'll have to recalibrate if I ever modify the top for chaff collection. |
|
|
|
| Coffee-ops |
Posted on 07/04/2023 6:13 PM
|
|
Newbie Posts: 3 Joined: July 04, 2023 |
Hi @timbarnes. I have added a second dc fan to the TC4+ shield design and looks like you attempted the same. Just wondering if you ever got the arduino code working with addition of a “IO4” variable to control a second dc fan via Artisan? Would you be able to share your code please and guidance of incorporating it to work with Artisan? Thanks |
|
|
|
| renatoa |
Posted on 07/05/2023 6:19 AM
|
|
Administrator Posts: 3104 Joined: September 30, 2016 |
So you need 4 (four) control channels ? OT1, OT2, IO3 and "IO4" ? Pretty crowded setup there |
|
|
|
| Coffee-ops |
Posted on 07/08/2023 7:32 PM
|
|
Newbie Posts: 3 Joined: July 04, 2023 |
The fourth is to connect an exhaust/cooling fan. I’m only currently using OT1 (heater), IO3 for DC fan. I’m hoping I can connect another DC fan and not mess around with OT2 and another board to connect an AC fan via OT2. Am I correct to assume that you can’t connect a DC fan via OT2? Do I also need to update code in Artisan to be able to operate a second dc fan? It doesn’t seem to have sufficient channels currently for TC4. |
|
|
|
| renatoa |
Posted on 07/09/2023 2:05 AM
|
|
Administrator Posts: 3104 Joined: September 30, 2016 |
To maintain usage consistency, just for the love of code "tinkering" there is no need to introduce an additional command for the fourth "IO4" fan... just modify the code of OT2, and handle them identically as IO3. Output pin for this fan can be the same defined for OT2 in user.h, but for DC use directly the GPIO pin of Arduino, not the OT2 output pin of TC4 board, that is for SSR driving ! |
|
|
|
| Coffee-ops |
Posted on 07/10/2023 9:45 PM
|
|
Newbie Posts: 3 Joined: July 04, 2023 |
Unfortunately, I am going to need to use that additional code to add another variable to enable using a second DC fan. My plan is to use OT1 for heater, OT2 for AC stepper motor for drum rotation, IO3 for DC fan 1, "IO4" for DC fan 2. I am definitely over designing this but I am trying to build a roaster that can roast a batch and cool a batch at the same time and re-using as much of the material from the popcorn popper as possible. Would I be able to get your 'untested' code to have a go at adding the additional variable? |
|
|
|

Page 1 of 2: 12
| Jump to Forum: |
Powered by PHP-Fusion Copyright © 2024 PHP-Fusion Inc
Released as free software without warranties under GNU Affero GPL v3
Designed with ♥ by NetriXHosted by skpacman