
Login

Shoutbox
You must login to post a message.
renatoa
07/26/2024 3:49 PM
Bill grubbe and Jk, 
allenb
07/26/2024 5:15 AM
Spiderkw Welcome to HRO!

renatoa
07/24/2024 8:31 AM
ramiroflores and John123,

 ?
?
?renatoa
07/21/2024 1:18 AM
 , Luislobo
renatoa
07/19/2024 11:28 AM
Koepea,
Forum Threads
Newest Threads
Skywalker roaster modsBackground Roast Iss...
Hello from Arkansas
TC4ESP
Green coffee reviews
Hottest Threads
| Skywalker roaster... | [375] |
| TC4ESP | [115] |
| War on Farmers by... | [47] |
| Adventures in flu... | [26] |
| Hello! (soon) Roa... | [17] |
In Memory Of Ginny

Donations
Latest Donations
dmccallum - 10.00
JackH - 25.00
snwcmpr - 10.00
Anonymous - 2.00
Anonymous - 5.00
dmccallum - 10.00
JackH - 25.00
snwcmpr - 10.00
Anonymous - 2.00
Anonymous - 5.00
Users Online
Guests Online: 5
Members Online: 0
Total Members: 8,394
Newest Member: Bill grubbe
Members Online: 0
Total Members: 8,394
Newest Member: Bill grubbe
View Thread
Who is here? 1 guest(s)
Page 1 of 2: 12
|
 Renatoa can you walk us through a roast based on Heat power control vs PID?
|
|
| exer31337 |
Posted on 07/23/2023 3:16 PM
|
|
Newbie  Posts: 49 Joined: September 12, 2022 |
I get the basics and understand how to replay my roast. I can also see my ET & BT, but I was wondering if you could walk us through what you consider a "good roast" with roast based primarily on ET or heat power. Such as are you trying to constantly increase? If so what is an ideal rate of increase? What do you do after FC Keep power where it was increase or decrease? I was hopeful for a fluid bed specific but I assume the same will apply across except the FB will be quicker to respond. I've seen the other post on here about this, but I feel like the information is generic vs a roast specific approach. I was wondering if you can walk us through an actual roast based on ET/Heat Power and explain the reasoning. Thank you |
|
|
|
| renatoa |
Posted on 07/24/2023 1:39 AM
|
|
Administrator Posts: 3104 Joined: September 30, 2016 |
Almost all was been already said here: https://homeroast...post_62977 The FB specifics are handled starting with post #43, second page, but it worth reading from the start, imo. |
|
|
|
| allenb |
Posted on 07/24/2023 12:59 PM
|
 Administrator Posts: 3869 Joined: February 23, 2010 |
Quote What do you do after FC Keep power where it was increase or decrease? This is an extremely important question and many screw this up. In my fluidbeds, if I want to leave ET constant from start of first crack though end of roast, I must choose an ET that is high enough to allow BT RoR to never drop lower than 6 degrees F per minute and not exceed much more than 10F/min. When any of my roasts drop below 6F/min, I get an odd baked tinge that totally screws up the batch. I've settled on an ET at that stage of the roast that keeps RoR within those numbers and works well. EDIT: I re-read the OPs first post and decided I was blabbing on for no good reason. I hadn't carefully read it before posting so I edited out the un-needed portion. Edited by allenb on 07/25/2023 10:52 AM 1/2 lb and 1 lb drum, Siemens Sirocco fluidbed, presspot, chemex, cajun biggin brewer from the backwoods of Louisiana
|
|
|
|
| ETomczak |
Posted on 07/24/2023 9:31 PM
|
|
Newbie Posts: 39 Joined: February 06, 2023 |
I'm also coming around to believing that paying attention to ET, for a variety of reasons, is extremely important, at least in a fluid bed. However it's challenging to compare my results with others' (in reading online) because I don't know what kind of thermocouple is being used. I've used both a thin shielded TC and a bare one, and they can give drastically different readings when measuring ET in an air stream. I don't see as big of a difference with, for example, the BT probe. Either way, there is a lot of reading to be done. I'm finding the thread on Ikawa roasting profiles over on HB to be quite interesting. |
|
|
|
| allenb |
Posted on 07/25/2023 11:11 AM
|
|
Administrator Posts: 3869 Joined: February 23, 2010 |
Quote from Jim Schulmans thread at Homebarista linked to by renatoa above: Quote I don't know how many times I have to link to this. It's a dissertation on coffee roasting. One part of the dissertation is on roast profiles, and deals with the profiles used by the major instititutional roasters (mostly Nestle's, since they paid the Schenker's fellowship). They have a simple three step profile for ET: 1. they blow the air in at around 350F for two to four minutes, 2. raise it to 475F or so over the next two to four minutes, 3. and leave it there to the end of the roast. After again reading his important posts on this subject, it occurred to me that this is exactly what I've settled on for the best results in my Freshroast 70 gram fluidbed. ET starts at 352 F (177C) and holds for 2 minutes, my Fuji ramp/soak controller then takes it on a 3 minute ramp to 478F (248C) where it holds until end of roast and allows the development stage BT to cruise at close to 7-8 degrees F per minute plus or minus a degree. This allows a 7 to 7 1/2 minute light roast finish. But, while this works in my Freshrosat with it's fully perforated flat bottom RC, these ET temps are not hot enough to give the same results in a standard conical or asymmetrical bottomed fluidbed. The temps would need to be more like 400F (204C) for first phase and ramp up to 500F (260C) for final end of ramp temp. 1/2 lb and 1 lb drum, Siemens Sirocco fluidbed, presspot, chemex, cajun biggin brewer from the backwoods of Louisiana
|
|
|
|
| renatoa |
Posted on 07/25/2023 11:44 AM
|
|
Administrator Posts: 3104 Joined: September 30, 2016 |
Or lower the load  |
|
|
|
| exer31337 |
Posted on 07/28/2023 4:23 AM
|
|
Newbie Posts: 49 Joined: September 12, 2022 |
Quote renatoa wrote: Almost all was been already said here: https://homeroast...post_62977 The FB specifics are handled starting with post #43, second page, but it worth reading from the start, imo. Not the answer I was hoping for but thank you for the honesty. I was using that as a generic guide, but I feel like my roaster goes a little to fast at times. I've checked ET with an infrared thermometer, an oven analog thermometer (which was accurate in the oven), and now 2 different digital thermometers. I keep getting max temps of about 350F but I keep hitting FC in about 7-8 minutes with 350 Deg ET... When I went off that guide I was hitting FC in 5-6 minutes and getting a little under roasted. Don't know if anyone else has had the problem with a pure FB roaster. |
|
|
|
| exer31337 |
Posted on 07/28/2023 4:26 AM
|
|
Newbie Posts: 49 Joined: September 12, 2022 |
Quote allenb wrote: Quote from Jim Schulmans thread at Homebarista linked to by renatoa above: Quote I don't know how many times I have to link to this. It's a dissertation on coffee roasting. One part of the dissertation is on roast profiles, and deals with the profiles used by the major instititutional roasters (mostly Nestle's, since they paid the Schenker's fellowship). They have a simple three step profile for ET: 1. they blow the air in at around 350F for two to four minutes, 2. raise it to 475F or so over the next two to four minutes, 3. and leave it there to the end of the roast. After again reading his important posts on this subject, it occurred to me that this is exactly what I've settled on for the best results in my Freshroast 70 gram fluidbed. ET starts at 352 F (177C) and holds for 2 minutes, my Fuji ramp/soak controller then takes it on a 3 minute ramp to 478F (248C) where it holds until end of roast and allows the development stage BT to cruise at close to 7-8 degrees F per minute plus or minus a degree. This allows a 7 to 7 1/2 minute light roast finish. But, while this works in my Freshrosat with it's fully perforated flat bottom RC, these ET temps are not hot enough to give the same results in a standard conical or asymmetrical bottomed fluidbed. The temps would need to be more like 400F (204C) for first phase and ramp up to 500F (260C) for final end of ramp temp. Do you notice under roasted notes on a 7-71/2 roast? Including dev time that is about what I would hit when I used the guide, FC around 6:30 ish, but I always notice some hint of grass or vegetables, very frustrating. |
|
|
|
| allenb |
Posted on 07/28/2023 6:58 AM
|
|
Administrator Posts: 3869 Joined: February 23, 2010 |
It’s unfortunate that there are some greens, in my experience maybe 1 in 10, that due to whatever processing issue’s occurred, will not be happy with anything under a 10 min roast. For example, one of the better rated Kenyas I purchased last week had a green, underdeveloped taint with a 7:45 finish. Some of these with processing problems won't be any better with a longer roast. If that is happening to most of your roasts then there may be other issues. Can you post the BT curve for a typical 7 min roast? Edited by allenb on 07/28/2023 7:11 AM 1/2 lb and 1 lb drum, Siemens Sirocco fluidbed, presspot, chemex, cajun biggin brewer from the backwoods of Louisiana
|
|
|
|
| renatoa |
Posted on 07/28/2023 8:47 AM
|
|
Administrator Posts: 3104 Joined: September 30, 2016 |
Quote exer31337 wrote: Quote renatoa wrote: Almost all was been already said here: https://homeroast...post_62977 The FB specifics are handled starting with post #43, second page, but it worth reading from the start, imo. Not the answer I was hoping for but thank you for the honesty. I was using that as a generic guide, but I feel like my roaster goes a little to fast at times. I've checked ET with an infrared thermometer, an oven analog thermometer (which was accurate in the oven), and now 2 different digital thermometers. I keep getting max temps of about 350F but I keep hitting FC in about 7-8 minutes with 350 Deg ET... When I went off that guide I was hitting FC in 5-6 minutes and getting a little under roasted. Don't know if anyone else has had the problem with a pure FB roaster. Which way I was dishonest in my reply ? :puzzled: If you mean that your initial question, as well the term used in the title, are related to power control profile, not ET, then apologies if I wasn't clear enough, will state here again, maybe a bit reworded: in the hot air based machines of small capacity and low inertia, as are FB, the ET is proportional with power % to such degree that they can be used interchangeable. Based on this rule I developed the "proportional on setpoint" approach of power control, about you can read more in post #45 of the thread linked above. The three steps rule of Schulman is nothing else than an over simplification of the same reasoning. Instead using 20-30 steps of 1% every 10-20 seconds, he steps only two times with bigger steps, and it works very well, due to the thermal inertia of the bigger machines he is using. Not the last, quoting again a key phrase from his lectures: Quote ...This ET part is basic roasting chemistry, and the same for all roasters and coffees. But the heat inputs required moment by moment to achieve this ET curve is based on the roaster's thermal characteristics, and is different for every roaster design. ...i.e. what works for me is not mandatory to work for you equally better
Edited by renatoa on 07/28/2023 2:37 PM |
|
|
|
| allenb |
Posted on 07/28/2023 9:18 AM
|
|
Administrator Posts: 3869 Joined: February 23, 2010 |
renatoa, there must have been a mistranslation in how you're reading exer31337's post. He is not insinuating any dishonesty. He was thanking you for your honesty but was looking for something more specific which may have not come through well enough in the translation to your native language. He was looking for one or more examples with numbers of a typical roast you do using the method described. He stated he understands the concepts in your's and Jims posts but would like to see some curves. At least , this is my take on it. exer31337, please chime in if I'm not interpreting well enough.
1/2 lb and 1 lb drum, Siemens Sirocco fluidbed, presspot, chemex, cajun biggin brewer from the backwoods of Louisiana
|
|
|
|
| Piotrkurak |
Posted on 07/28/2023 9:57 AM
|
 1/4 Pounder  Posts: 82 Joined: March 01, 2023 |
Somebody with roast recording hardware post a typical roast profile. Can dissect it from there along with comments as to WHY. shouldn't care what the thermocouples indicate as long as they are within a degree or two of each other which good quality TCs should be. Does it really matter if you stop at (in my case) 348, 349 or 350 as long as you get batch to batch consistency and the roast level you want? |
|
|
|
| exer31337 |
Posted on 07/28/2023 8:53 PM
|
|
Newbie Posts: 49 Joined: September 12, 2022 |
Quote renatoa wrote: Quote exer31337 wrote: Quote renatoa wrote: Almost all was been already said here: https://homeroast...post_62977 The FB specifics are handled starting with post #43, second page, but it worth reading from the start, imo. Not the answer I was hoping for but thank you for the honesty. I was using that as a generic guide, but I feel like my roaster goes a little to fast at times. I've checked ET with an infrared thermometer, an oven analog thermometer (which was accurate in the oven), and now 2 different digital thermometers. I keep getting max temps of about 350F but I keep hitting FC in about 7-8 minutes with 350 Deg ET... When I went off that guide I was hitting FC in 5-6 minutes and getting a little under roasted. Don't know if anyone else has had the problem with a pure FB roaster. Which way I was dishonest in my reply ? :puzzled: If you mean that your initial question, as well the term used in the title, are related to power control profile, not ET, then apologies if I wasn't clear enough, will state here again, maybe a bit reworded: in the hot air based machines of small capacity and low inertia, as are FB, the ET is proportional with power % to such degree that they can be used interchangeable. Based on this rule I developed the "proportional on setpoint" approach of power control, about you can read more in post #45 of the thread linked above. The three steps rule of Schulman is nothing else than an over simplification of the same reasoning. Instead using 20-30 steps of 1% every 10-20 seconds, he steps only two times with bigger steps, and it works very well, due to the thermal inertia of the bigger machines he is using. Not the last, quoting again a key phrase from his lectures: Quote ...This ET part is basic roasting chemistry, and the same for all roasters and coffees. But the heat inputs required moment by moment to achieve this ET curve is based on the roaster's thermal characteristics, and is different for every roaster design. ...i.e. what works for me is not mandatory to work for you equally better The phrase is lost in translation, but yes as Allenb stated I do not think you were being dishonest, I was just hopeful for a more specific real world example of a roast. |
|
|
|
| exer31337 |
Posted on 07/28/2023 8:58 PM
|
|
Newbie Posts: 49 Joined: September 12, 2022 |
Quote allenb wrote: It’s unfortunate that there are some greens, in my experience maybe 1 in 10, that due to whatever processing issue’s occurred, will not be happy with anything under a 10 min roast. For example, one of the better rated Kenyas I purchased last week had a green, underdeveloped taint with a 7:45 finish. Some of these with processing problems won't be any better with a longer roast. If that is happening to most of your roasts then there may be other issues. Can you post the BT curve for a typical 7 min roast? I wish but my thermocouple hooked into my Arduino have ben giving me fits. I just ordered new couplers and if I get it working I will pos the curves. Currently I have a dual temp display thermometer from harbor freight and using the et vs by ratio as a kind of relative guide to keep the bt ror constantly rising through the roast. I will be ordering a lot of one bean and roasting it until I get it right.... Kind of off topic where would you all buy beans if you're going 300 lbs or more? I have found either very expensive or unremarkable beans. |
|
|
|
| renatoa |
Posted on 07/29/2023 3:31 AM
|
|
Administrator Posts: 3104 Joined: September 30, 2016 |
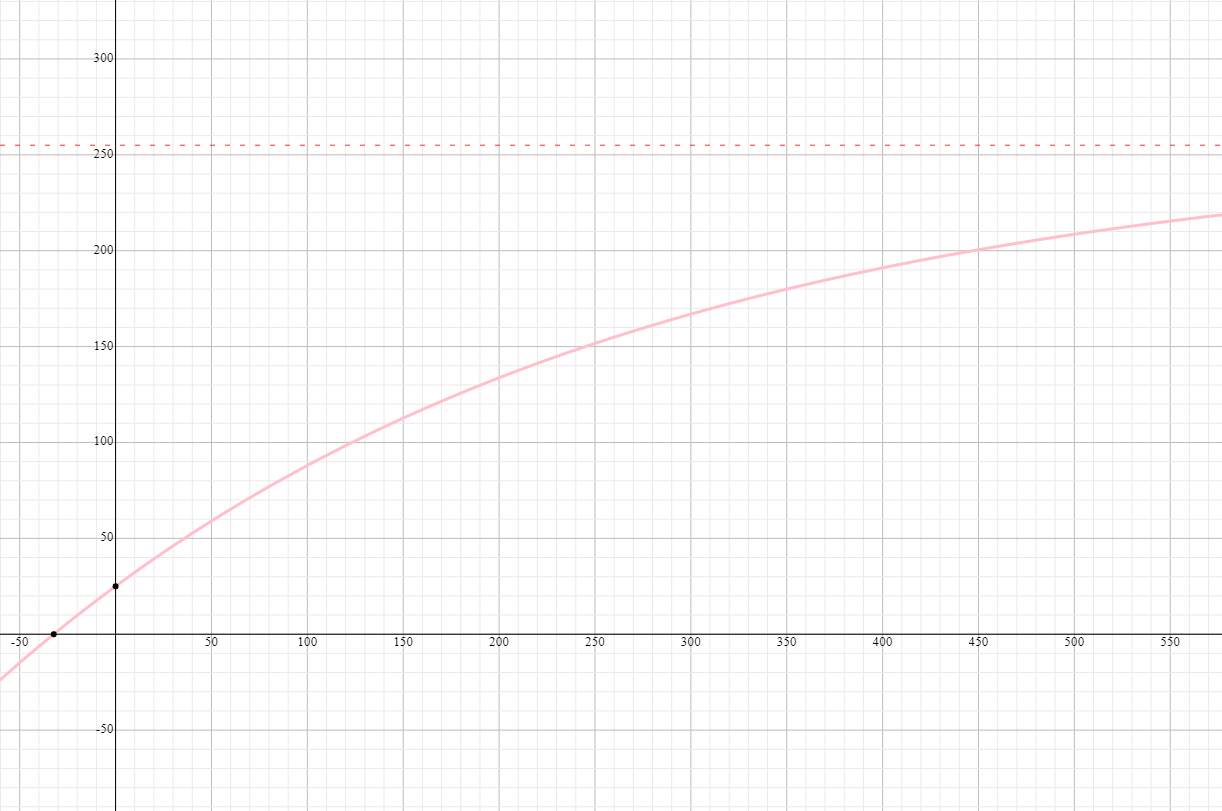
Where the profiles comes? Much simpler then most people thinks... from physics/thermodynamics. If you drop a body in a hot environment, that body absorbs heat and increase its own temperature according to this law: Code Download source BT = AT + ET * (1-exp(-k * t)) where: AT is ambient, k is the machine constant, and t is time If you plot this equation, for example for ET = 230C and k = 0.0032, as I found for my TO based machine, you get the following, attached image. This shape is probably a perfect profile for many of us, with 150C for Dry End reached at 240 seconds = 4 minutes, and 200C for FC reach at 450 seconds = 7:30 What we are doing in real life by changing ET means actually change the dry and brown intervals according to same law, and according to machine and bean origin specifics. That's why Schulman recipe for the basic roast is so simple, all you have to do is to keep beans in a hot (stable) environment, and keep them moving. A power level for dry, and the second/next for brown/development. Posting exact values of ET or power... would not help so much, my machine is different than yours.
renatoa attached the following image:
|
|
|
|
| exer31337 |
Posted on 07/29/2023 8:45 PM
|
|
Newbie Posts: 49 Joined: September 12, 2022 |
Quote renatoa wrote: Where the profiles comes? Much simpler then most people thinks... from physics/thermodynamics. If you drop a body in a hot environment, that body absorbs heat and increase its own temperature according to this law: Code Download source BT = AT + ET * (1-exp(-k * t)) where: AT is ambient, k is the machine constant, and t is time If you plot this equation, for example for ET = 230C and k = 0.0032, as I found for my TO based machine, you get the following, attached image. This shape is probably a perfect profile for many of us, with 150C for Dry End reached at 240 seconds = 4 minutes, and 200C for FC reach at 450 seconds = 7:30 What we are doing in real life by changing ET means actually change the dry and brown intervals according to same law, and according to machine and bean origin specifics. That's why Schulman recipe for the basic roast is so simple, all you have to do is to keep beans in a hot (stable) environment, and keep them moving. A power level for dry, and the second/next for brown/development. Posting exact values of ET or power... would not help so much, my machine is different than yours. So to use that formula as a method of plotting my roast curve would require tests to solve for k which would be a machine specific variable? |
|
|
|
| renatoa |
Posted on 07/30/2023 2:09 AM
|
|
Administrator Posts: 3104 Joined: September 30, 2016 |
Not so many tests, nor extra scientific. My routine to evaluate an unknown machine dynamics would be to find the power % to reach 175/200/225/245 C degrees, for empty machine. This works especially well for hot air roasting with mechanical agitation. Not so well for high convection machines as FBs, even less well for high inertia machines, like drum roasters. Then load at 50% stated capacity, starting with power level for 175C, at minute 1 raise power corresponding to 200C, at minute 2 for 225, ending with a last raise for 245C. Observe how fast ET follows the power % changes, if the machine is not able of 20C / minute raise (for ET), then it's overloaded. Also, watching and note the dry end time, then FC time. If the times are longer than the expected/planned timing, would adjust the power levels accordingly, but not more than 260C for last phase. Based on this power adjustment you can also judge how accurate is the machine capacity. For example my 8 litres TO machine, when empty, stabilize at 240C using 56% power, when loaded with 330 grams requires 4% more. Having all these gathered numbers handy, you can play with some values to find k by trial and error. You can use this tool to plot graphs: https://www.symbo...calculator In real world roast, though, you have to compensate for the exothermal phase preceding FC, that is not covered by the heat absorption formula. This means that a power reduction of about 5% should be done in the last 1-2 minutes before FC. Just observe when ET start to raising unexpected faster than before, and adjust power to keep it flat. Edited by renatoa on 07/30/2023 2:17 AM |
|
|
|
| ETomczak |
Posted on 07/31/2023 9:51 AM
|
|
Newbie Posts: 39 Joined: February 06, 2023 |
Quote exer31337 wrote: ... I've checked ET with an infrared thermometer, an oven analog thermometer (which was accurate in the oven), and now 2 different digital thermometers. I keep getting max temps of about 350F but I keep hitting FC in about 7-8 minutes with 350 Deg ET... When I went off that guide I was hitting FC in 5-6 minutes and getting a little under roasted. Don't know if anyone else has had the problem with a pure FB roaster. You might be running into the same problem I was referring to in my above post. Depending on your TC, your readings can be massively different when measuring air, at least in my roaster. I think part of the problem is that (again, in my roaster) the TC is relatively short, just sticking into a 2" tube, so it sinks a lot of heat back to the wall of the tube, which is colder than the air. None of that matters if you're using your measurements simply as a reference point for yourself, but if you want to use a guide, like the links posted above, then you need to be more confident in your readings. If you're hitting FC with the inlet temp reading 350f, then something is wrong. It might also be helpful to know what kind of FB you're using, since as others have mentioned here, that can have a big difference on how it needs to be run. |
|
|
|
| Piotrkurak |
Posted on 07/31/2023 10:20 AM
|
|
1/4 Pounder Posts: 82 Joined: March 01, 2023 |
Probably an even dozen reasons you are getting different TC readings: what type probe, length, where the sense point is in the flow, grounding, sheathing materials, ad nauseum. Also recognize that TC's record data that is up to 6 seconds in the past and never closer than 2 seconds ago for even a bare one. They're probably not calibrated to a known standard in the range of use and you probably didn't purchase lab grade hardware. Doesn't matter. If FC starts at 398f indicated then proceed appropriately to end roast which is imho the best indication |
|
|
|
| renatoa |
Posted on 07/31/2023 10:39 AM
|
|
Administrator Posts: 3104 Joined: September 30, 2016 |
Quote If FC starts at 398f ... Exactly... even 5 degrees off could be a matter of calibration, not reading error. For air the best is to place a naked junction inside a pipe with holes like a flute, this is the industrial standard for gas measurements. Some examples: https://www.tegam...-t-airgas/ https://de.farnel...dp/7081625 For DIY, even a spring could replace the pipe, as this: https://www.amazo...B007JN08KI Somewhere between my lines above I suggested this is one of the main reasons I am thinking in terms of power% instead temperatures... I trust them more  Or Watts, measured directly at mains plug, a domestic wattmeter is cheap today... |
|
|
|
| ETomczak |
Posted on 07/31/2023 11:22 AM
|
|
Newbie Posts: 39 Joined: February 06, 2023 |
Quote renatoa wrote: Exactly... even 5 degrees off could be a matter of calibration, not reading error. For air the best is to place a naked junction inside a pipe with holes like a flute, this is the industrial standard for gas measurements. Some examples: https://www.tegam...-t-airgas/ https://de.farnel...dp/7081625 For DIY, even a spring could replace the pipe, as this: https://www.amazo...B007JN08KI Somewhere between my lines above I suggested this is one of the main reasons I am thinking in terms of power% instead temperatures... I trust them more Or Watts, measured directly at mains plug, a domestic wattmeter is cheap today... Interesting. I wonder if those cross drilled sleeves do anything to reduce noise, or if they're just to protect the tip from getting bent/damaged. I like my bare TC, but it does have a lot of noise in the reading. I may try the spring, that's easily added to and removed from an existing probe. I agree as well about using the actual power applied to the roast, and that's the direction I'm going for control. However I understand the OP's questions, it's sounds like they are reading posts here and elsewhere online and wanting to see if what they're doing compares, and for that you need at least a reasonably accurate reading. |
|
|
|
| renatoa |
Posted on 07/31/2023 12:22 PM
|
|
Administrator Posts: 3104 Joined: September 30, 2016 |
Protection, and also allows the free flow of air/gas around the sensor, but reducing turbulence, i.e. measurement noise. |
|
|
|
| Piotrkurak |
Posted on 07/31/2023 1:16 PM
|
|
1/4 Pounder Posts: 82 Joined: March 01, 2023 |
Quote renatoa wrote: Somewhere between my lines above I suggested this is one of the main reasons I am thinking in terms of power% instead temperatures... I trust them more Or Watts, measured directly at mains plug, a domestic wattmeter is cheap today... Power is just so much easier to calculate, measure, manipulate as opposed to energy absorption of random beans flowing past a sensor |
|
|
|
| renatoa |
Posted on 08/01/2023 2:36 AM
|
|
Administrator Posts: 3104 Joined: September 30, 2016 |
Indeed... and assuming the losses through walls are constant, that power goes into beans, where else ? But... this approach creates a strong dependency to the ambient temperature ! Mandatory power changes of about 1-2% per 3-4C degree of ambient, i.e. per season. What we roast using 48% in the summer requires 50% in the spring and fall, and 52% in the winter, just an example. |
|
|
|
| Piotrkurak |
Posted on 08/01/2023 10:00 AM
|
|
1/4 Pounder Posts: 82 Joined: March 01, 2023 |
You live somewhere warm or don't have to roast outside in the winter. Winter for me requires at least 25% more energy/time to take the below 0C temps to something useable, even if a bit low like 245C. However you probably have a much larger heat source or roast smaller batches |
|
|
|

Page 1 of 2: 12
| Jump to Forum: |
Powered by PHP-Fusion Copyright © 2024 PHP-Fusion Inc
Released as free software without warranties under GNU Affero GPL v3
Designed with ♥ by NetriXHosted by skpacman