
Login

Shoutbox
You must login to post a message.
renatoa
07/26/2024 3:49 PM
Bill grubbe and Jk, 
allenb
07/26/2024 5:15 AM
Spiderkw Welcome to HRO!

renatoa
07/24/2024 8:31 AM
ramiroflores and John123,

 ?
?
?renatoa
07/21/2024 1:18 AM
 , Luislobo
renatoa
07/19/2024 11:28 AM
Koepea,
Forum Threads
Newest Threads
Skywalker roaster modsBackground Roast Iss...
Hello from Arkansas
TC4ESP
Green coffee reviews
Hottest Threads
| Skywalker roaster... | [375] |
| TC4ESP | [115] |
| War on Farmers by... | [47] |
| Adventures in flu... | [26] |
| Hello! (soon) Roa... | [17] |
In Memory Of Ginny

Donations
Latest Donations
dmccallum - 10.00
JackH - 25.00
snwcmpr - 10.00
Anonymous - 2.00
Anonymous - 5.00
dmccallum - 10.00
JackH - 25.00
snwcmpr - 10.00
Anonymous - 2.00
Anonymous - 5.00
Users Online
Guests Online: 7
Members Online: 0
Total Members: 8,394
Newest Member: Bill grubbe
Members Online: 0
Total Members: 8,394
Newest Member: Bill grubbe
View Thread
Who is here? 1 guest(s)
 IsaacC’s 4kg (8.9lb) Classic Drum Roaster
|
|
| IsaacC |
Posted on 10/09/2023 11:03 AM
|
|
Newbie  Posts: 9 Joined: April 16, 2023 |
This thread is meant to keep a record of my process and is a place where people will be most benefited by it. I also need a lot of help. ☺️ Background: I started roasting coffee in 2013 with a whirley pop and never upgraded. Great learning experience though. That’s when I discovered my love for tasty coffee, similar to wine tasting in its complexity. Fruity coffee notes are my favorite! I’m a mechanical engineer by education, and always try to figure out how to DIY things. I love frugality as well. I started a non-profit coffee shop called Ardent Coffee in Portland, OR, USA, all profit to help end human trafficking through IJM, and the desire to cultivate a space of belonging surrounding this cause. The shop closed in 2022, but my dream lives on in the form of a coffee roasting business with the same mission and vision. This roaster is my next step in furthering that vision! Here’s a google sheet with design info. Feel free to download a copy and mess around with the numbers. It’s probably more confusing than it needs to be. 😂 https://docs.goog...pe=msexcel Here are a few pictures of my design so far
IsaacC attached the following images:


Edited by renatoa on 10/09/2023 11:40 AM |
|
|
|
| allenb |
Posted on 10/09/2023 1:24 PM
|
 Administrator Posts: 3869 Joined: February 23, 2010 |
Let us know what stage you are at? Are you already fabricating parts or still in the design mode? If you haven't finalized the design and aren't cutting metal, I would suggest that you discuss the major design components with us so we can make sure all of the major parts are going to be optimum and work together as a whole. I see some issues with the burner BTU's for the size of this roaster, forward vanes size, BT probe layout and internal shroud surrounding the drum.
1/2 lb and 1 lb drum, Siemens Sirocco fluidbed, presspot, chemex, cajun biggin brewer from the backwoods of Louisiana
|
|
|
|
| IsaacC |
Posted on 10/09/2023 7:49 PM
|
|
Newbie Posts: 9 Joined: April 16, 2023 |
Thanks Allenb, I'd be honored to hear your thoughts. I have currently purchased many materials and components, but nothing is set in stone. I have purchased the 12" drum, 3/16" wall thickness, and I'm working on drilling holes to bolt vanes to the 12" drum. Vanes: Forward vanes are rough cut at 1"x3", let me know your thoughts, I think I saw another thread which spoke about forward vanes being at least 1" and reverse being at least 1.5 times the width?? BTUs: I am using the rule of thumb formula BTU required = lbs green * 5000 =8.9lb*5000 =44,500 BTU My hope is to design a 60,000 BTU pipe burner so there's some headroom. Let me know your thoughts and any insights you may have. Burner specs: 0-10psi adjustable regulator, (82) 1/8" holes (pattern pictured), 1-1/2" steel pipe, Dwyer 4-50 scfh flow meter, piezo pilot. BT Placement: I'm not sure exactly where to put this, but I did see the video showing the beans tumbling in a 6lb drum with a plexiglass front. seems like the lower left quadrant, ensuring the probe is at least 3/4" away from any turning vanes. Let me know your thoughts. Drum Shell: I have the 18" drum on legs right now, but haven't been able to find a 16" internal drum. I'd like to put 1" ceramic blanket between the two walls. (so this is different from the drawing, which shows a smaller internal wall). |
|
|
|
| allenb |
Posted on 10/10/2023 8:54 AM
|
|
Administrator Posts: 3869 Joined: February 23, 2010 |
Hi Isaac, looks like this should be a fun project. Here's a few thoughts on your design. On the forward vanes, for a 12" drum, I'd go with at least a 1.25" vane height and 1.5" for the reverse. Let me know what you mean by 1 x 3? 3" long? Maybe you're doing them in two segments totaling 6" in length? On the burner btus, while it's nice to have some additional headroom on heating capacity, going to 60kbtus could cause issues with being able to maintain a clean, stable low fire rate. In my experience, 44kbtus for your intended batch size is plenty with room to spare and should have good turndown capability. On BT probe. I would not place it higher than 1.25" above the drum wall to ensure it resides in sufficient bean mass and I would use the clear acrylic front test panel to find highest bean mass density within the upsweep part of the drum rotation. Middle of lower left quadrant sounds right for clockwise rotation. The probe should enter the front plate for a very short distance and then make a 90 degree bend to the left for couple of inches. This allows your forward vanes to be as close as possible to the front plate, hopefully no farther than 1.25" away from it. Reverse vanes need to also come as close as possible to the front in order to sufficiently grab the bean pile that hangs out at the front. This means the trier needs to be located closer to the center, out of the path of travel of the reverse vanes. The acrylic test front allows finding the sweet spot for that as well. Looking at one of your drawings of the sheet metal shrouds surrounding the drum I noticed the inner one was full circle excluding where the burner heat would have access to the drum. You want to keep the area below the drum open for easy access for cleaning chaff/debris. For a good design to emulate, see the probat L12 design. This causes the shroud to be more of an upside down U instead of a full circle. Also, give the full length of the burner tube full access to air so that all makeup air will pass up through the full length of the flame, preheating the air prior to hitting the drum and on back to the perforated back plate. If you are looking to do a perforated drum, all of this is moot and will require a completely different burner layout keeping the flame out of the path of falling chaff and particles. 1/2 lb and 1 lb drum, Siemens Sirocco fluidbed, presspot, chemex, cajun biggin brewer from the backwoods of Louisiana
|
|
|
|
| IsaacC |
Posted on 10/10/2023 11:34 AM
|
|
Newbie Posts: 9 Joined: April 16, 2023 |
Allen, thanks for those great insights, yes it has been a fun project so far, though paralyzing at times. Vanes The current plan has (3) vanes that are 1"x3.25" at a 25 degree angle for a total of about 9in^2 of forward vane area. Sounds like ideally we need to increase the forward vane area, and the best way to do that is by increasing to 1.25" vane height? Also to have (1) reverse vane which is 1.5"x5.25" at a 40 degree angle for a total area of 7.5 in^2. BTUs That is such great insight on the burner. Just what I needed to hear. I wasn't sure if the 5000BTU/lb green included headroom, and sounds like it does. Do you have experience with the regulator pressure setting vs orifice size? The chart below says a size 5/64" or #47 (ish) at 11" WC is appropriate for 44K: https://www.contr...sChart.jpg But if I increase regulator pressure, the orifice size would need to decrease. I'm not sure if its a linear relationship or not. I was thinking to start with a 1/16" orifice (27K BTU at 11"WC) and see if I need to increase from there. With that info, I'm also thinking my 1-1/2" steel pipe may be too large and cause issues with gas flow through the 1/8" burner holes. I'm using this helpful chart to design the burner, which says that the cross sectional area of the burner holes needs to be at least 80% the area of the ID of the pipe: http://www.allied...burner.pdf Bean Temp Interesting suggestion to bend the thermocouple. The K-type thermocouple I have is 1" long and has a 1/4" sheath (I thought would be better to withstand the beating). I could order longer ones and bend the sheathing to create that "L" shape slightly closer to the face plate. Or I could step the current probe out slightly with a spacer so its less than 3/4" protruding. I just don't know how well it would sense the bean mass in either case. Would you say the 2" length turning in the direction of rotation really aids a lot in sensing temperature accurately? Either way, it sounds like the BT sensor needs to be within the radial section along with the forward vanes. How close to the face plate would you recommend the forward vanes be placed so as to avoid conflict with the BT, but still push beans out of the door effectively? Shroud Yes, I was trying to avoid fabricating a completely enclosed "U" shape shroud, but I definitely see the wisdom in allowing room to clean out any chaff and debris. Do you think it would be adequate to alter my design to have a larger opening for the burner, and also not have the shroud extend under the drum past the center, and thereby avoid catching debris? The burner will be outside the opening, but adjustable so the flame can tuck up into the shroud, while allowing for airflow around the flame. Drum The plan is to have a solid drum, 3/16" wall thickness, with a perforated endplate. Wow, thanks so much for coming alongside me in this process. This is fun! Edited by renatoa on 10/10/2023 11:41 AM |
|
|
|
| allenb |
Posted on 10/10/2023 1:25 PM
|
|
Administrator Posts: 3869 Joined: February 23, 2010 |
I'm not following your design for vanes layout. Standard protocol for most typical drums is 4 forward and 4 reverse traveling from rear plate up to the end point you choose (at chosen angle) for safe gap to not have beans cause a thump when front of vanes pass your BT probe. 3/4" gap between probe and front of vane should be sufficient. On regulator pressure question, please describe what your control format will be. You can use a standard fixed 11" WC regulator and adjust burner output via suitable needle valve, or, if you will need to use an existing smaller ported needle valve that requires higher incoming pressures then you can use an adjustable high pressure reg and just dial it in until you arrive at a pressure that allows the needle valve to not need lots of turns in order to hit highest firing rate. I don't think you will run into any problems using the 1.5" pipe diameter. A 1" long 1/4" sheathed probe can work in situations where there is not much of a temperature variance between the product being sensed and the temperature of the plate it's attached to which is not the case in a typical drum roaster. You will find that the front plate will conduct too much heat away from the sheath causing a large sensing error. To avoid this, don't go less than a 3" sheath length in a 1/8" sheath. The 1/8" diameter allows for less thermal conduction to the outside and faster response. Also allows bending. Bend the 90 degree turn so that none of the probe extends more than 3/4" measuring from the back side of the front plate to the furthest point of the probe. I would keep 3/4" gap between the probe sheath and vanes. On the inner shroud question, post a sketch as it's difficult to visualize the design. Best in my opinion is a simple upside down U with burner off to one side with heat rising upward hitting the left side of the drum and flowing up past the drum as it travels to the drums rear end. Probat provides a curved baffle a few inches above the row of burner nozzles to spread it out and not allow flame to impinge onto the drum surface. https://homeroast...ad_id=4323 1/2 lb and 1 lb drum, Siemens Sirocco fluidbed, presspot, chemex, cajun biggin brewer from the backwoods of Louisiana
|
|
|
|
| IsaacC |
Posted on 10/10/2023 6:03 PM
|
|
Newbie Posts: 9 Joined: April 16, 2023 |
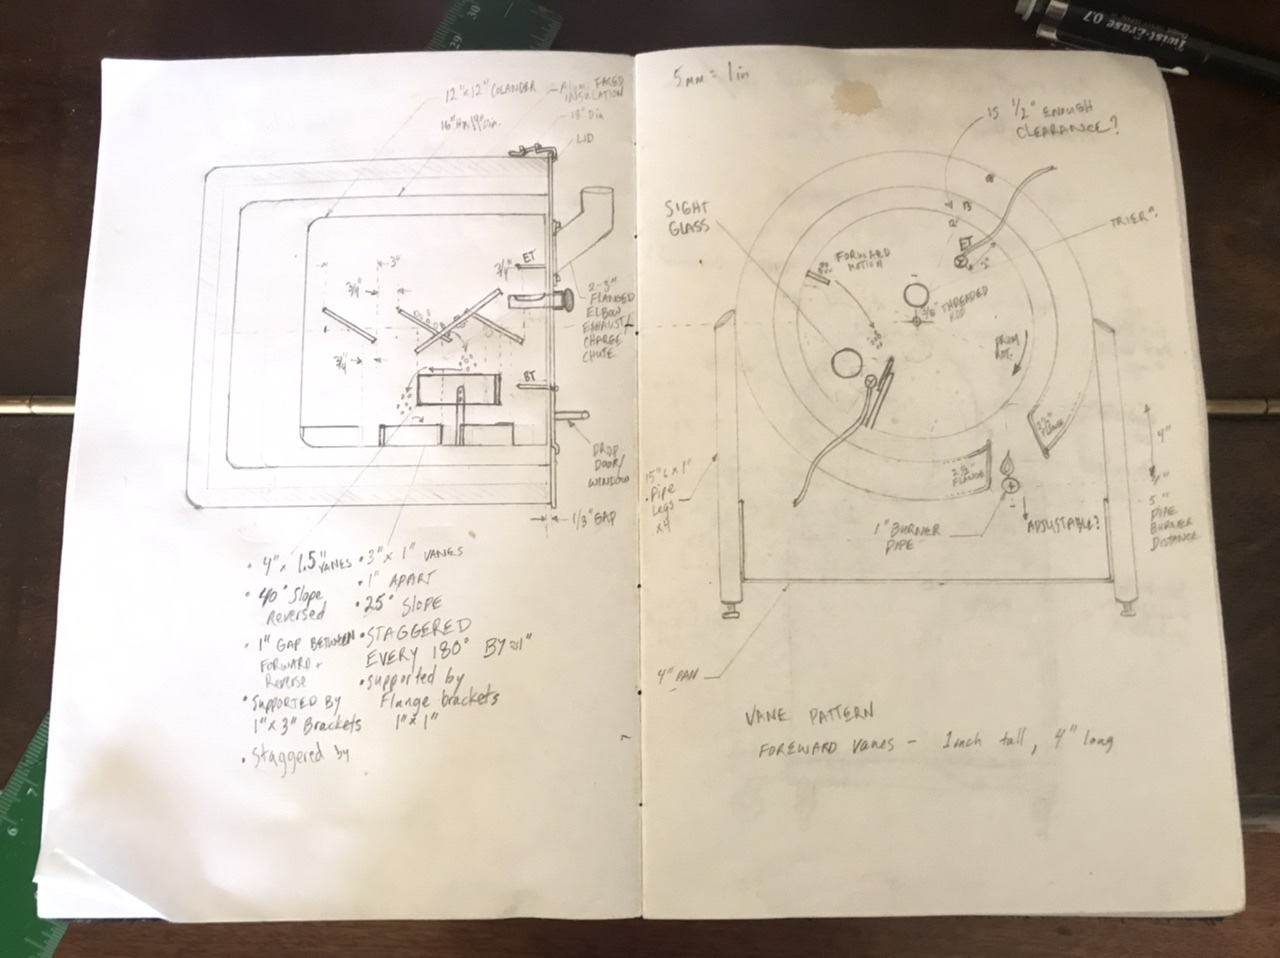
Vanes Attached is a sketch of the vane pattern on the side of the drum. The pattern will be replicated every 90 degrees. Sounds like the forward most vane needs to be recessed until it's 1.5" from the front plate (for BT and bean clearance), and the reverse vane should be shifted forward to about 3/4" from the front plate (bean clearance) Burner My current setup for gas control is a Dwyer 4-50 scfh needle valve flow meter. Calculations for why I chose this size are in the google sheet, but I don't need that range anymore if I'm good with just 44K. So that's nice. So as it is I'm using both an adjustable regulator, and a fine needle valve with about 6 turns from closed to fully open. Glad to hear the 1.5" steel pipe should be good. I'll give it a go, since I've already drilled all the holes. BT That all makes good sense, thank you. I found some 1/8" sheath 4" long probes that I can use. Sounds like the smallest distance between forward vanes and front plate needs to be about 1.5" to account for the probe and bean clearance. Attached is an image of the front plate with a sketch of the placement for items required, including the BT at 1" from the drum wall. an acrylic test may be the way to go to confirm the placement. Shroud Attached is a picture of the outer shroud as it is, with the layout of the cut out I suggested in my previous post. The cutout would allow for plenty of air flow, while giving room for chaff and debris to fall through to the pan below. I could used some of the metal from the cut out as a baffle to prevent direct flame to drum heat transfer. Does that makes sense now? I feel like an upside down "U" would mean a lot of rework and redesign. But if you think it is well worth it, I will definitely consider it.
IsaacC attached the following images:


Edited by IsaacC on 10/10/2023 6:12 PM |
|
|
|
| allenb |
Posted on 10/10/2023 9:08 PM
|
|
Administrator Posts: 3869 Joined: February 23, 2010 |
Vanes Makes more sense on your plans for the vanes now. I would utilize a longer reverse vane than what I'm seeing sketched on the side of the drum. Burner Looks good to me. Should give you good control. BT probe I agree, acrylic panel can save a lot of problems early on. Shroud What you show could work fine except for one potential issue. Chaff drops through the gap between drum face and front panel and will build up on the front ledge of your shroud fairly quickly. The chaff needs to be able to fall freely down onto an accessible location where it won't require daily removal. Edit, add: Your idea from an earlier post to start out with a smaller orifice than calculations called for and work up from there for your burner is a great idea. I'm sure you've experienced the problem as I have that no matter how good the calcs, there are always unknown variables that make it difficult to perfectly nail things the first time. Edited by allenb on 10/11/2023 1:12 PM 1/2 lb and 1 lb drum, Siemens Sirocco fluidbed, presspot, chemex, cajun biggin brewer from the backwoods of Louisiana
|
|
|
|
| IsaacC |
Posted on 10/11/2023 10:24 PM
|
|
Newbie Posts: 9 Joined: April 16, 2023 |
Vanes Sounds good, yes I’m seeing now that the reverse vanes have quite a bit less surface area than the forward vanes, which is probably ok, since we need a mass for the BT to probe, but it will be good to have a bit more reverse vane surface area. Shroud I’ll have to think through what to do. I may be able to cut away enough that there is no ledge at the front, but still leaves some support for the face plate. If I cut the shroud away too much underneath, I’m afraid the shroud will lose too much heat and make the roast temp hard to control. Burner I will put the burner together in the next few days and do some tests and take pictures. Then I’ll report back my findings. Thanks so much!! |
|
|
|

| Jump to Forum: |
Powered by PHP-Fusion Copyright © 2024 PHP-Fusion Inc
Released as free software without warranties under GNU Affero GPL v3
Designed with ♥ by NetriXHosted by skpacman